21 Genius Craft Room Organization Ideas for Maximum Efficiency
Are you tired of a cluttered craft room that makes creativity feel impossible? You’re not alone, and I understand the struggle! But don’t worry—this guide will share 21 easy organization ideas to transform your space into a creative haven. Say goodbye to mess and hello to inspiration with practical tips that matter now!
Shop Our Must-Haves


1 Stylish Wire Memo Boards
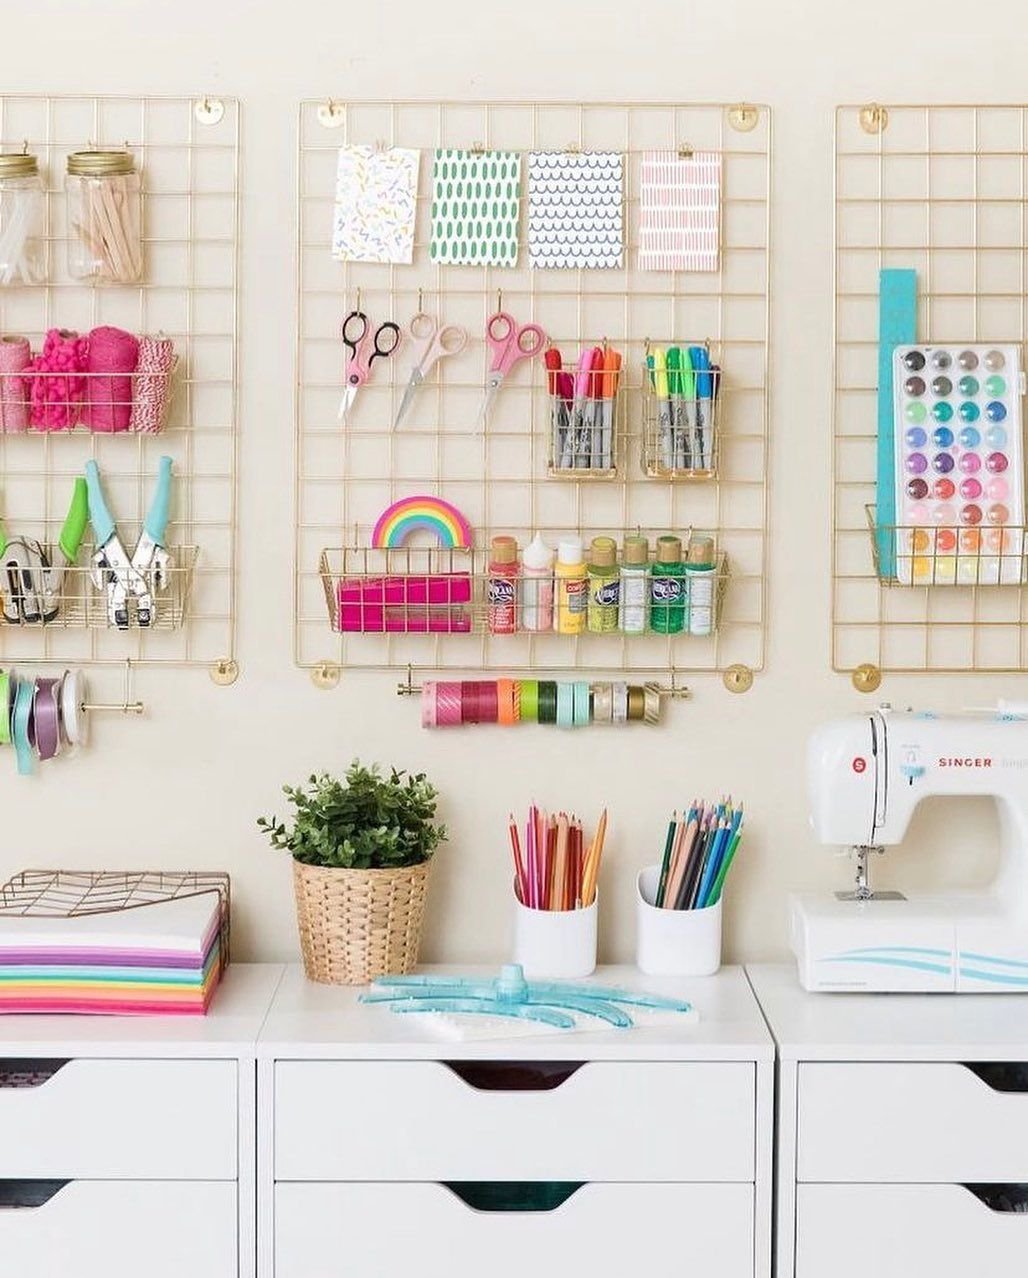
Wire memo boards are a fantastic way to keep your craft room organized and stylish! These boards can easily be mounted on the wall, saving valuable desk space. Plus, they add a modern touch to your room’s decor.
I love using these boards because they not only look great but are also functional. You can hang clips for important notes, artwork, or reminders. Some even come with baskets to hold supplies like pens, markers, and scissors.
For a fun twist, consider painting the wire grid in a color that matches your room. This simple project can transform your organization tool into a stunning decor piece!
2 Organize Papers with Style
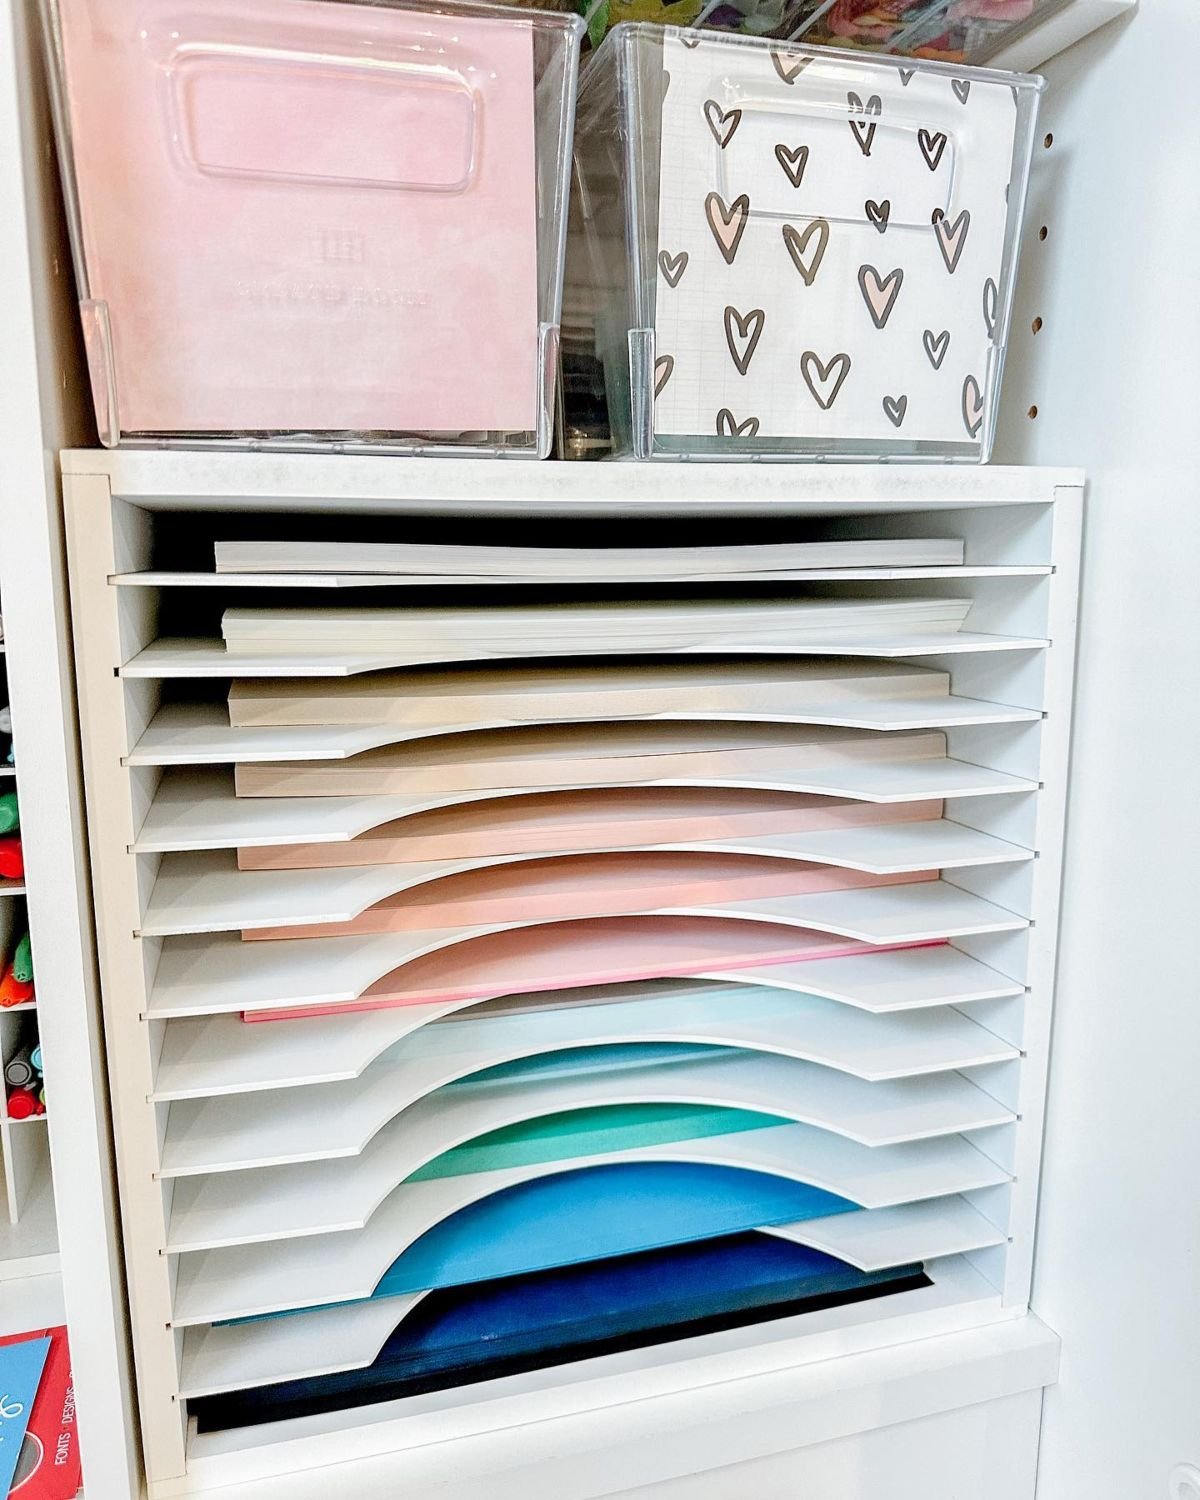
Organizing papers can really change how you work in your craft room. One great tool is a paper sorter. This handy item keeps your paper neatly arranged and easily accessible. Instead of digging through piles of paper, you can quickly grab what you need.
You can also use color-coded folders to categorize your documents. For example, blue for project ideas, green for supplies, and yellow for important receipts. This method makes it super easy to find what you need when you’re in a hurry.
Labeling your files is a must! Use a label maker or handwritten tags to let you know which papers belong where. It’s a small step that saves a lot of time and frustration. Happy organizing!
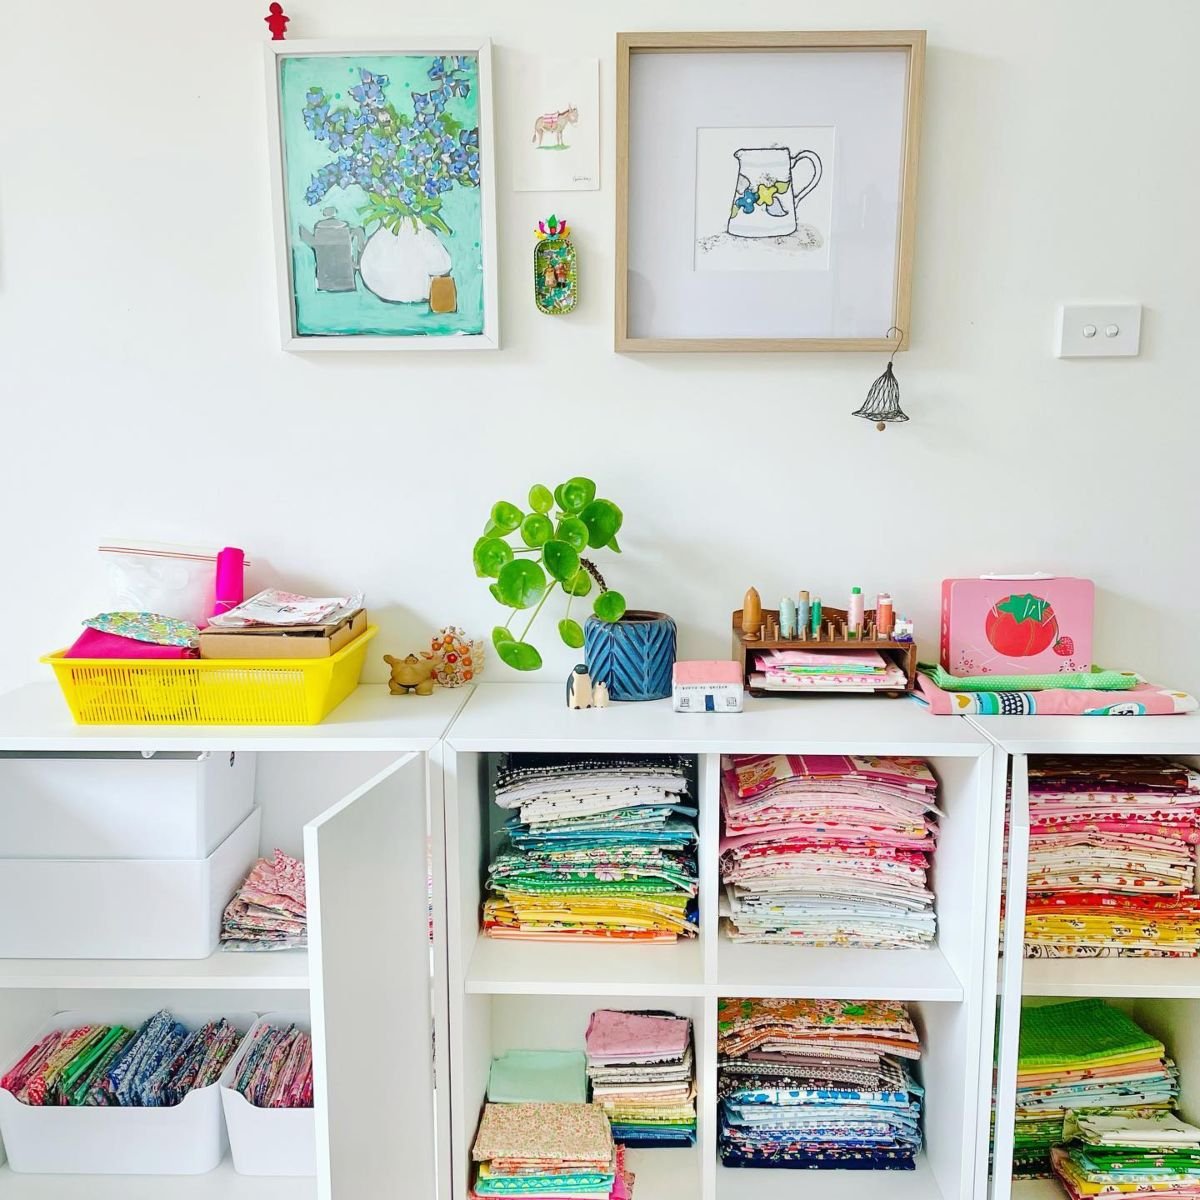
3 Organize Fabrics Neatly Here
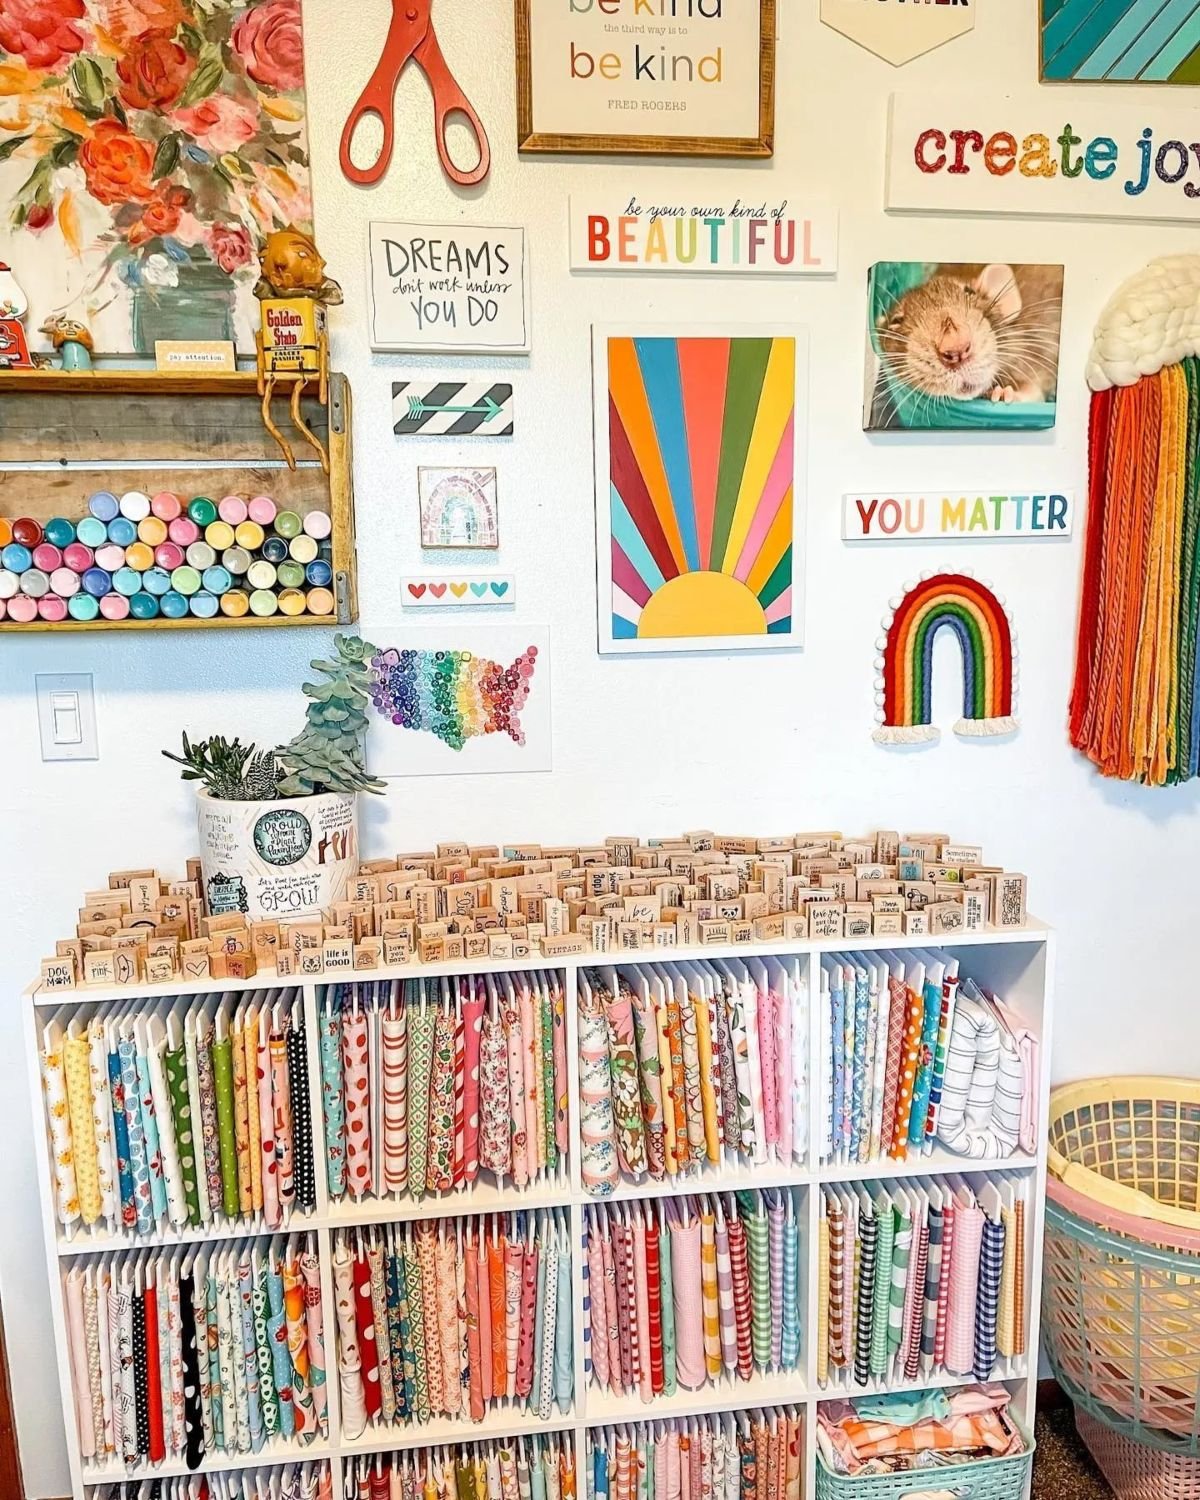
Keeping your fabrics organized can save you a lot of time when crafting. Instead of tossing them in a box, try treating your fabric like books on a shelf. This way, not only will it look nice, but you’ll also find what you need quickly.
Use clear containers or fabric bins to store different types or colors of fabric. Label each container so you can easily identify what’s inside. I love using a wooden shelf to display my fabric, which makes it accessible and adds a decorative touch to the room.
Another idea is to use a hanging organizer on the wall. It keeps the fabrics visible and saves space. This method helps me see my options right away, making crafting so much easier.
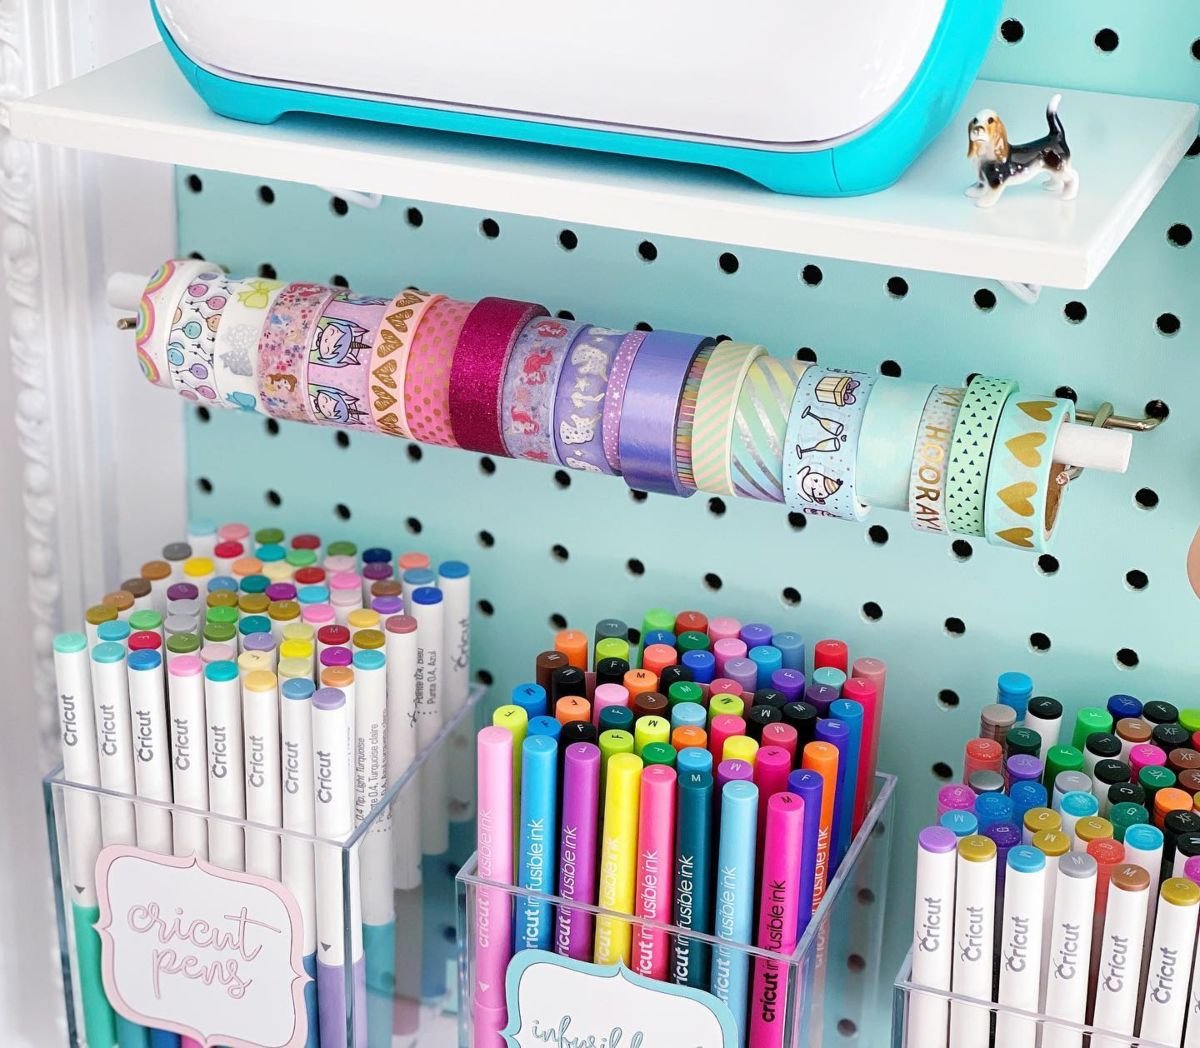
4 Washi Tape in Embroidery Hoops
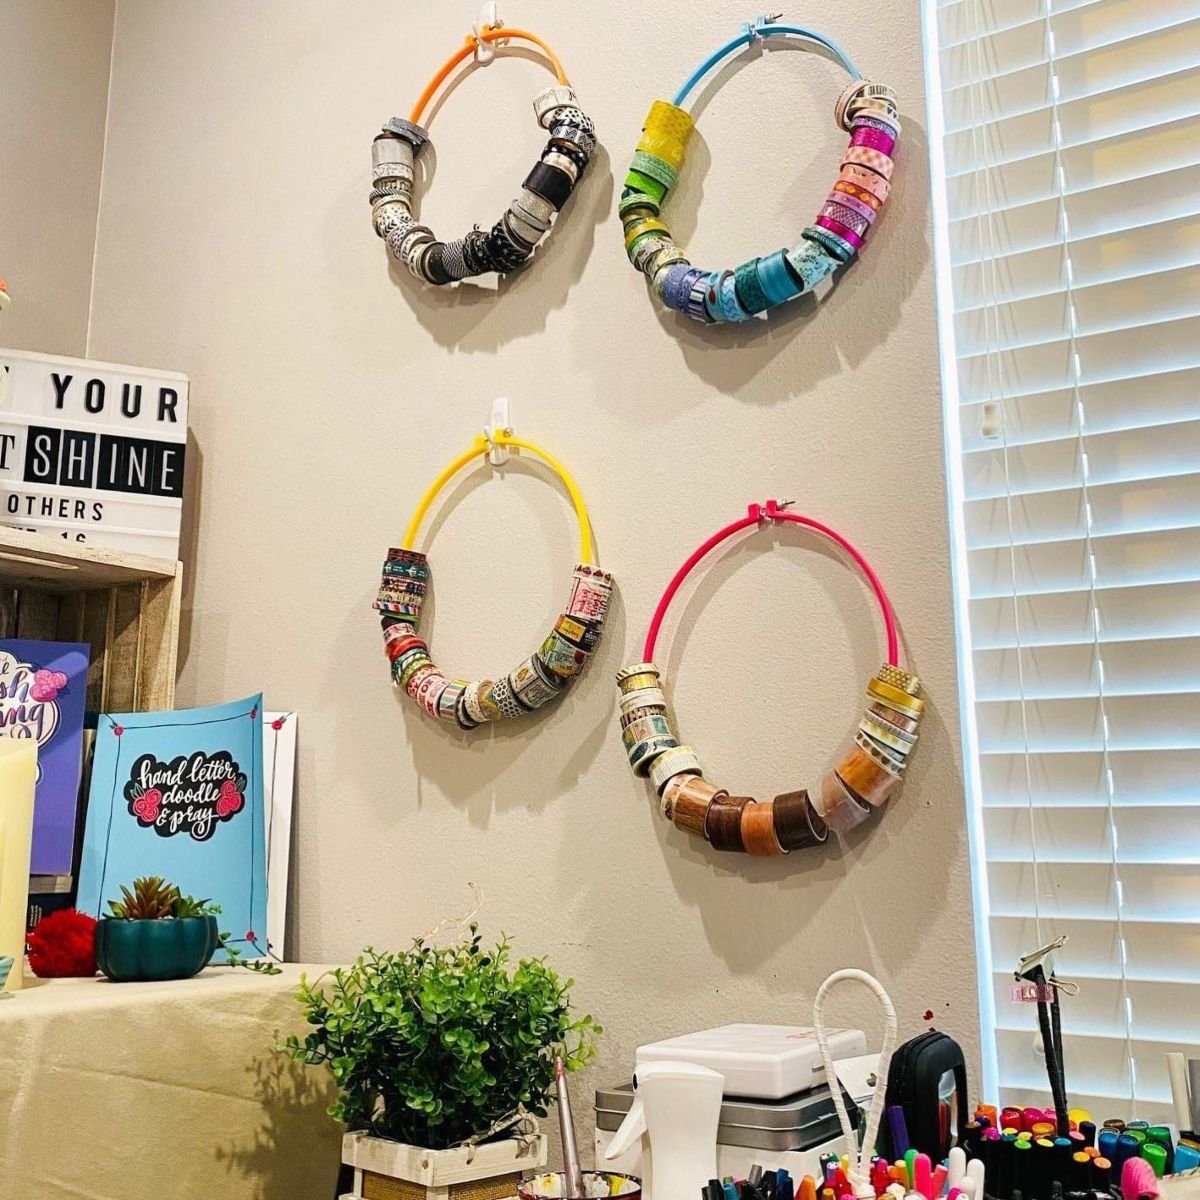
Washi tape makes your craft room look vibrant and playful! Using embroidery hoops to display your washi tape collection is a fantastic idea. It not only organizes your tape but also turns it into beautiful wall art.
You can find affordable embroidery hoops at craft stores. Just stretch some fabric or even leave them bare for a rustic look. Then, simply hang your washi tape rolls on the hoops with clips or string. This way, you can easily see all your colors and patterns, helping you choose the perfect tape for your next project.
Try arranging the hoops in a fun pattern on your wall. It will add a splash of color and make your space feel more inviting!
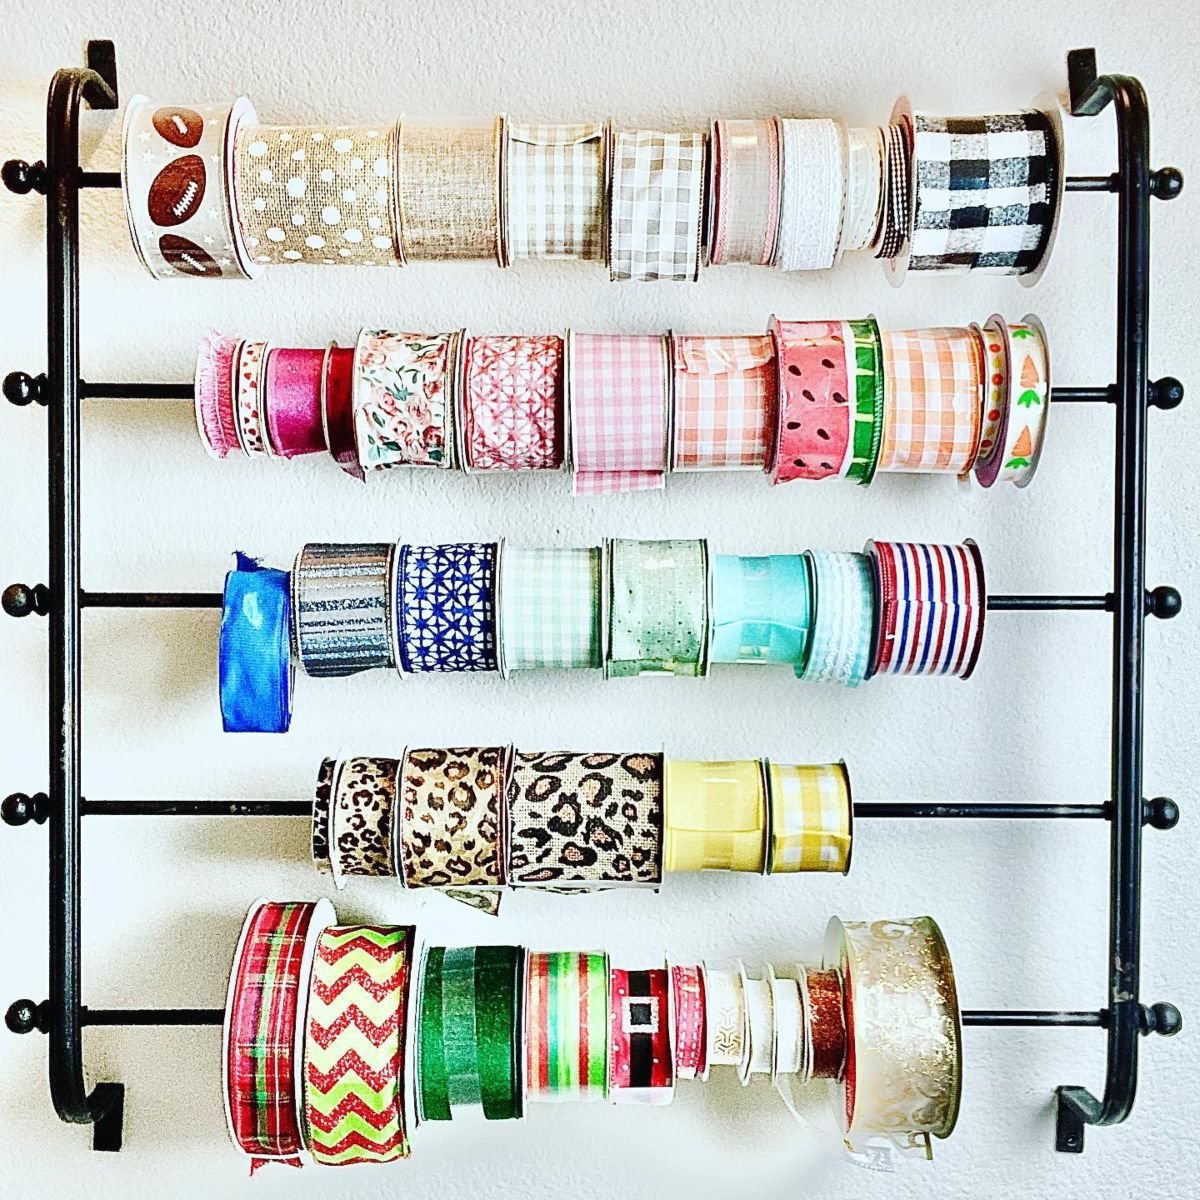
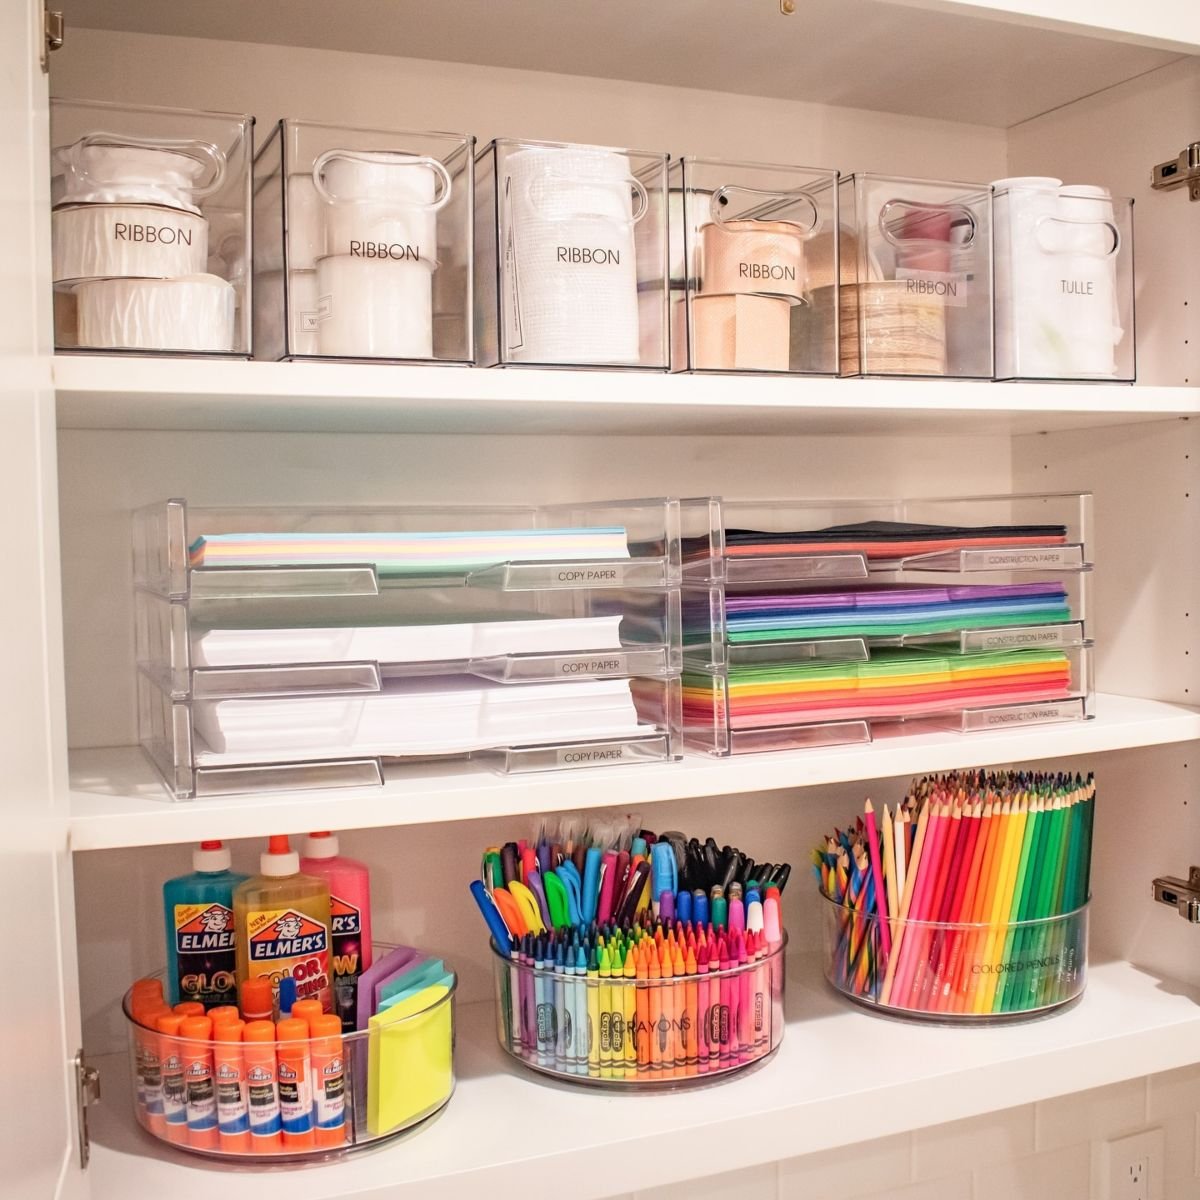
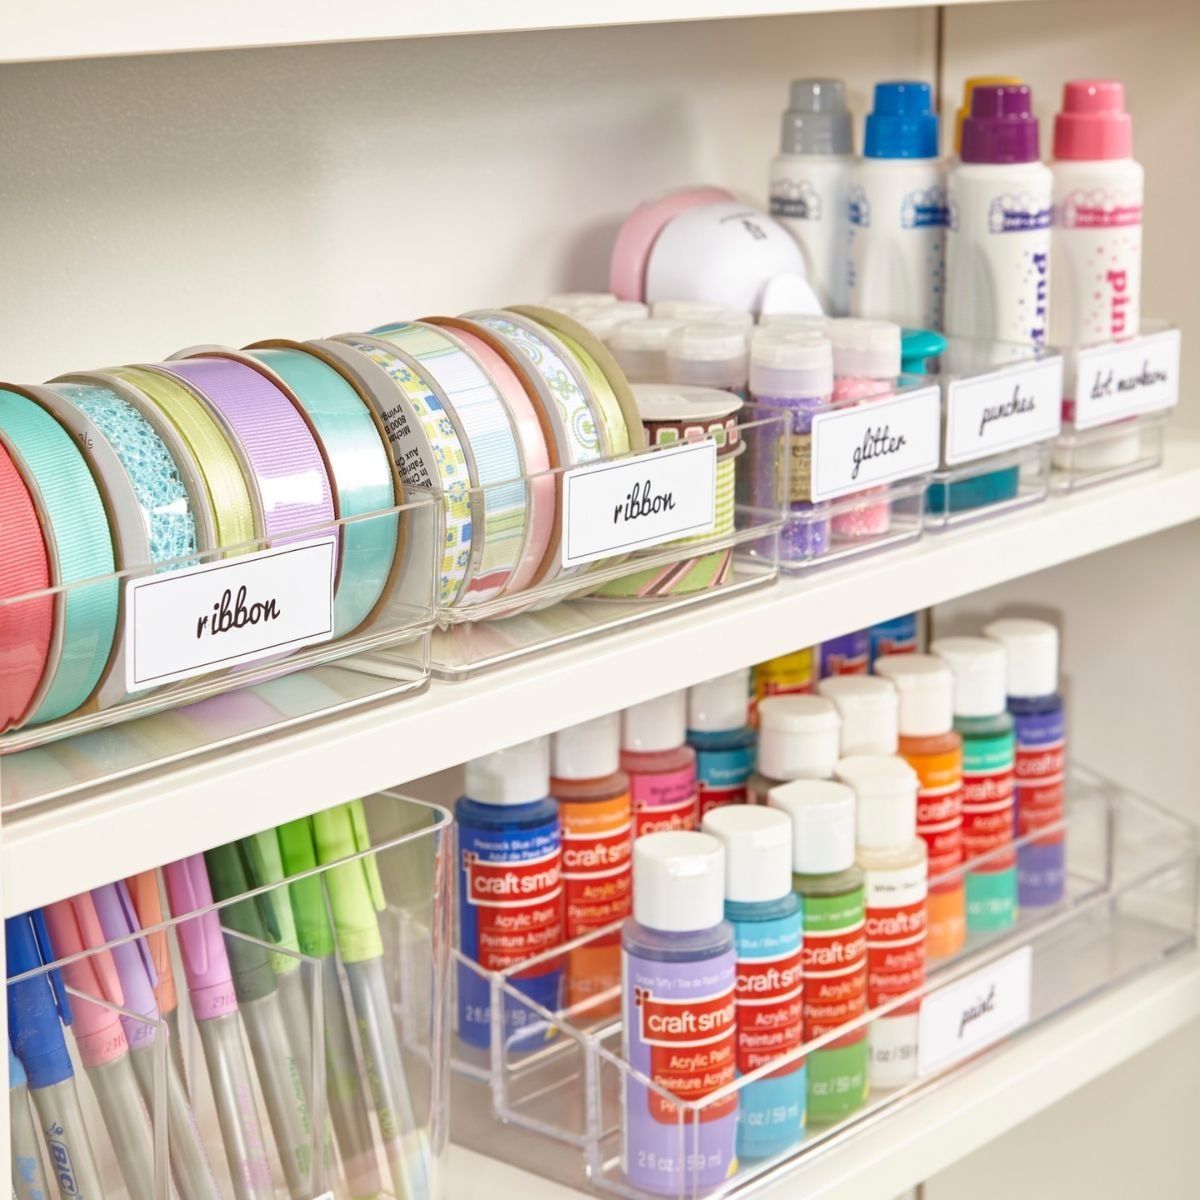
5 Space-Saving Ribbon Organizers
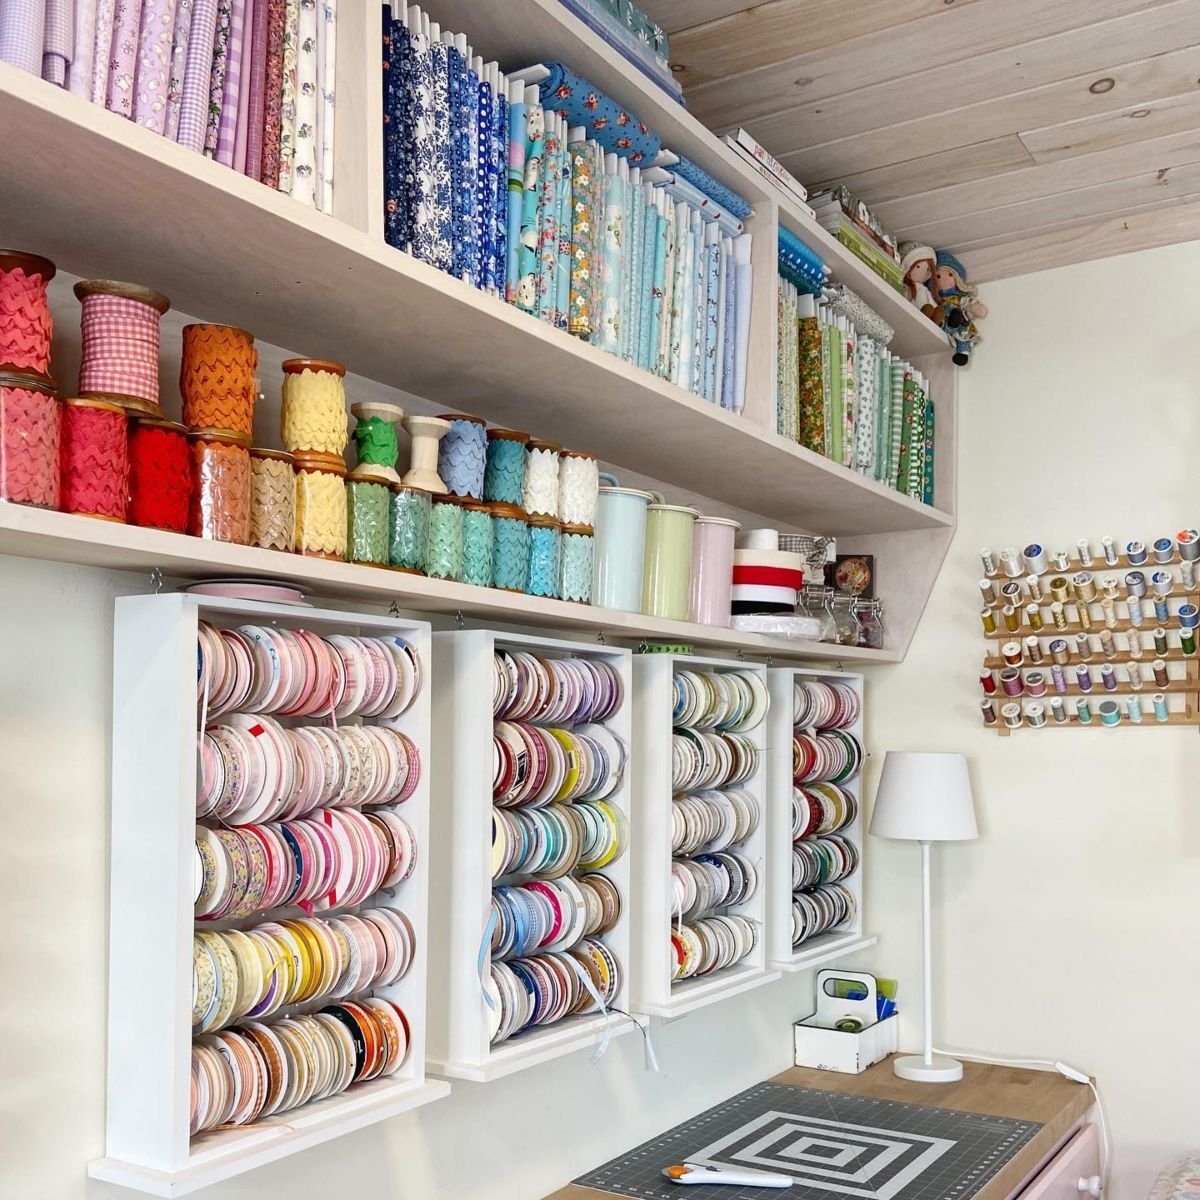
Ribbon organizers are a fantastic way to keep your craft room tidy and save space. Wall-mounted options are particularly cool because they let you see all your ribbon types at a glance. No more digging through drawers or boxes!
I recommend getting a rack with multiple rods. This way, you can hang ribbons of different sizes and colors. You can even organize them by season or project, which makes finding the right ribbon a breeze!
If you prefer something portable, look for a stackable ribbon organizer with clear containers. It keeps your ribbons protected while still giving you easy access. Plus, you can easily take it out for different projects!
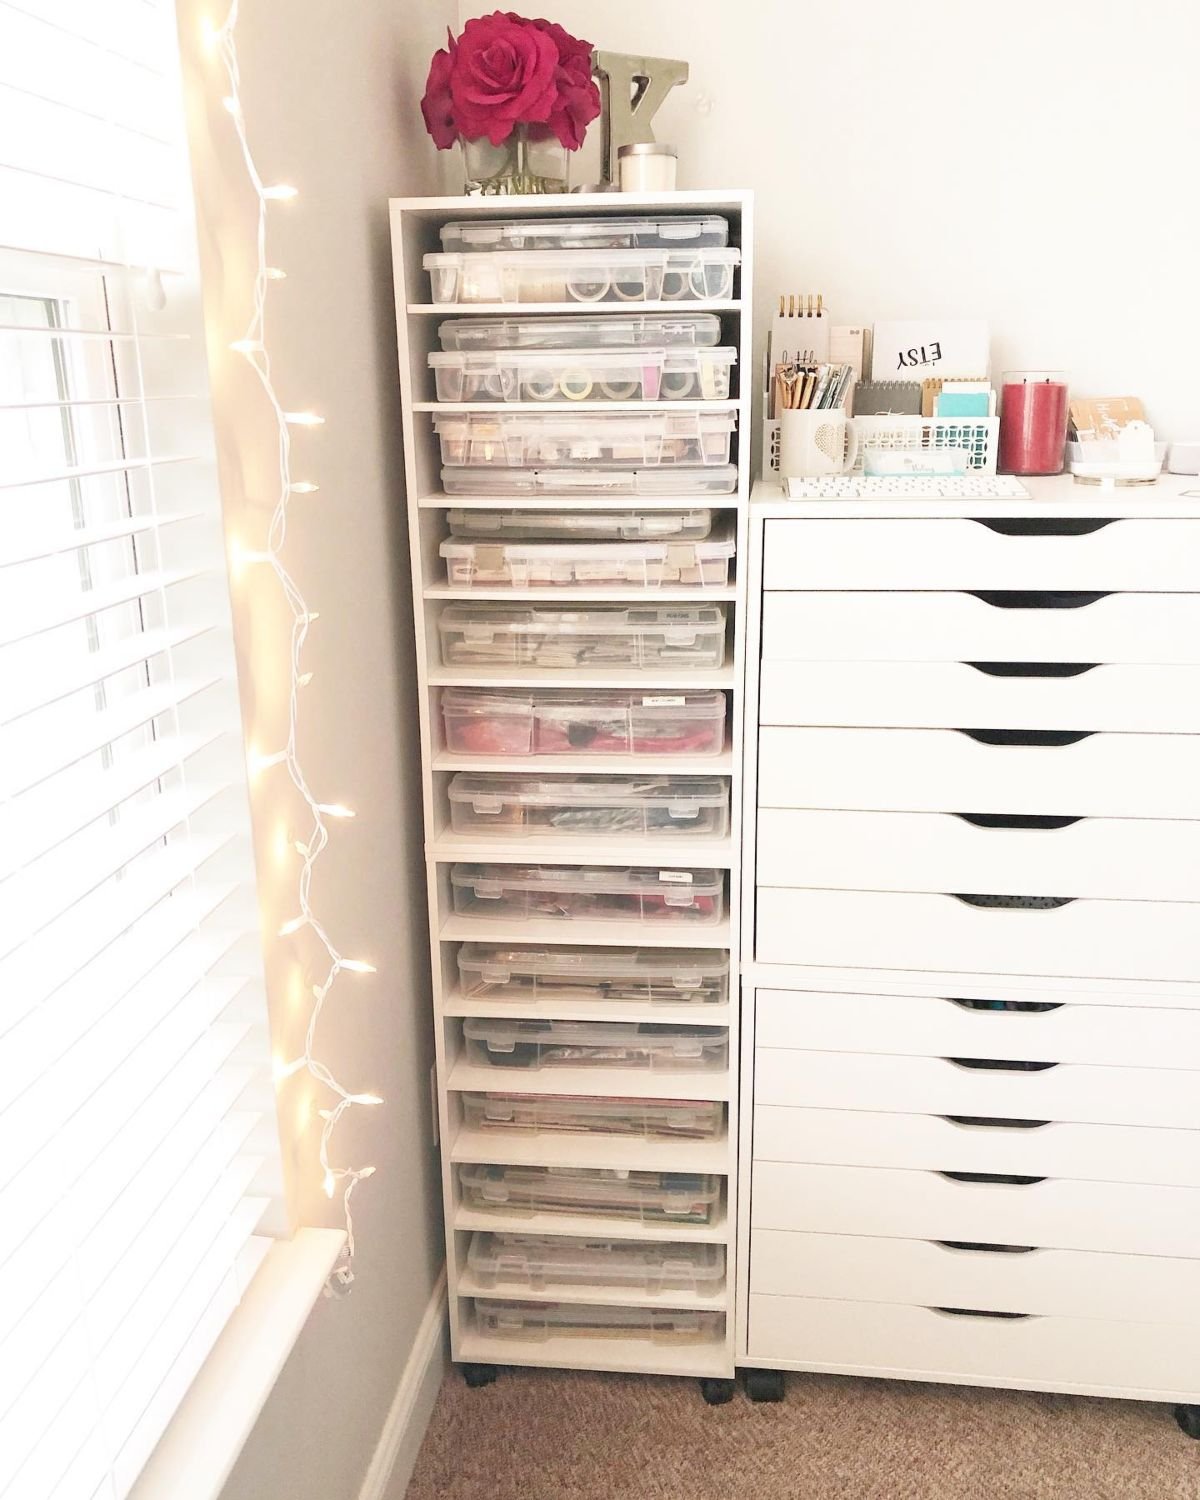
6 Space-Saving Storage Towers
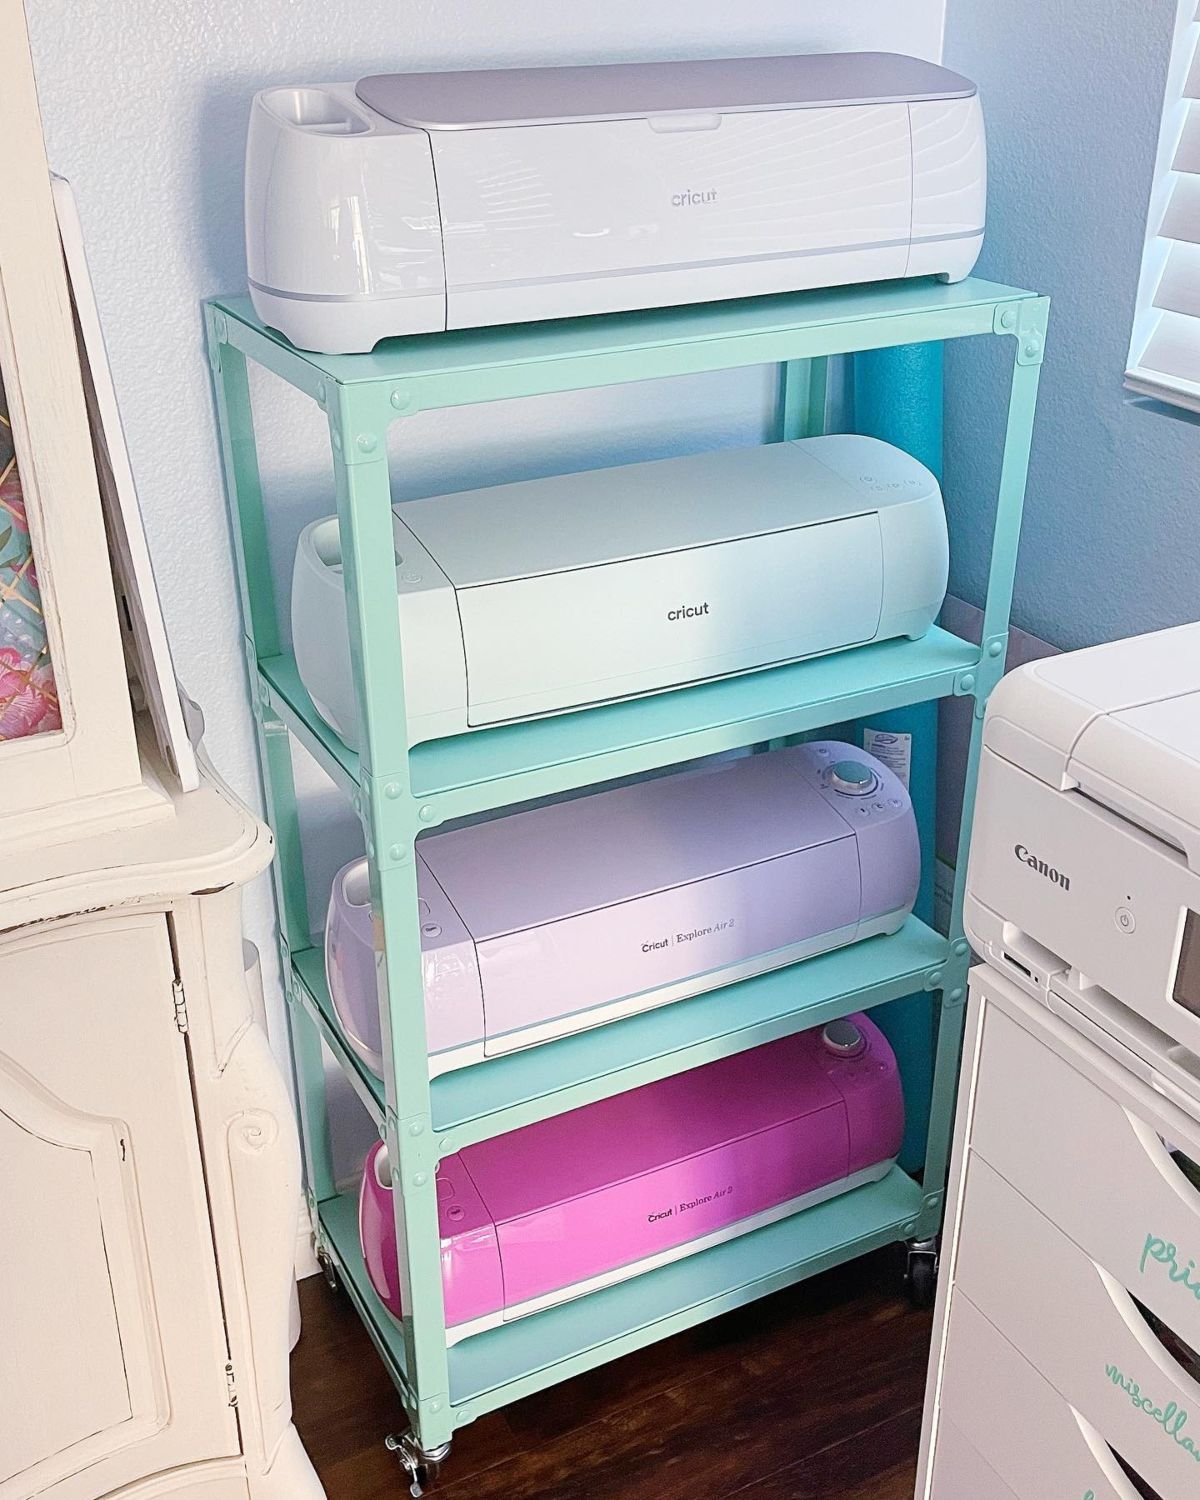
Storage towers are a fantastic way to keep your crafting area organized without taking up too much space. Imagine having all your bulky items like printers, scanners, and cutting machines neatly stored yet easily accessible.
You can choose a storage tower with multiple shelves to fit all your essentials. For instance, one shelf could hold your printer, while others can store crafting papers, tools, and supplies. Look for towers with wheels for mobility, allowing you to pull them out when needed and tuck them away when you’re finished.
Making your space efficient is key! Label each shelf or section so you can quickly find what you need. With a bit of creativity and the right setup, your craft room can be both stylish and functional.
7 Effortless Fabric Organization Ideas
Fabric organization is super important for crafters. It helps you see what you have, so you can start new projects without digging through heaps of fabric.
Try using open shelving to display your fabric collection. This makes it easy to grab what you need without rummaging around. You can even sort your fabric by color, type, or season for quicker access.
Another great tip is to use fabric bins. Label each bin with what’s inside, like “cotton” or “flannel.” This way, you’ll know exactly where to look when inspiration strikes!
8 Space-Saving Fold-Down Desk
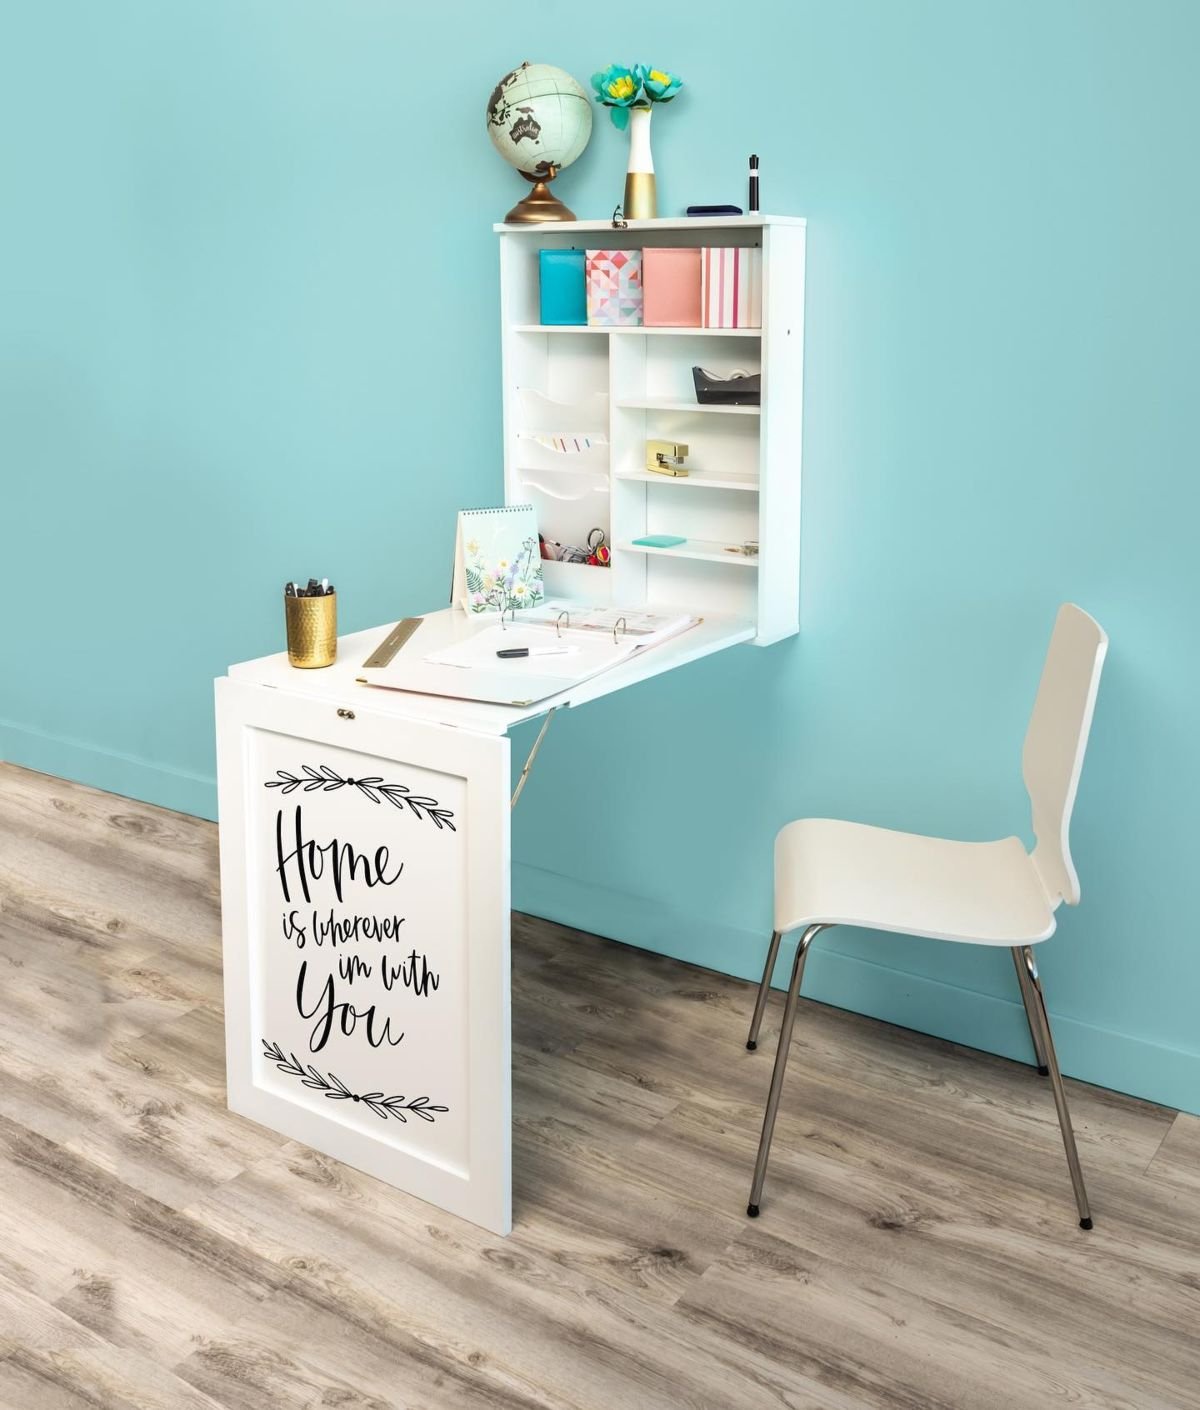
A space-saving fold-down desk can change how you organize your craft room. This clever solution allows you to create a workspace that you can simply tuck away when not in use. Imagine having a sleek desk that you can pull down only when you need it!
You can easily make one by attaching a sturdy shelf to the wall. Just add some brackets that allow it to fold down. When you’re finished crafting, simply lift it up to free up floor space. It’s a practical way to keep your room looking tidy!
Consider adding cubby holes or small drawers above or below the desk for extra storage. This keeps your supplies handy but out of sight when the desk is up. You’ll find that having a designated crafting area boosts your creativity while saving space!
9 Vinyl Roll Organizer Solutions
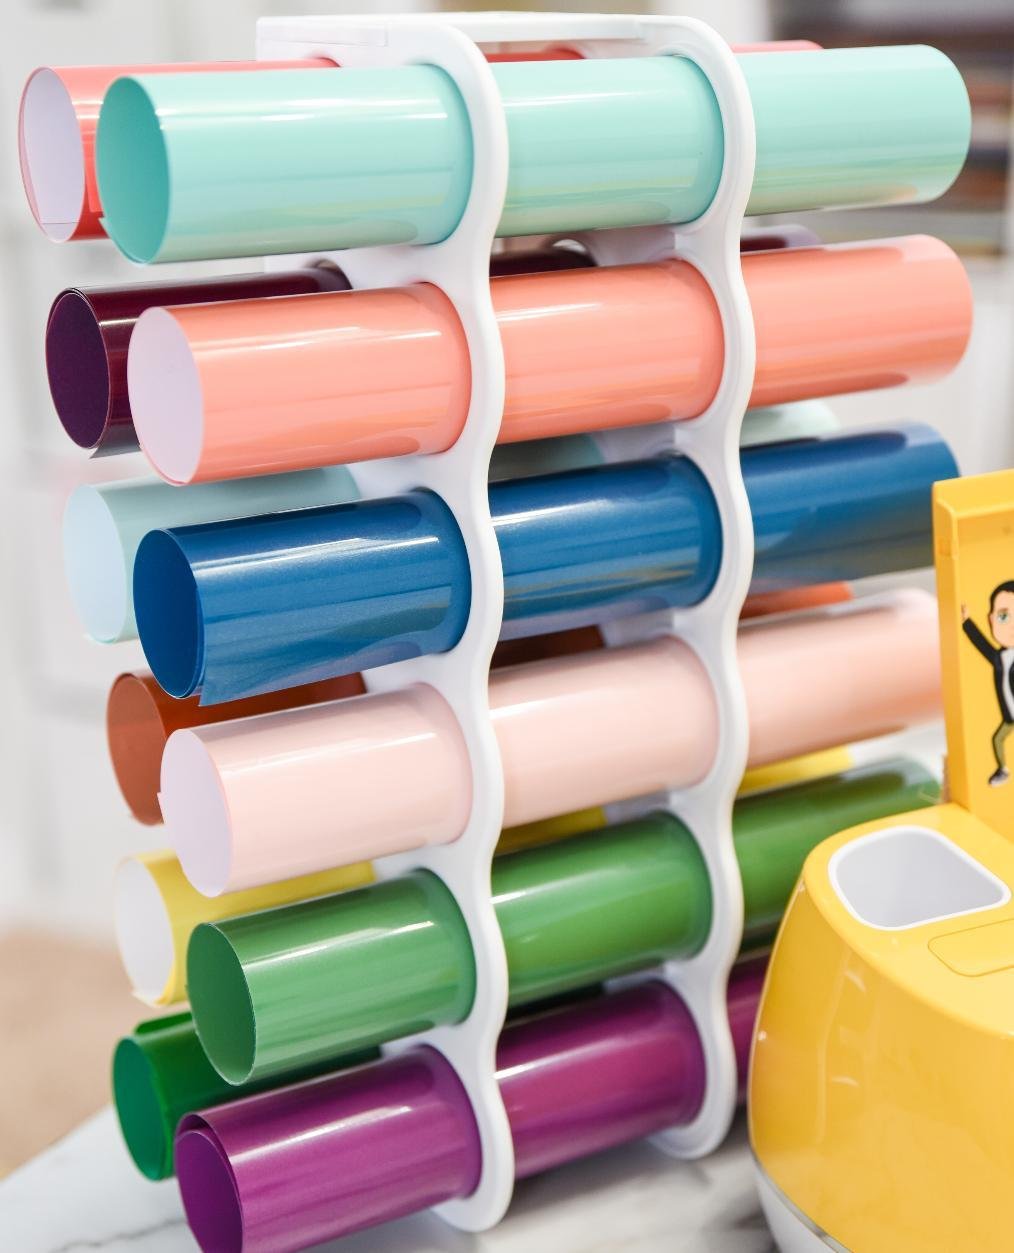
Vinyl rolls can be tricky to store, but I’ve found some great solutions that keep everything neat and easily accessible. A simple way is to use a wall-mounted holder. It’s like a mini shelf where you can hang your rolls. This way, you save space and get to see all your beautiful colors at a glance!
You can also try using desks or cabinets with vertical slots. Just cut some cardboard to size and create sections for each roll. This method helps keep your vinyl untangled and organized. Plus, it looks tidy in your craft room!
Think about using a multi-tiered rack that you can place on your table or shelf. It’s perfect for stacking and you can easily see and reach for any roll you need. Keeping your vinyl organized not only looks nice, but it saves you time during your crafting projects!
10 Stylish Ribbon Wall Storage
Stylish ribbon wall storage is a fantastic way to organize your craft space while adding a splash of color! Instead of stuffing your ribbons in a drawer, why not display them on a wall? It not only saves space but also turns your ribbons into a decorative piece.
You can easily create this storage by using a simple pegboard or a tension rod. Just hang ribbons in different colors and patterns for a beautiful visual effect. Use clips or hooks to keep them organized and easily accessible.
Try to match the ribbons with your room’s color scheme to give it a polished look. I personally love how functional and attractive it looks, making my crafting easier and more enjoyable!
11 Efficient Pegboard Craft Storage
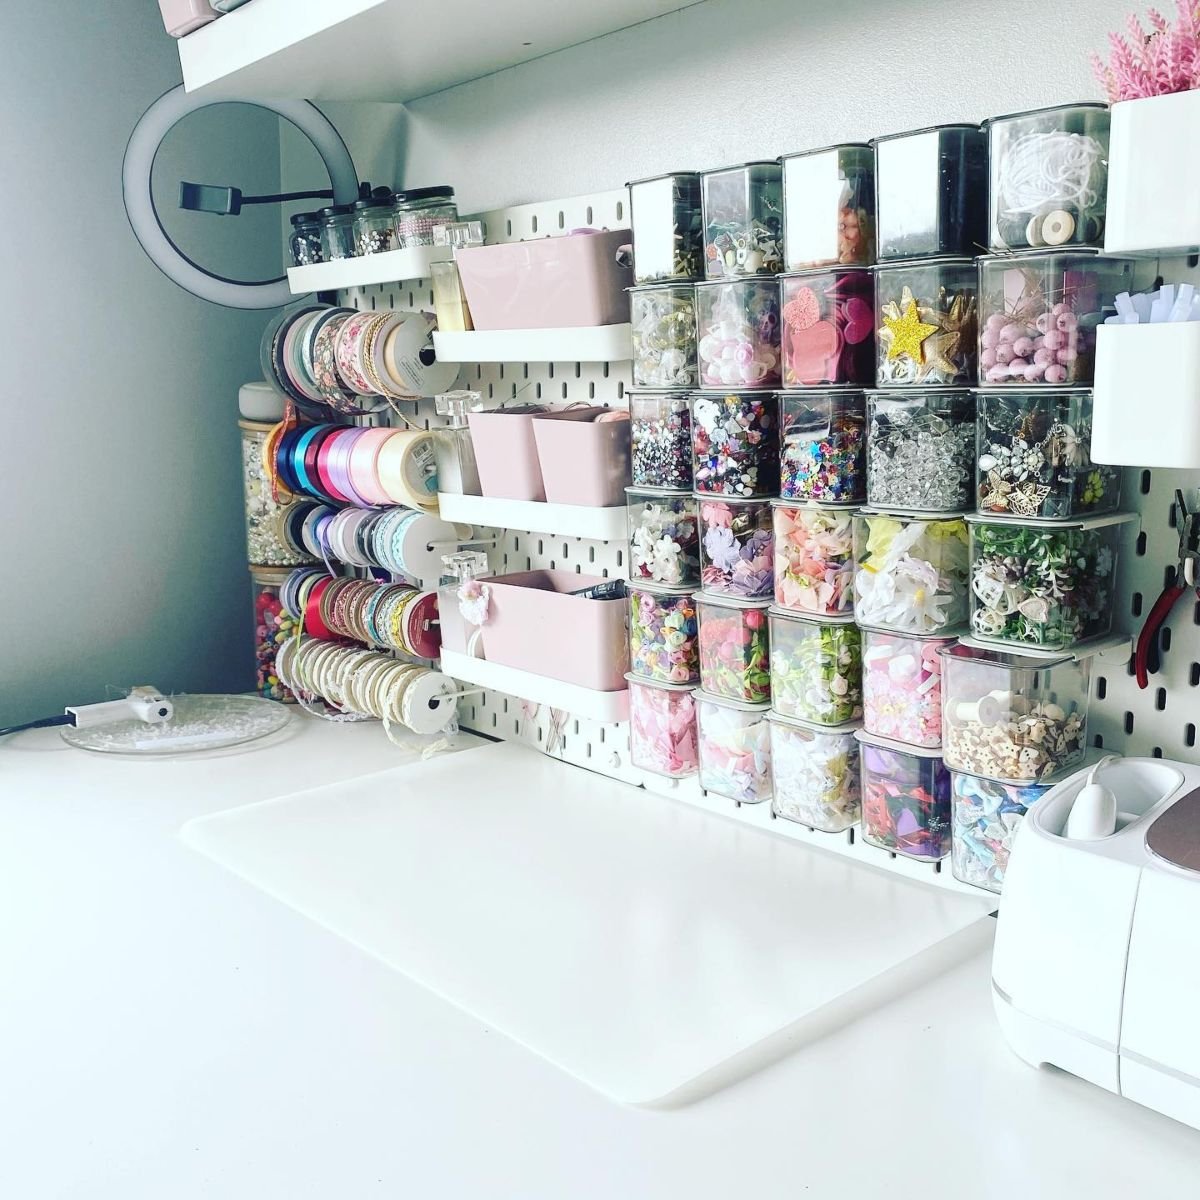
Using a pegboard for craft storage is a game changer! It gives you a place to hang everything you need, keeping your workspace organized and clutter-free. You can easily see what you have, which saves time when you’re crafting.
Try adding baskets and bins to hold smaller items like buttons, ribbons, and paint supplies. Hooks are perfect for hanging scissors, tape, and even larger tools. I really love using dowels to organize rolls of washi tape or ribbon. With so many options, you can customize your pegboard to fit all of your favorite supplies!
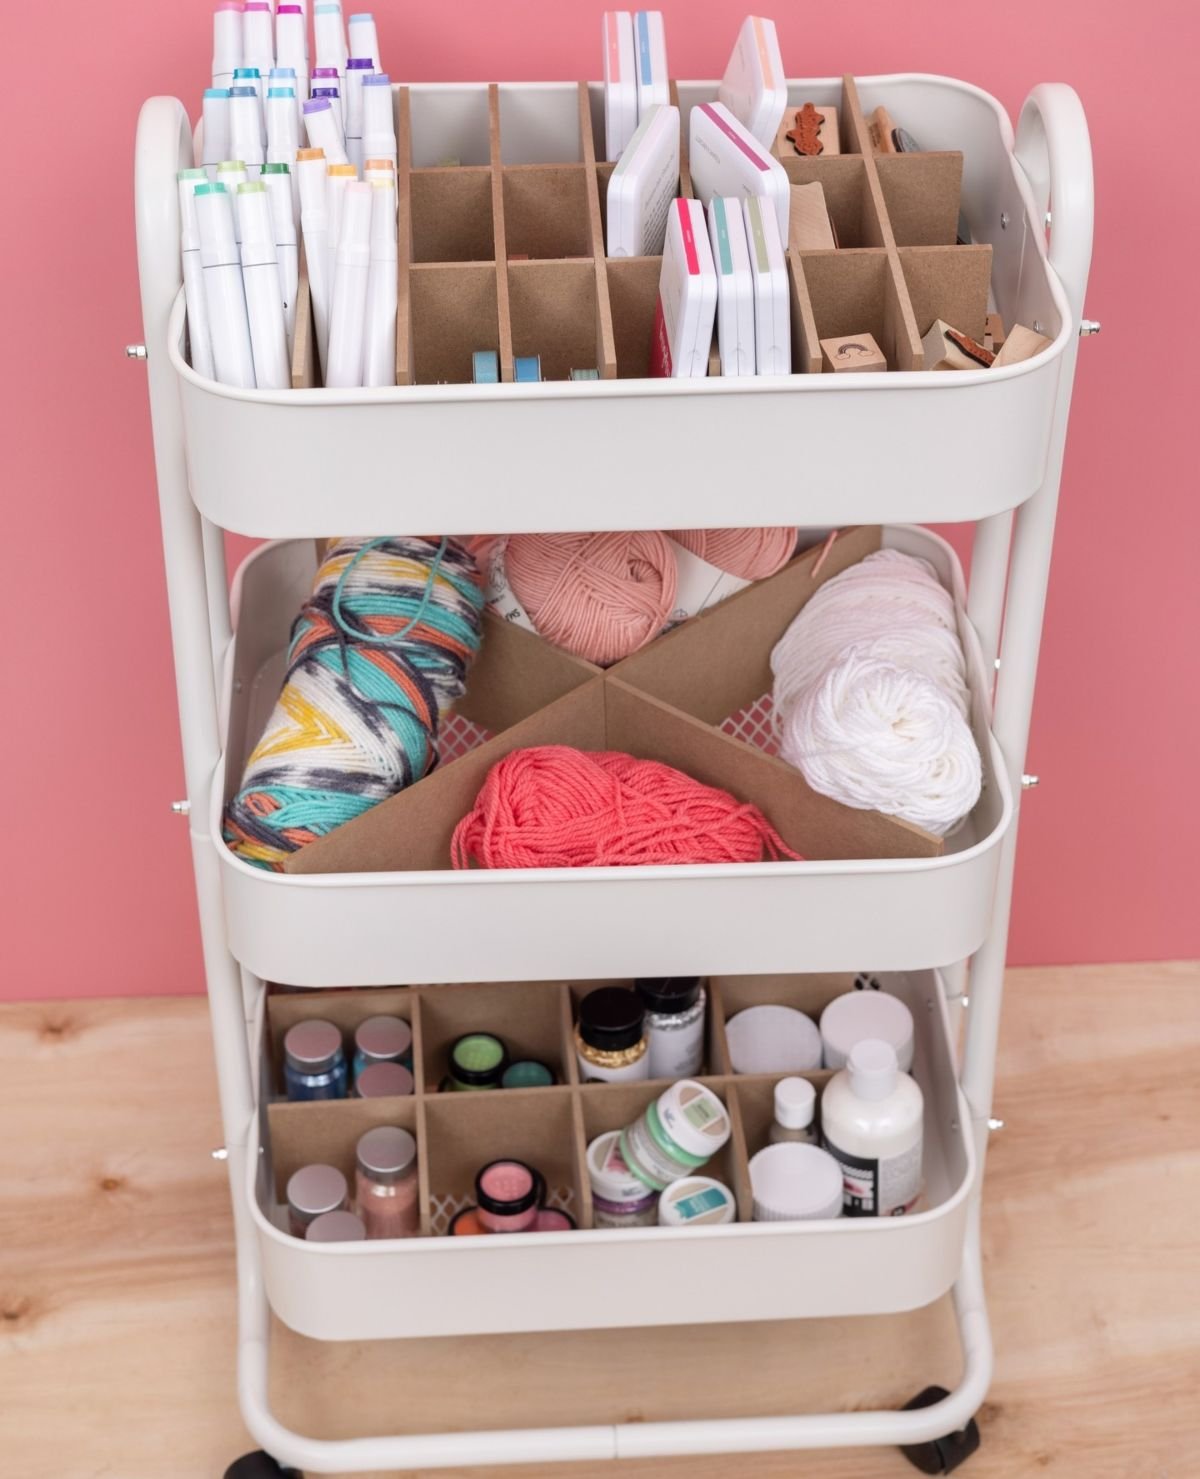
12 Organize with Craft Carts
Craft carts are a fantastic way to keep your crafting supplies organized. I love how you can move them around easily and access your materials right where you need them.
You can use containers or cups on the cart to separate pens, pencils, and other tools. This keeps everything visible and easy to grab. For example, you might have one container for markers and another for brushes.
Don’t forget to assign each shelf a specific purpose! One shelf could hold paper and canvases, while another could be for glue, scissors, and tape. This makes finding things a breeze, so you can focus on what you love: creating!
13 Yarn Cubbies for Organized Storage
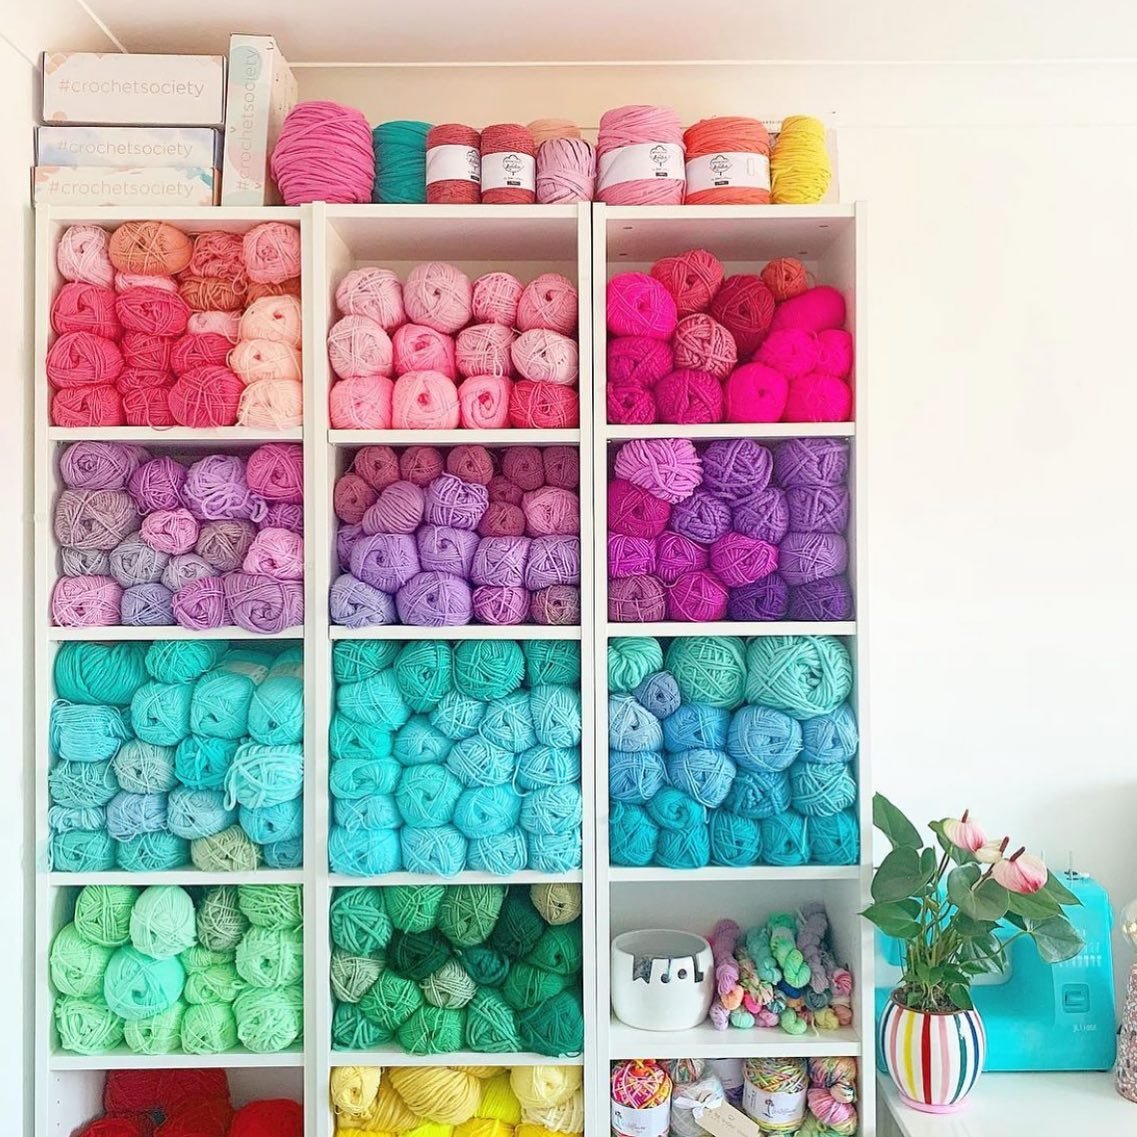
Yarn cubbies are a fantastic way to keep all your yarn neat and tidy. I love how they organize my crafting space while showcasing my colorful yarn collection. You can easily find the yarn you need without digging through a messy stash.
To create your own yarn cubbies, consider using a shelving unit with square compartments. These are perfect for stacking your yarn in a way that lets you see everything at a glance. You can even organize your yarn by color or weight for a beautiful rainbow effect!
Investing in clear bins or baskets can also make a big difference. They keep your yarn dust-free and let you grab the right skein quickly. Remember to label your storage for even easier access!
14 Versatile Acrylic Storage Solutions
Acrylic storage solutions are extremely versatile and a great way to keep your craft room tidy. I love using clear organizers because they not only look sleek, but they also let you see everything at a glance.
You can use acrylic containers for various supplies like markers, beads, and scissors. They are fantastic for smaller items too! Just imagine having a separate organizer for ribbons and another for tape. It makes finding what you need so much easier.
For bigger items, consider a larger acrylic bin for yarn or fabric scraps. This way, you can maximize your space and have everything stored neatly. Trust me, acrylic organizers will transform your crafting experience!
15 Organize Your Craft Cart
A craft cart can be a great helper in your crafting space. If you have one, it’s time to give it some love! Start by adding small cubbies or baskets to separate your supplies. For your yarn, fabric, and tools, different sections will make it easier to find what you need.
Label each section clearly. You can use colorful tape or cute tags! For example, mark one cubby for yarn and another for paints. This way, everything has a home and you won’t spend ages searching. With a neat craft cart, you’ll feel more inspired to create!
16 Versatile Craft Storage Towers
Craft storage towers are truly game changers for organizing your materials. They come in many styles and sizes, which makes them perfect for small spaces. You can easily fit them in a corner or even along a wall.
These towers are ideal for storing scrapbooking supplies, fabric scraps, and art supplies. Imagine having all your glue, scissors, and glitter neatly arranged and ready to grab when inspiration strikes! I recommend choosing a tower with multiple drawers or shelves. This way, you can group similar items together, making it super easy to find what you need without a huge mess.
17 Wall-Mounted Embroidery Floss Hooks
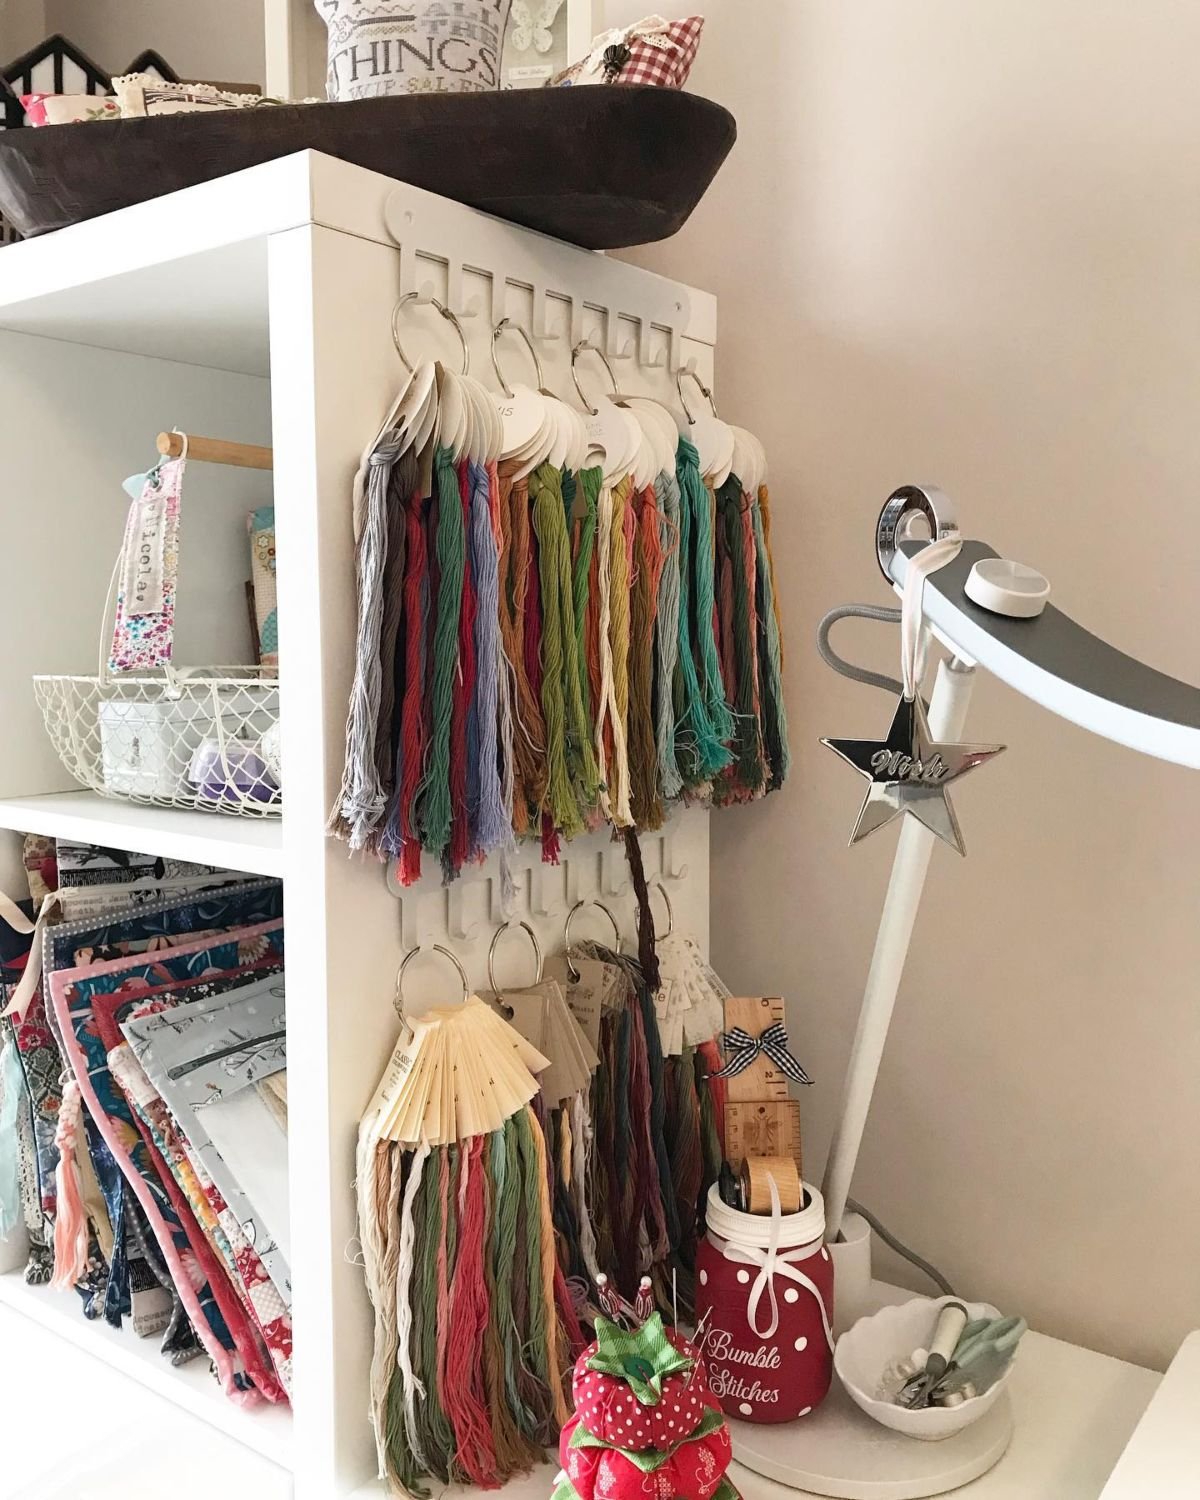
Wall-mounted embroidery floss hooks can be a game-changer for your craft room! Instead of digging through drawers or boxes, you can easily see all your colorful threads at a glance. By keeping your floss visible, it not only looks pretty but also saves you time when you’re ready to start a new project.
To make your own hooks, you can use simple cup hooks or choose decorative ones for a stylish touch. Mount them on a wooden board painted in a color that matches your space.
Here’s a quick setup idea:
- Arrange the hooks in rows based on color.
- Label each section for easy access.
- Use small baskets underneath for scissors and needles.
This setup is both practical and visually appealing!
18 Organize Washi Tape Efficiently
If you love using washi tape like I do, keeping it organized is super important! One cool idea is to use a hanging dowel. You can easily hang your washi tape rolls on it and see all the colors at a glance. This makes it simple to choose the right one for your next craft project.
You can create your own hanging system by using a wooden dowel and some hooks. Just hang it on the wall or above your desk! It not only keeps the tape tidy but also frees up space on your work surface, making it easier to work on your projects. Plus, this method works great for ribbon too!
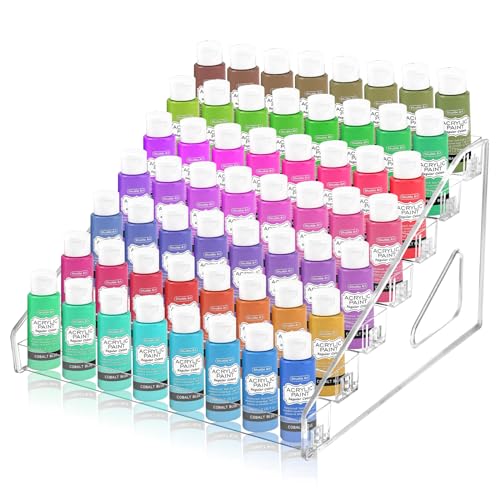
19 Colorful Cubbies for Paint Storage
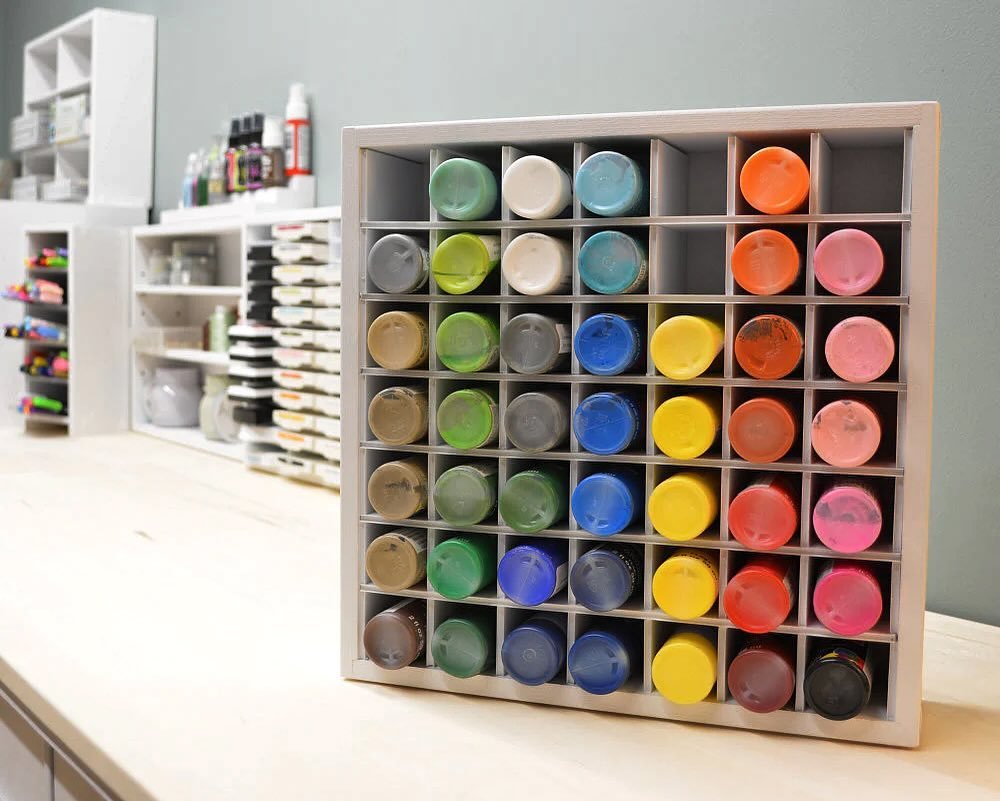
Colorful cubbies are a fantastic way to store your craft paint. Instead of letting them pile up in a messy drawer, using cubbies helps keep everything neat and visible. You can organize your paint jars and tubes in individual compartments, which is super helpful!
Imagine seeing all your paints lined up by color. It makes it much easier to find the shade you need for your latest project. Plus, when everything is in its own space, it feels great to keep your craft room tidy. I think it’s really rewarding to look at a well-organized paint station!
20 Stylish Clear Labeled Storage Jars
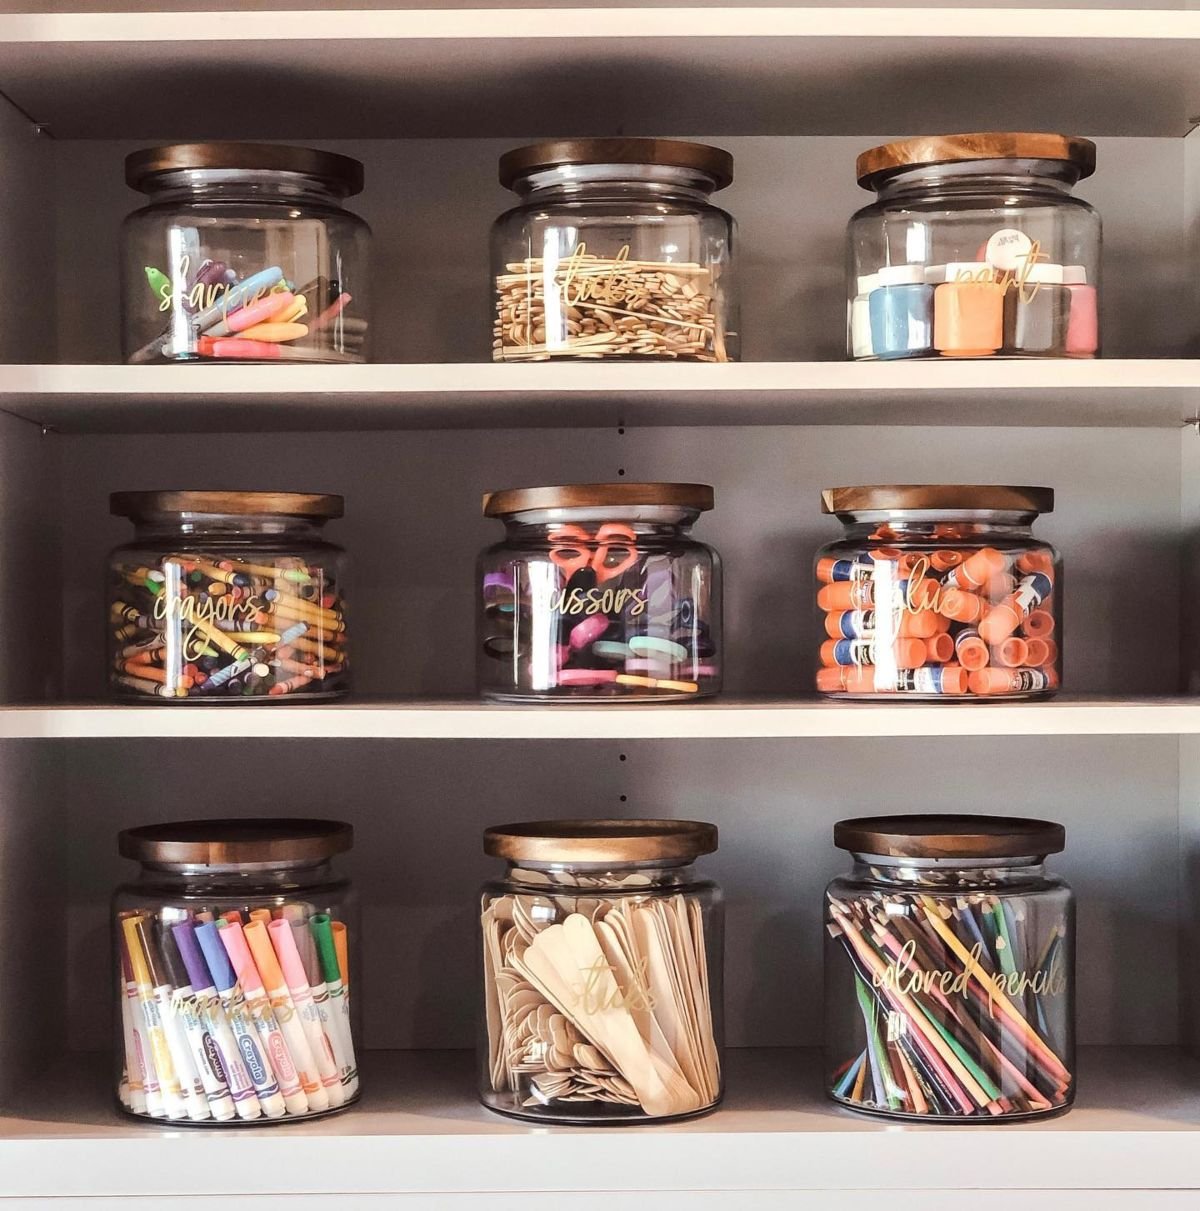
Clear labeled storage jars are a fantastic way to keep your craft supplies organized. These jars not only show off your items but also make it super easy to find what you need! I love how they add a touch of style to my workspace while keeping everything neat.
Choose jars that come with labels, or purchase label stickers separately. You can use them for everything, from crayons and colored pencils to buttons and ribbons. This way, you’ll always know where to look, and your crafting area will look amazing!
For a fun touch, I suggest color-coding your jars. For example, put all red items in a red jar and blue items in a blue jar. This visual difference makes it even easier to grab what you need quickly!
21 Efficient Craft Supply Organization
Keeping your craft supplies organized can make your projects a lot easier and more enjoyable. I recommend using labeled drawer organizers. These help make sure that everything has its own special spot. You’ll always know where to find that glitter glue or your favorite markers!
Try using small bins to separate different types of materials. For example, have one bin for crayons and colored pencils, another for washi tape and stickers, and a third for ribbons and fabric scraps. This way, you won’t waste time digging through a messy pile!
Labeling is key! Use clear labels so you can quickly grab what you need. With this setup, your craft room will not only look tidy but also be super functional for all your creative ideas!
Last update on 2026-04-01 / Affiliate links / Images from Amazon Product Advertising API