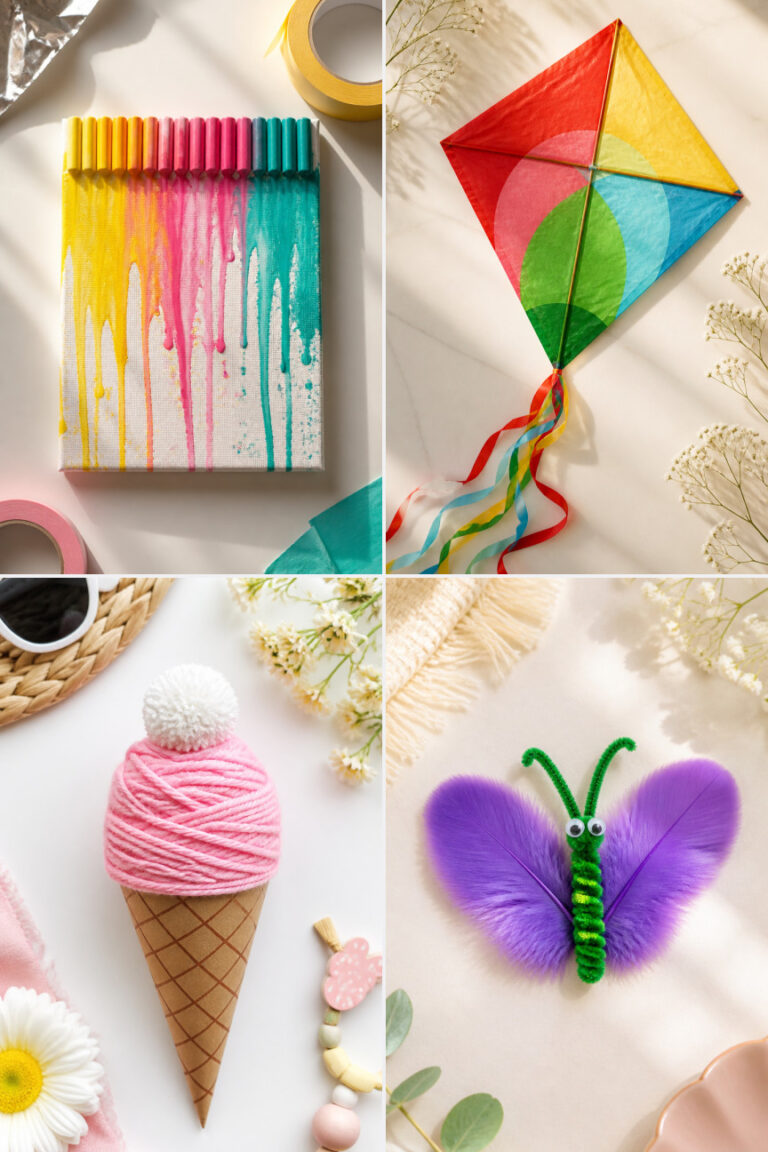
15 Easy First Day of Summer Crafts for Kids
Summer begins with sunshine, laughter, and the kind of creative energy that spills onto tables in bright colors and crumpled paper. These crafts meet kids right where they are, using simple materials to make joyful keepsakes that celebrate the season.
Each one is designed to be finished in under an hour, with clear steps and everyday supplies. You’ll find no two ideas alike—just plenty of fun waiting to unfold.
1. Paper Plate Sun Masks
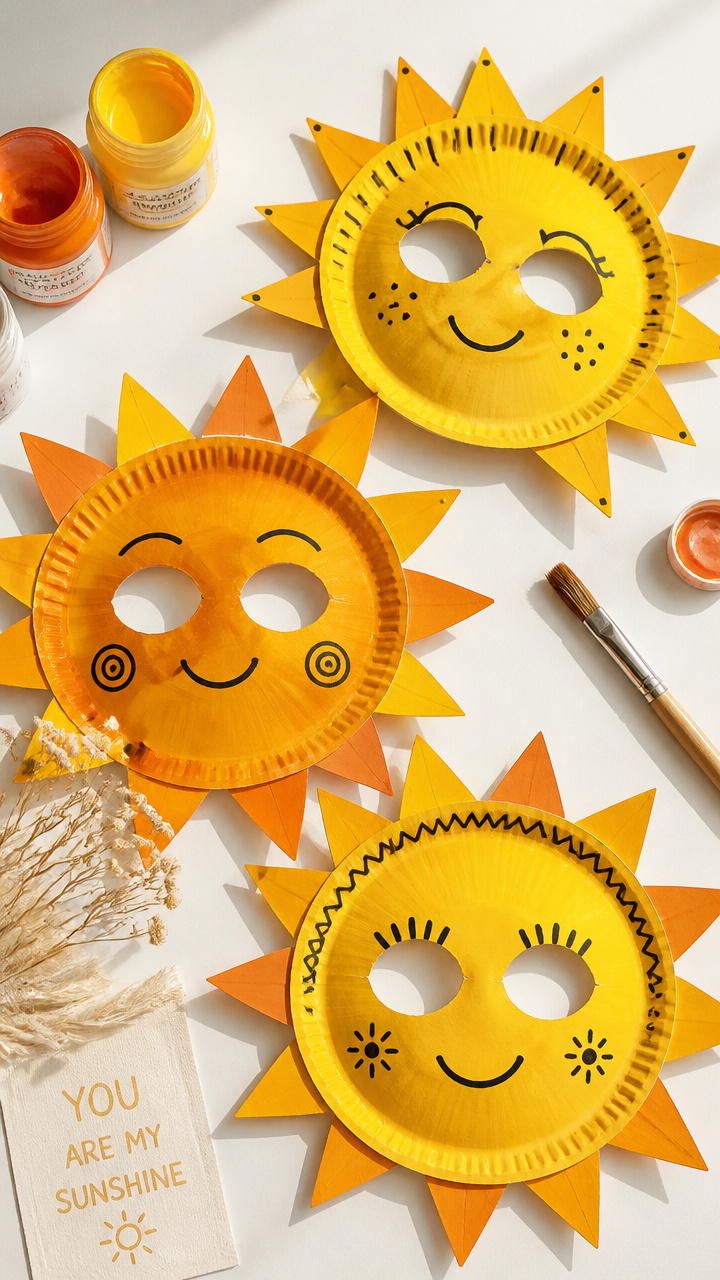
Bright yellow rays fan out from a smiling sun face that kids wear like a daytime star. This lightweight mask pairs well with backyard adventures and storytime parades.
Materials Needed
- 1 paper plate per child
- yellow acrylic paint
- orange acrylic paint
- paintbrush size 4
- black marker
- scissors
- elastic string 30 cm per mask
- glue stick
How to Make It
- Paint the front of the paper plate with yellow acrylic paint, covering all surfaces except the rim. Let it dry completely on a flat surface for 20 minutes.
- Use the orange paint to add wavy rays around the edge, extending from the center to the rim. Set aside to dry for another 15 minutes.
- Draw a smiling face in the center with the black marker. Cut two small eye holes just above the mouth, large enough to see through.
- Glue the ends of the elastic string to the back side of the plate, one on each side. Press firmly and let sit for 5 minutes before wearing.
2. Seashell Wind Chimes

Gathered shells tinkle softly when lifted by a breeze, turning any porch or window into a seaside corner. Each chime uses real seashells and makes a sweet sound.
Materials Needed
- 5 assorted clean seashells per chime
- 1 wooden embroidery hoop 15 cm diameter
- blue embroidery floss 2 meters
- small drill with 1 mm bit
- scissors
- bead needle
- clear nail polish
How to Make It
- Use the small drill to carefully make one hole near the top edge of each shell. Work slowly to avoid cracking.
- Thread the blue embroidery floss through the bead needle and tie a double knot at one end. Pass the needle through one shell and pull until the knot stops it.
- Tie each shell to the bottom of the embroidery hoop with a secure double knot, spacing them evenly around the circle.
- Wrap the remaining floss around the top of the hoop twice and tie it off. Trim excess. Seal each knot with a drop of clear nail polish and let dry for 10 minutes.
3. Popsicle Stick Flip-Flops
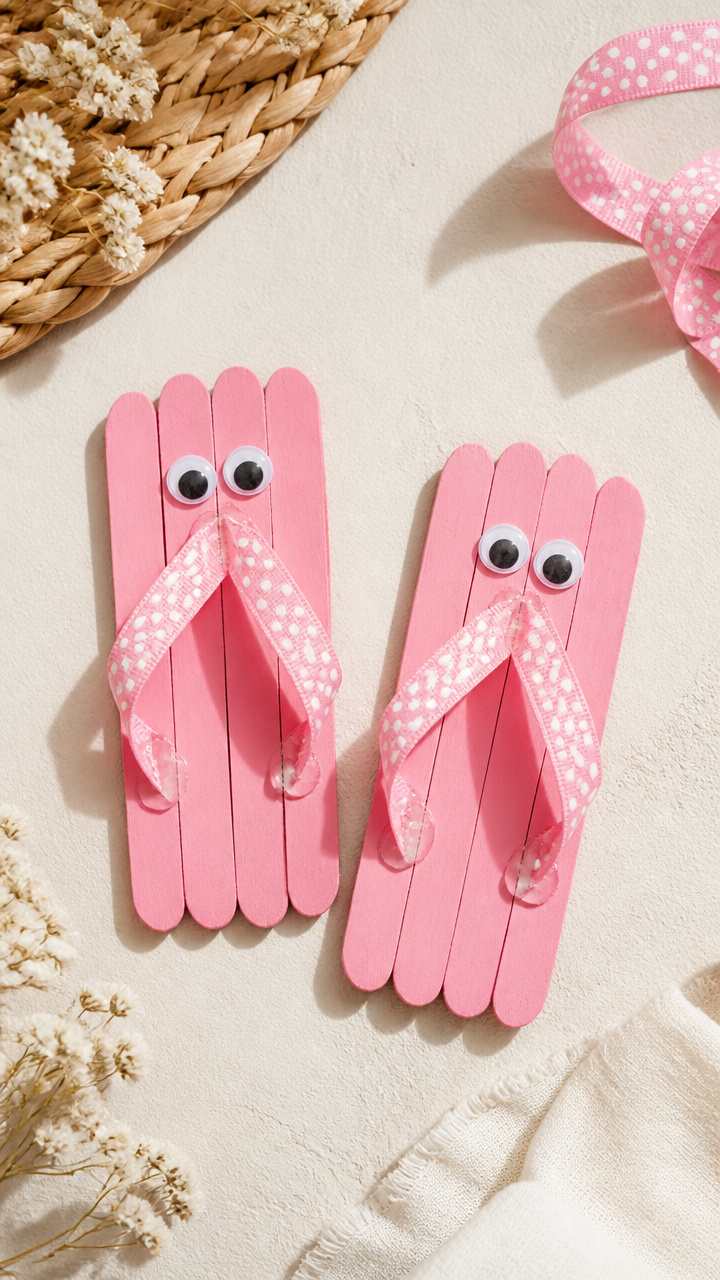
Tiny sandals made from craft sticks stand upright with personality and charm. These mini flip-flops can be decorated with patterns and worn as pins.
Materials Needed
- 2 flat popsicle sticks per project
- pink acrylic paint
- paintbrush size 2
- googly eyes 6 mm 2 per pair
- white school glue
- ribbon scrap 10 cm
- tweezers
How to Make It
- Lay one popsicle stick horizontally. Place the second stick vertically across the center to form a T shape. Glue the intersection and press for 30 seconds.
- Paint both sticks pink and let dry on a tray for 25 minutes. Avoid touching the painted surface while drying.
- Glue two googly eyes near the top of the vertical stick to look like toes. Use tweezers to position them neatly.
- Cut the ribbon into a 5 cm piece. Fold it into a loop and glue it to the back of the horizontal stick to use as a pin backing. Let cure for 10 minutes.
4. Sunset Silhouette Jars
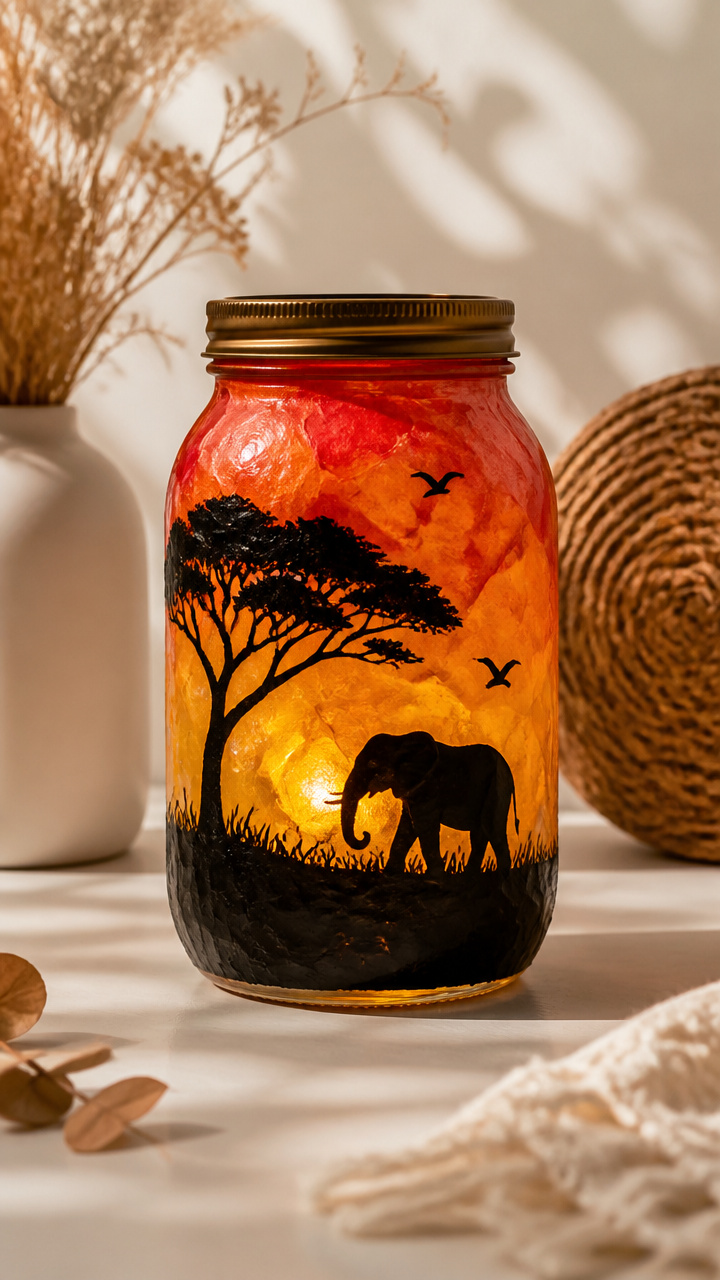
A mason jar glows with layers of colored tissue that mimic a warm evening sky. When lit with a tea light, it casts a soft gradient on walls.
Materials Needed
- 1 clear glass mason jar 250 ml
- red tissue paper
- orange tissue paper
- yellow tissue paper
- mod podge matte finish 60 ml
- foam brush 2 cm wide
- battery-powered tea light
How to Make It
- Cut the tissue paper into 5 cm squares in each color. Keep them stacked by hue for easy access.
- Use the foam brush to apply a thin layer of mod podge to the outside of the jar. Start at the bottom and work upward in sections.
- Press red squares onto the bottom third of the jar, overlapping slightly. Smooth each piece with your fingertip to remove air bubbles.
- Repeat with orange in the middle third and yellow on the top third. Let the jar dry upright for 40 minutes. Insert the tea light when dry.
5. Pool Noodle Name Rings
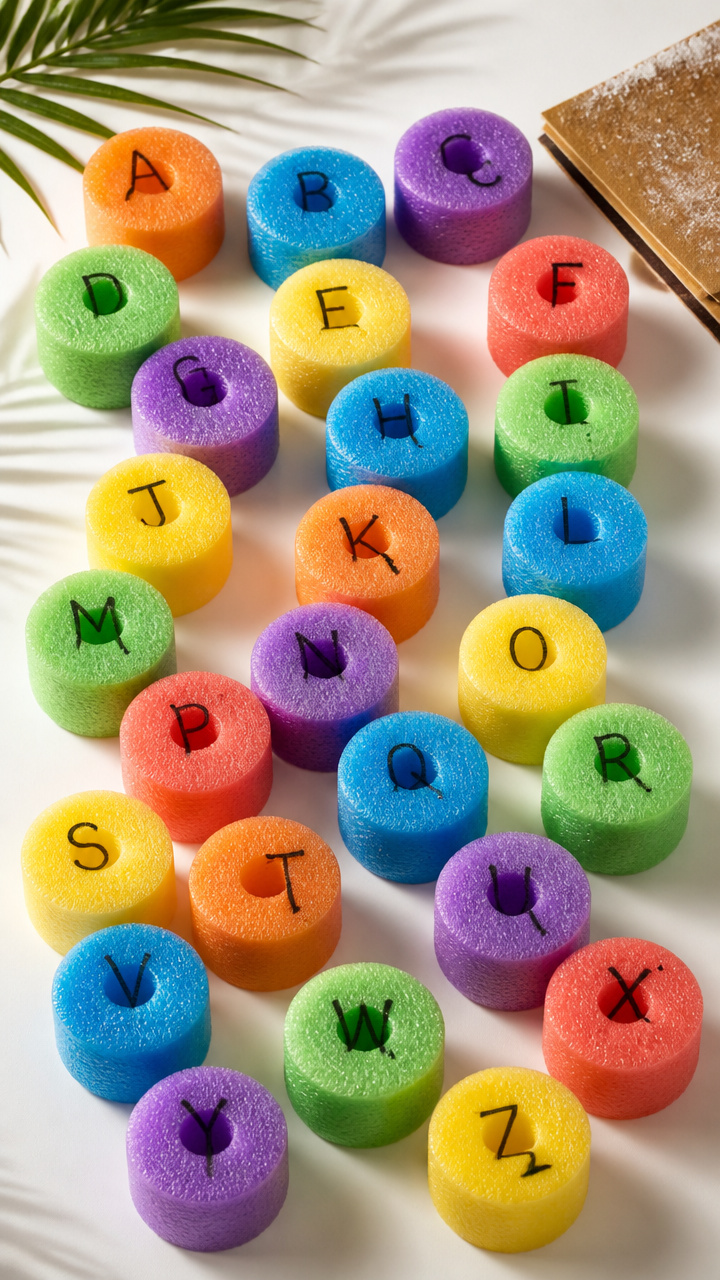
Colorful floating letters spell out names in a pool-safe format. These rings are buoyant, durable, and personalized for splash time.
Materials Needed
- 1 pool noodle per letter
- permanent markers in assorted colors
- ruler
- utility knife
- sandpaper fine grit
- alcohol wipe
How to Make It
- Wipe the pool noodle surface with an alcohol wipe to remove dust. Measure and mark every 7 cm along its length.
- Use the utility knife to cut straight across at each mark to create thick rings. Make sure cuts are even and perpendicular.
- Sand the cut edges lightly with fine grit sandpaper to smooth any roughness. Wipe clean again after sanding.
- Write one letter of the child’s name on each ring using a permanent marker. Let ink dry for 5 minutes before handling.
6. Beach Towel Mini Flags
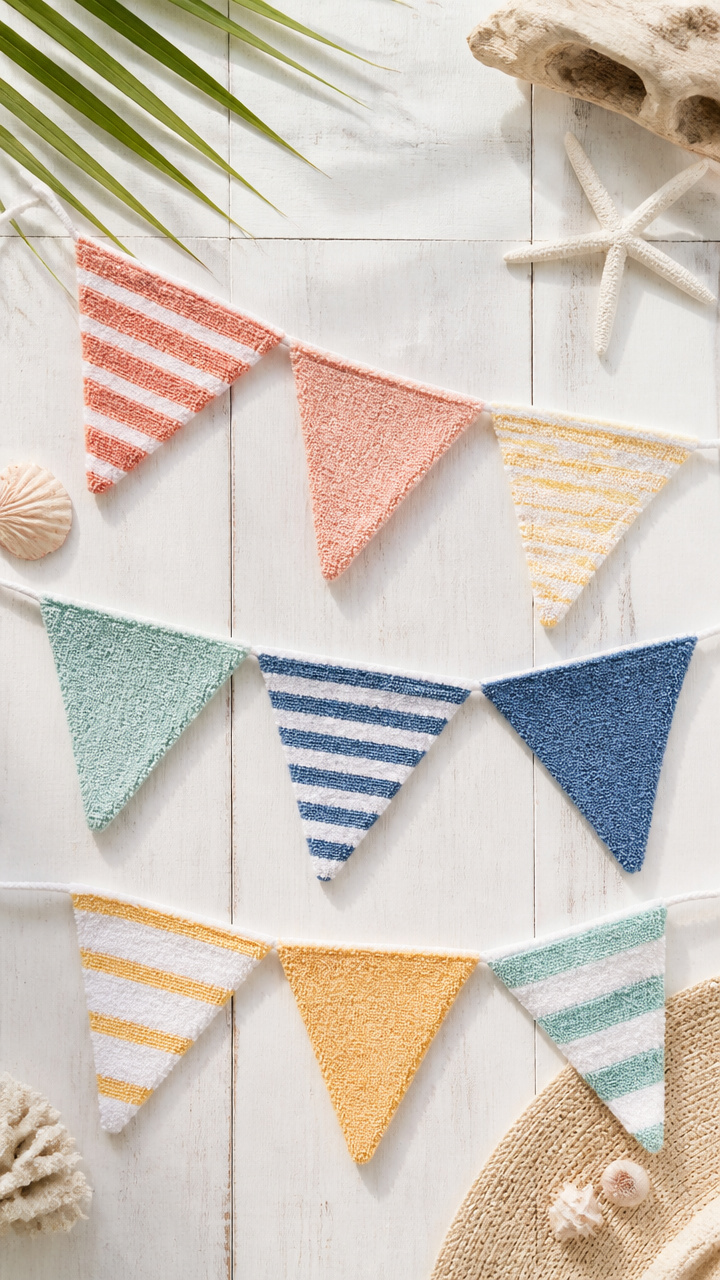
Fray-free fabric triangles wave from a string line like tiny beach banners. These flags use old towels and add festive color to any room.
Materials Needed
- old cotton beach towel
- fabric scissors
- ruler
- white cotton twine 1 meter
- needle
- thread to match towel color
- iron
How to Make It
- Lay the towel flat and cut 8 equilateral triangles measuring 10 cm per side. Use the ruler to guide straight edges.
- Fold over 1 cm along one side of each triangle to create a clean hem. Iron the fold flat to set the crease.
- Thread the needle and sew the hem closed with small running stitches. Knot securely at both ends.
- Space the flags evenly along the twine and sew each one in place through the folded edge. Hang once all are attached.
7. Strawberry Paper Cup Hats
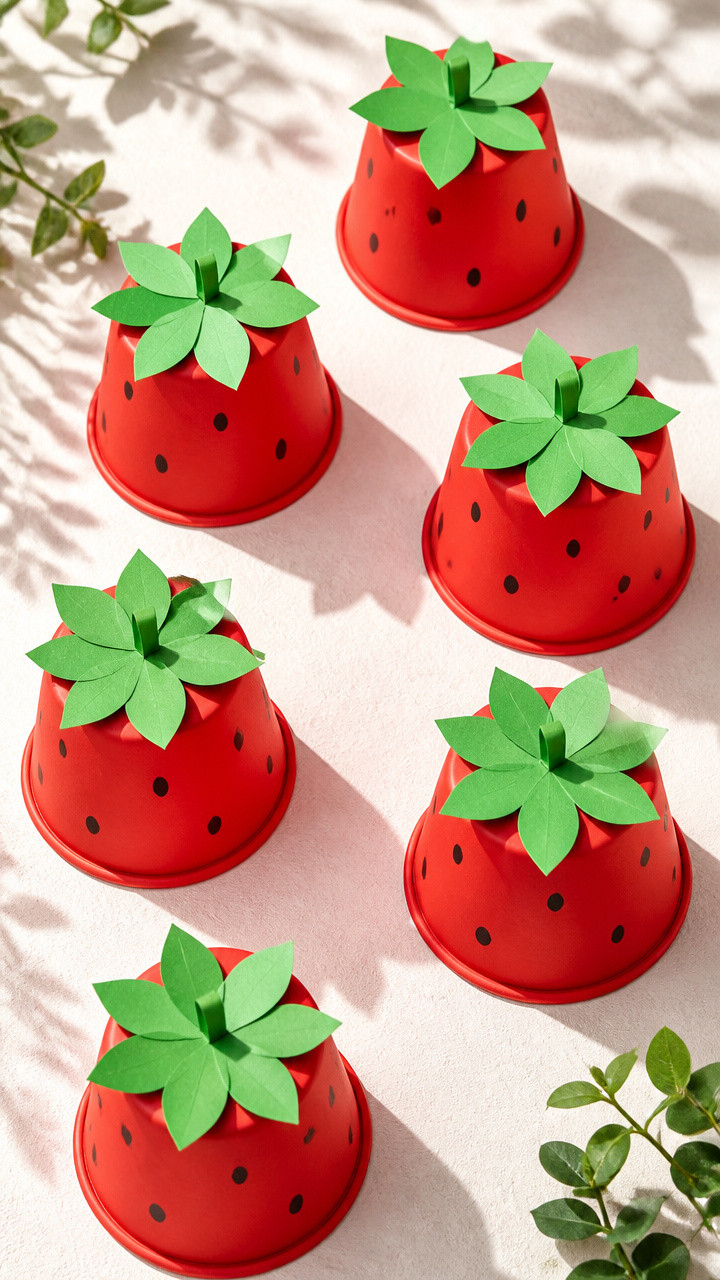
Red cups become juicy strawberry hats with green frilly tops and tiny seeds. Lightweight and silly, these fit snugly on little heads.
Materials Needed
- 1 red paper cup per hat
- green construction paper
- black dot stickers 3 mm
- craft scissors
- hot glue gun with glue sticks
- ruler
- pencil
How to Make It
- Cut the green construction paper into a strip 3 cm wide and 40 cm long. Make small snips every 5 mm along one edge to create fringe.
- Wrap the fringed strip around the rim of the cup so the fringe hangs down. Overlap the ends and glue with hot glue.
- Apply 8 black dot stickers randomly on the red body of the cup to mimic seeds. Space them unevenly for a natural look.
- Let the glue cool completely before placing the hat on a child’s head. Adjust fit by trimming the cup height if needed.
8. Ice Pop Stick Boats
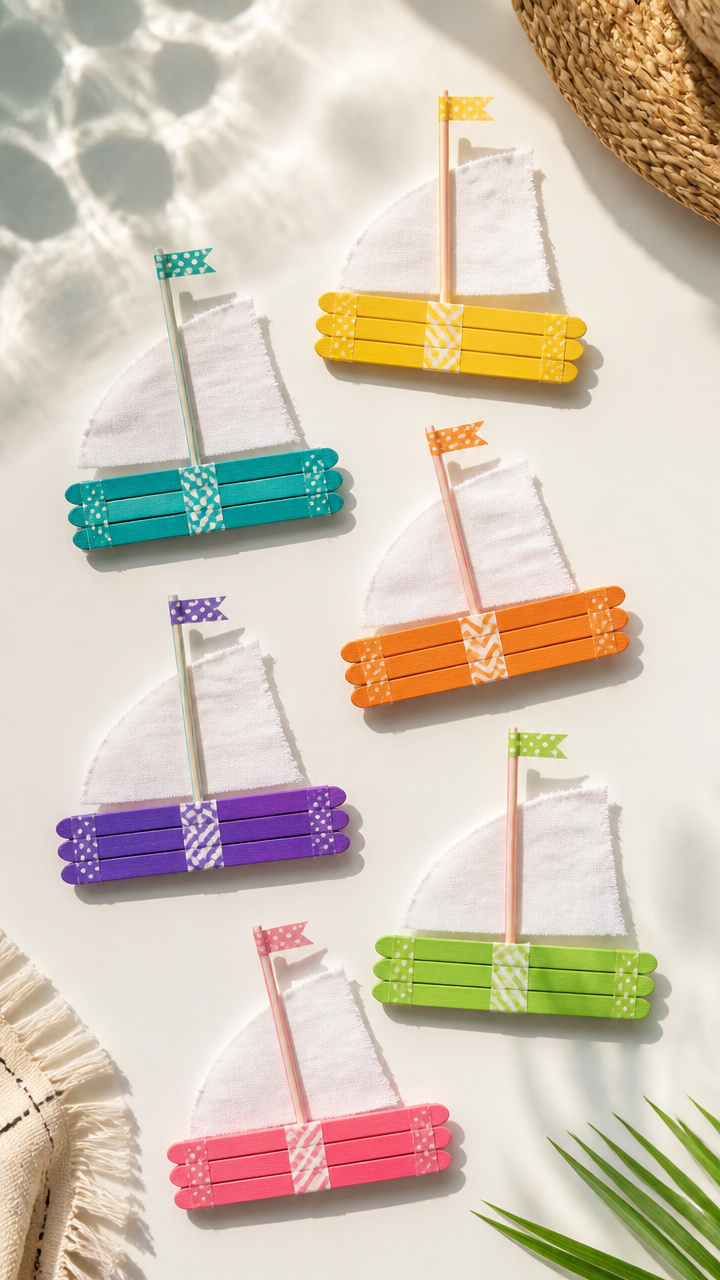
Mini sailboats glide across puddles or bathtubs with real sails and steady hulls. These float thanks to a clever weight balance.
Materials Needed
- 5 flat ice pop sticks per boat
- 1 square of white fabric 10 cm x 10 cm
- plastic drinking straw
- white school glue
- waterproof tape
- scissors
- marker
How to Make It
- Lay three ice pop sticks side by side to form the base. Glue two more sticks crosswise at each end to lock them in place. Let dry for 15 minutes.
- Cut the straw to 8 cm. Position it upright in the center of the base and glue it securely to the middle stick. Hold for 30 seconds.
- Cut the fabric into a rectangle 10 cm x 7 cm. Slide it over the straw to form a sail. Fold the top edge over the straw and tape it shut.
- Place the boat in water after 20 minutes. Push gently to test floatation. Add a tiny pebble under the sail if it tips.
9. Sun Catcher Sand Bottles
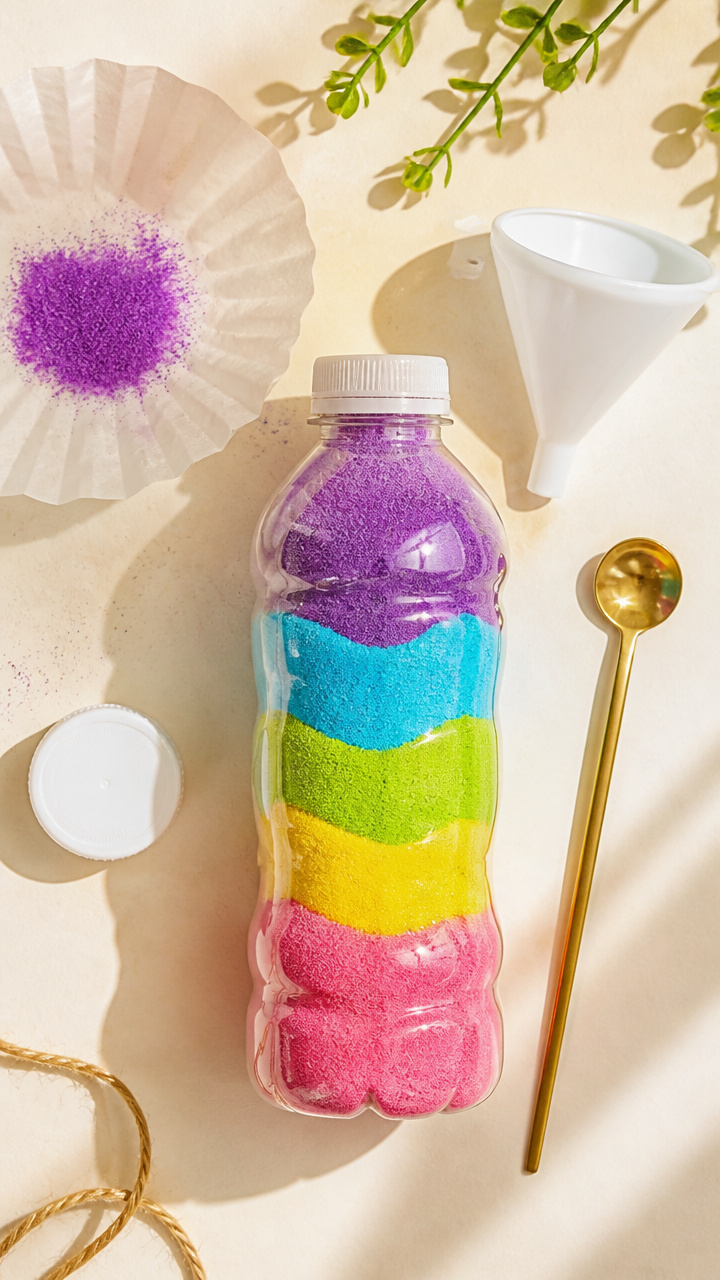
Layered colored sand forms radiant patterns inside narrow bottles. These desktop catchers sparkle when sunlight passes through.
Materials Needed
- 1 clear plastic bottle with lid 200 ml
- colored sand 5 hues, 2 tablespoons each
- funnel small
- spoon
- rubber band
- coffee filter
- flashlight
How to Make It
- Stretch the coffee filter over the bottle opening and secure with a rubber band. This helps control sand flow.
- Spoon one color of sand into the funnel. Let it pass slowly through the filter into the bottle. Tap the side gently to settle.
- Repeat with different colors, adding one layer at a time. Alternate hues for contrast and leave thin gaps between layers.
- Once full to 1 cm below the neck, screw the lid on tightly. Shine a flashlight through the side to see the glowing effect.
10. Flip-Flop Photo Holders
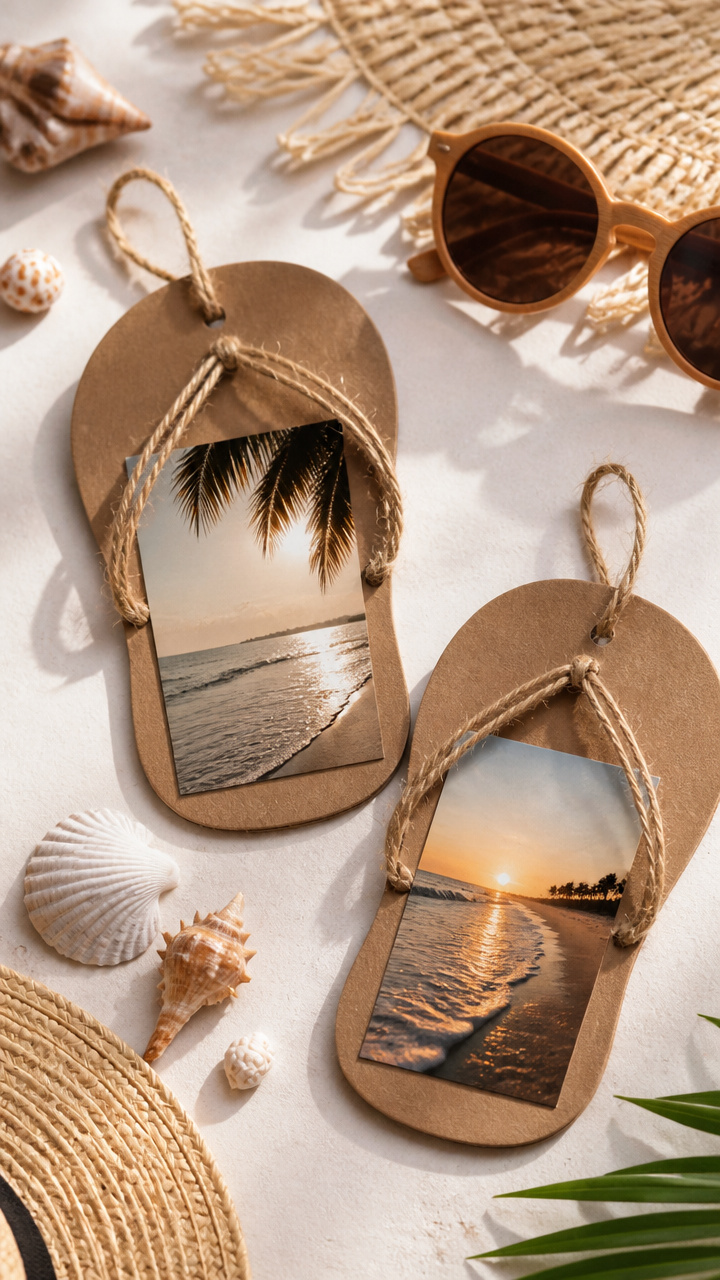
Cardboard sandals hold favorite snapshots with a tilt that shows them clearly. These stand on shelves and desks like tiny displays.
Materials Needed
- 1 sheet brown cardstock
- ruler
- pencil
- scissors
- photo 10 cm x 15 cm
- white school glue
- black marker
How to Make It
- Draw a flip-flop outline on the cardstock using the ruler and pencil: a rectangle 12 cm long and 4 cm wide, with a strap connecting mid-top to mid-bottom.
- Cut out the shape with scissors. Fold the bottom 3 cm upward at a 90-degree angle to create a stand.
- Glue the photo to the front of the upright portion, aligning the bottom with the fold. Press for 20 seconds.
- Draw texture lines on the sole and strap with the black marker to resemble real sandals. Let dry fully before displaying.
11. Water Balloon Paint Bombs
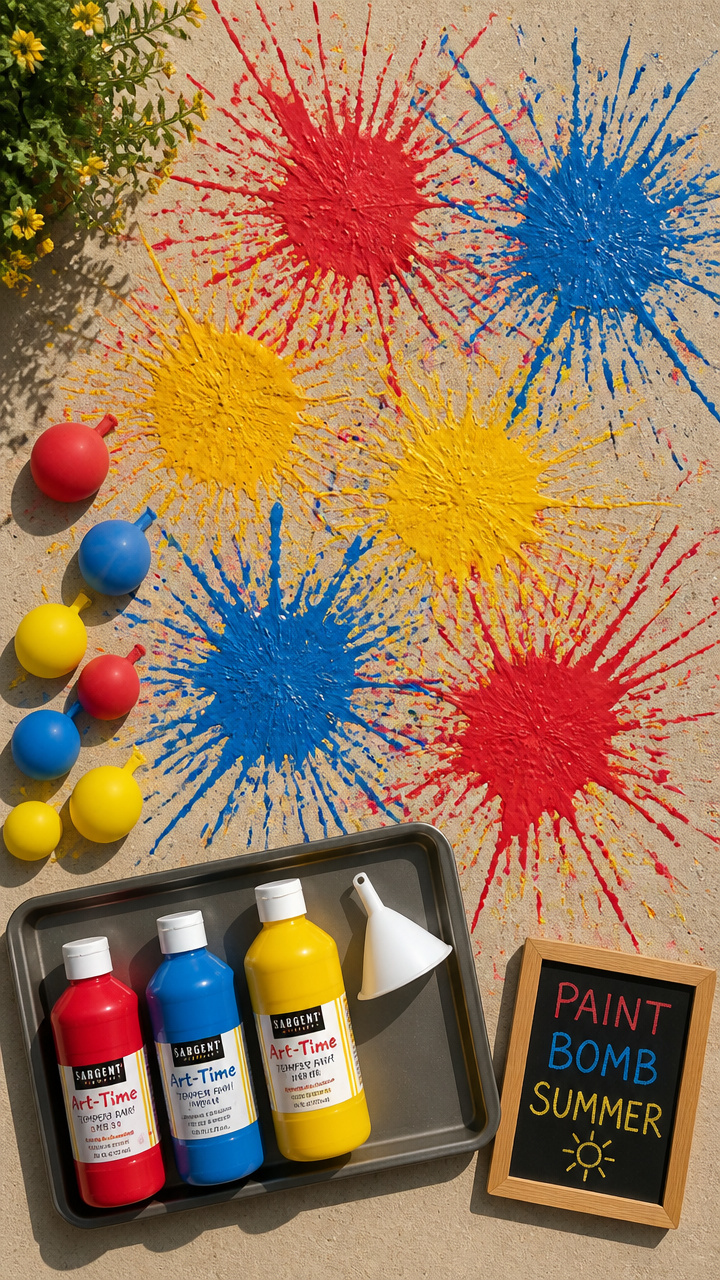
Filled balloons burst with washable paint to create explosive art on pavement. This outdoor activity combines science and creativity.
Materials Needed
- 6 round water balloons
- washable tempera paint red, blue, yellow
- funnel small
- baking tray
- sidewalk or driveway space
- measuring spoon
- latex gloves
How to Make It
- Put on latex gloves. Mix 2 tablespoons of tempera paint with 1 tablespoon of water in a bowl for each color.
- Use the funnel to pour 1 tablespoon of colored paint into each balloon. Stretch the neck carefully to fill without spilling.
- Tie each balloon securely after filling. Place them on the baking tray for transport to the painting area.
- Throw one balloon at a time onto the pavement from shoulder height. Step back quickly and observe the splatter pattern.
12. Starfish Paper Bag Puppets
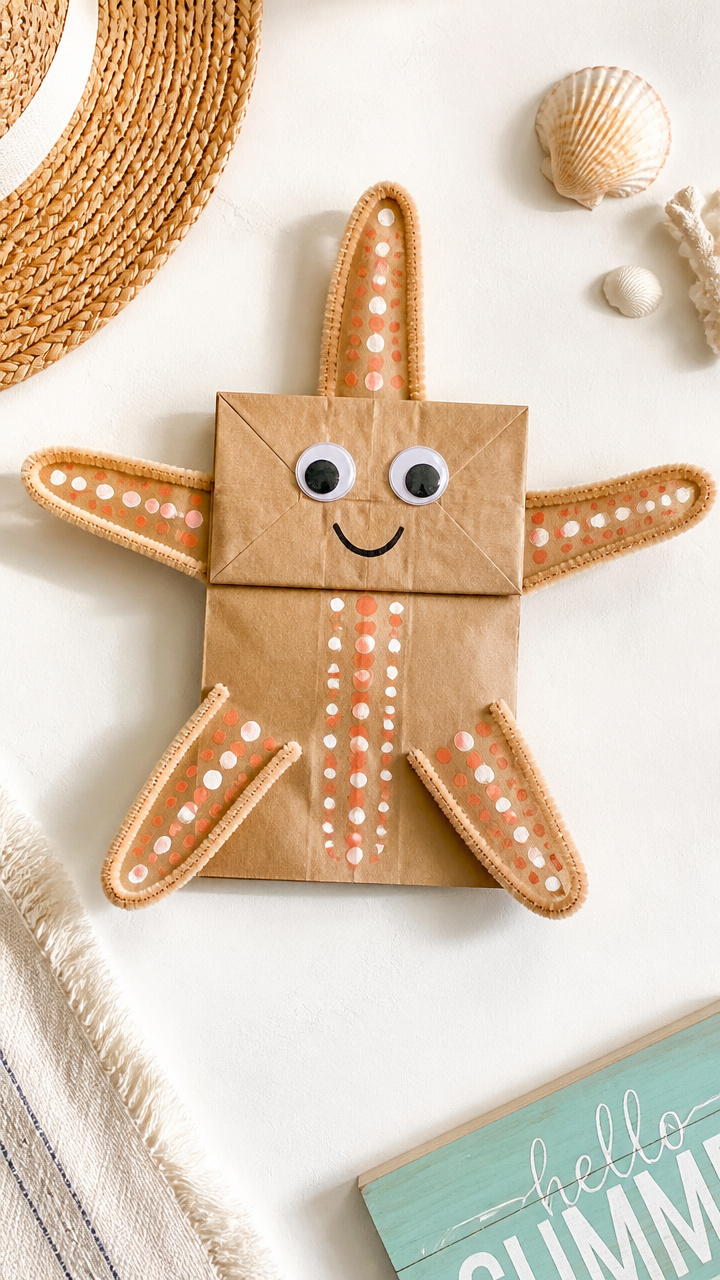
Five-armed ocean creatures come alive with googly eyes and textured bodies. Slipping a hand inside brings instant underwater drama.
Materials Needed
- 1 brown paper lunch bag
- 5 pipe cleaners tan color
- hot glue gun
- 2 googly eyes 8 mm
- tan acrylic paint
- paintbrush size 1
- sponge scrap
How to Make It
- Lay the paper bag flat. Bend each pipe cleaner into a zigzag arm shape and glue one to each side of the bag bottom using hot glue.
- Paint the arms and bag base with tan acrylic paint using the sponge to dab on texture. Let dry for 20 minutes.
- Glue two googly eyes near the top fold of the bag to represent the starfish face. Press gently to adhere.
- Insert your hand into the bag so fingers point downward. Move arms by wiggling wrists during play.
13. Lemon Slice Drink Coasters
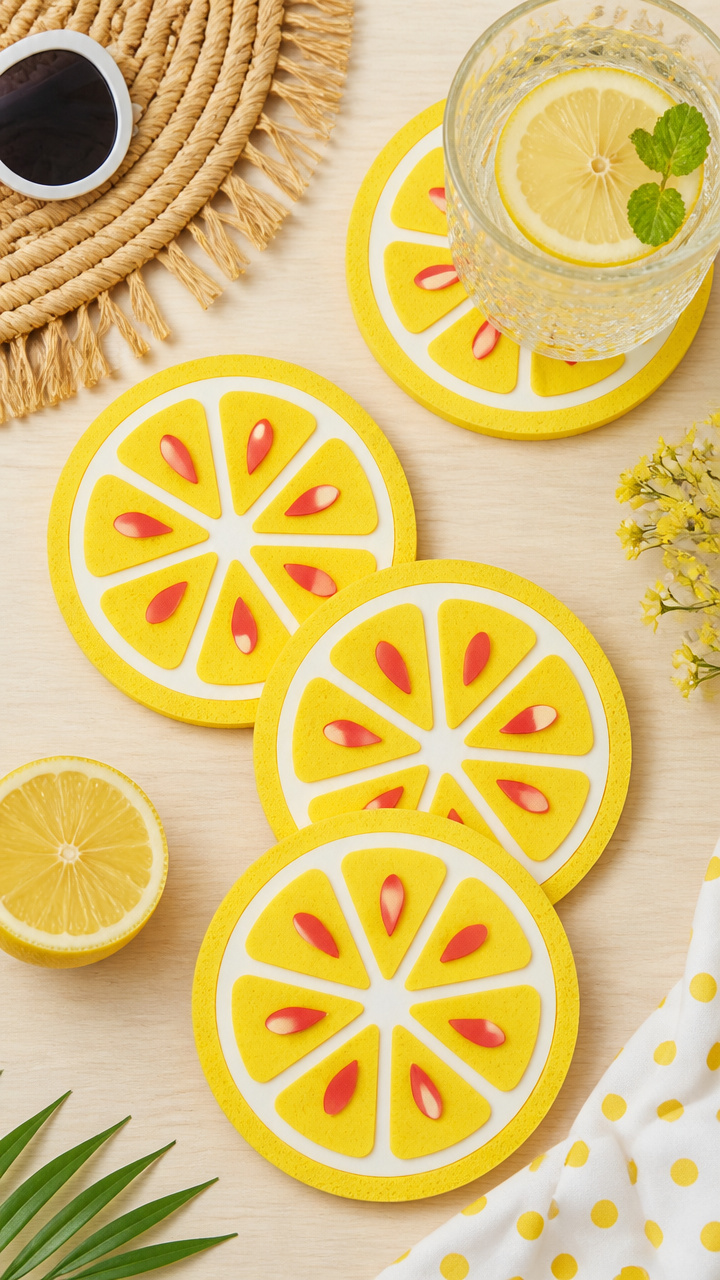
Yellow sponge circles with red seed dots mimic citrus slices and protect tabletops. These absorb moisture and add summer flair.
Materials Needed
- yellow kitchen sponge
- red craft foam sheet
- hole punch
- scissors
- white school glue
- round object 10 cm diameter for tracing
How to Make It
- Trace the round object onto the yellow sponge and cut out 4 circles. Use firm pressure with scissors for clean edges.
- Cut 8 tiny circles from the red craft foam using the hole punch. These will be the lemon seeds.
- Glue two red dots randomly onto each sponge circle. Press and hold for 10 seconds per coaster.
- Let all coasters dry face-up for 30 minutes before placing drinks on them.
14. Hula Hoop Dreamcatchers
Mini dreamcatchers woven on plastic hoops hang in windows with beads and feathers. These capture light and imagination.
Materials Needed
- 1 plastic embroidery hoop 10 cm diameter
- yarn assorted colors 3 meters total
- feathers 3 per dreamcatcher
- beads with large holes 10 per dreamcatcher
- scissors
- glue dot
How to Make It
- Separate the inner and outer hoop. Tie one end of the yarn to the inner hoop with a double knot.
- Loop the yarn around the hoop every 2 cm to create a web, moving clockwise. Pull each loop tight but not stretched.
- After completing three full rounds, thread beads onto the yarn as you continue weaving. Add one feather by tying it to the bottom.
- Secure the end with a knot and hide it under the web. Attach two more feathers with glue dots to the sides.
15. Sunglasses Frame Collages
Empty frames fill with tiny magazine cutouts of summer things. These wearable artworks spark conversation and smiles.
Materials Needed
- 1 pair of inexpensive plastic sunglasses
- old magazines
- scissors
- tacky glue
- paintbrush size 1
- cotton swab
How to Make It
- Remove the lenses from the sunglasses. Cut small images from magazines that show summer items like fruit, waves, or sand.
- Brush a thin layer of tacky glue onto one lens surface. Use the brush to spread it evenly to the edges.
- Arrange the cutouts face-down on the glue, covering the entire lens. Overlap pieces slightly to fill gaps.
- Let dry for 45 minutes. Use a cotton swab dipped in water to wipe excess glue from the frame. Reinsert the collage lens.
You’ve got everything you need to start making right now. Grab a few supplies and invite the kids to join in—the memories will stick as much as the glue.