15 Fun and Easy Summer Cricut Projects for Beginners
Summer is the perfect time to explore your creativity with simple, joyful projects that bring color and personality to your days. With a Cricut machine, you can make handmade items that feel personal and polished, even if you're just starting out.
These beginner-friendly ideas use basic materials and clear steps so you can build confidence while making things you’ll actually use. Each project is designed to be finished in a single afternoon, leaving you with something bright, useful, and uniquely yours.
1. Personalized Beach Tote Bag

Soft canvas tote customized with your name or favorite summer phrase using iron-on vinyl. This bag survives sand, sun, and repeated washes while looking stylish every time.
Materials Needed
- One natural canvas tote bag, 15 x 15 inches
- 12 x 12 inch sheet of white iron-on vinyl
- Cricut cutting mat
- Weeding tool
- EasyPress 2 or household iron
- Cricut StandardGrip mat
How to Make It
- In Cricut Design Space, type your name or short phrase in a bold sans-serif font like Arial Black, sized to 8 inches wide. Mirror the image before loading the mat.
- Load the iron-on vinyl onto the StandardGrip mat, shiny side down, then cut using the custom 'Iron-On' setting for your machine.
- Use the weeding tool to remove excess vinyl around and inside the letters. Peel away the carrier sheet carefully.
- Place the tote flat on a hard surface. Position the design where you want it, then press with the EasyPress at 305°F for 30 seconds. Let cool before peeling the carrier sheet.
2. Sunset Gradient Suncatchers
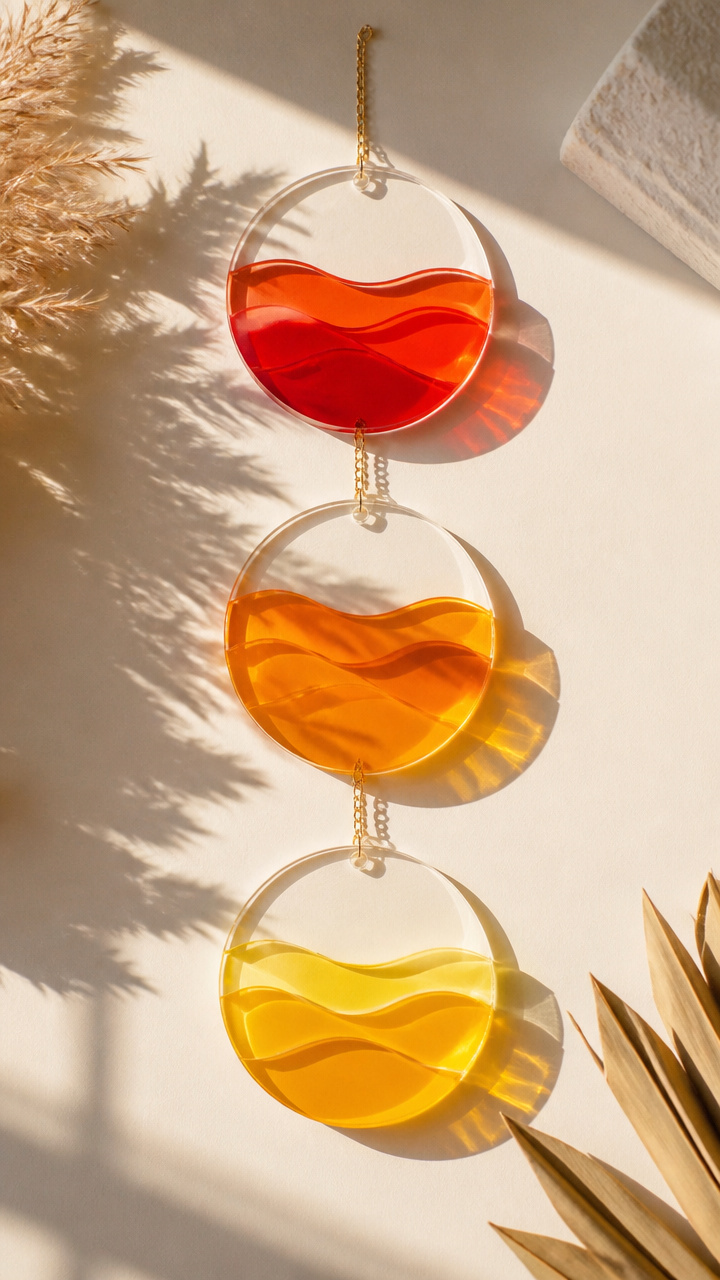
Transparent suncatchers made from colored adhesive film that catch light in warm pinks, oranges, and yellows. Hang them in windows to cast colorful shadows all afternoon.
Materials Needed
- 6 x 9 inch sheets of red, orange, and yellow adhesive-backed window film
- Clear 4-inch diameter acrylic discs, 3 pieces
- Cricut Fine Point blade
- Scrap paper for backing
- X-Acto knife
How to Make It
- In Design Space, create three concentric circle outlines: 3.8, 3.5, and 3.2 inches in diameter. Arrange them to form a target shape.
- Cut each color from its respective film sheet using the 'Adhesive-Backed Window Film' setting. Use the scrap paper to back each piece after cutting.
- Layer the red circle on the outer edge, orange in the middle ring, and yellow in the center. Trim any overhang with the X-Acto knife.
- Press the layered design firmly onto one side of the acrylic disc. Repeat for two more suncatchers using the same layout.
3. Lemonade Stand Vinyl Sign
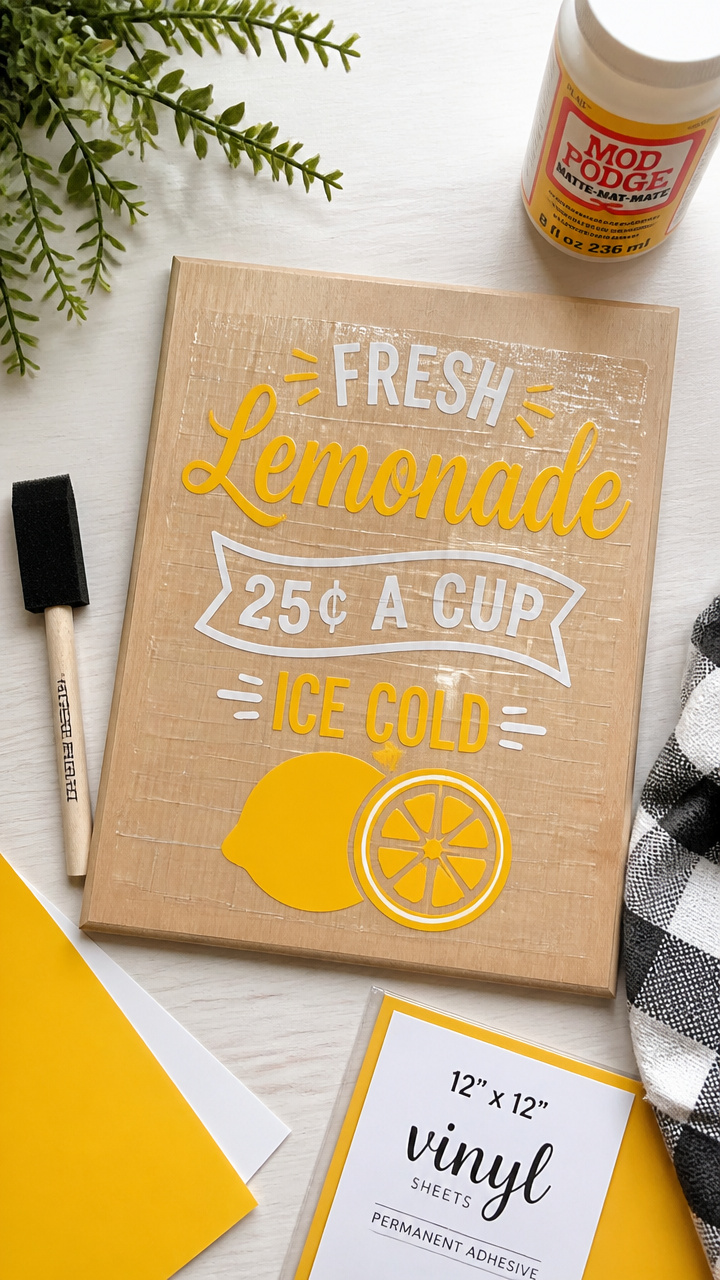
A cheerful wooden sign with hand-cut lemon and straw graphics plus playful lettering. Perfect for front porches, picnics, or photo backdrops.
Materials Needed
- One 8 x 10 inch unfinished wood plaque
- Yellow and white adhesive vinyl, 12 x 12 inch sheets
- Foam brush
- Matte Mod Podge
- Transfer tape, 12 inch roll
How to Make It
- In Design Space, upload or draw a lemon slice with a straw. Add the word 'LEMONADE' in a rounded script font below, sized to fit the plaque width.
- Cut the design from yellow vinyl and details from white vinyl using the 'Vinyl' setting. Weed away excess material.
- Apply transfer tape over the weeded design. Burnish gently with your fingers, then lift from the mat.
- Center the design on the wood plaque. Press firmly from center outward, then slowly peel off the transfer tape. Seal with one coat of Mod Podge using the foam brush.
4. Flip-Flop Sole Grips
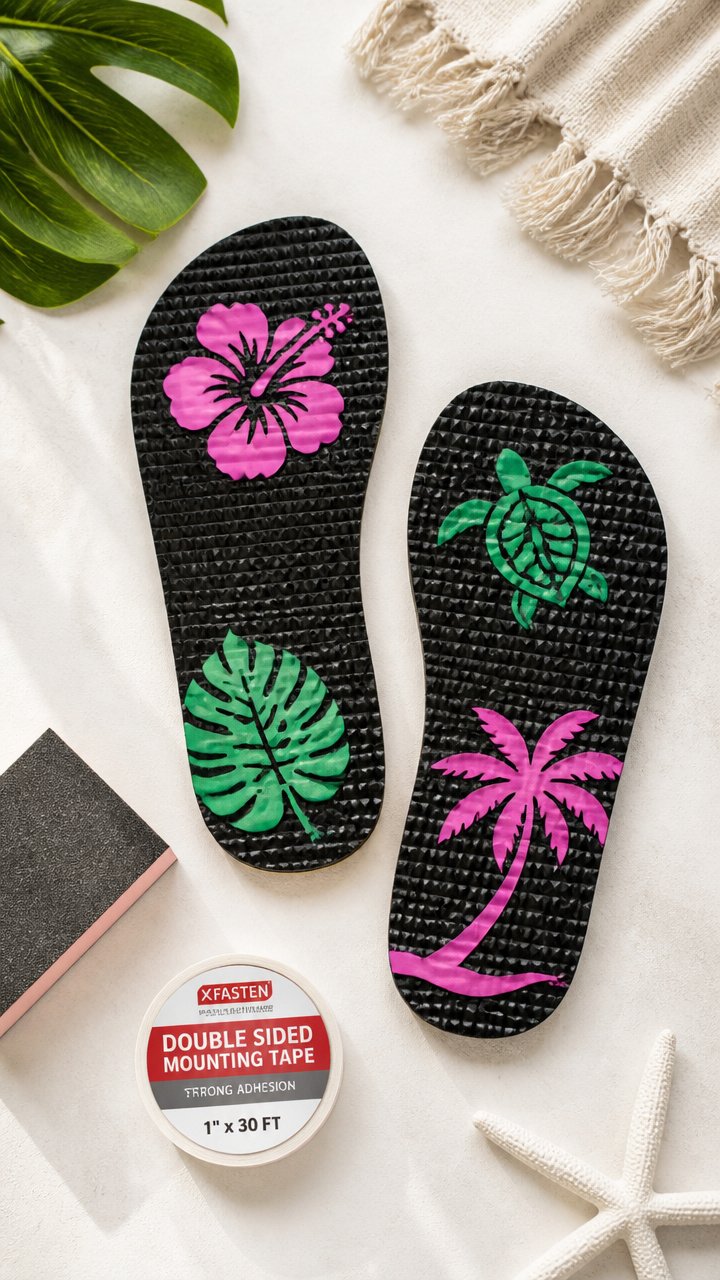
Custom rubber grips cut from black EVA foam and decorated with tiny flamingos or pineapples. Slide them into sandals to keep feet from slipping.
Materials Needed
- Black EVA foam sheet, 10 x 12 inches, 2mm thick
- Pink and green adhesive vinyl scraps
- Cricut Deep Point blade
- Strong double-sided tape
- Sandpaper block
How to Make It
- Trace the sole of your flip-flop onto printer paper, then scan into Design Space. Size the image to match exactly and cut from EVA foam using the Deep Point blade and 'EVA Foam' setting.
- Cut small flamingo shapes from pink vinyl and palm trees from green vinyl. Weed carefully with tweezers.
- Attach each vinyl design to the top surface of the EVA sole using transfer tape, pressing firmly.
- Lightly roughen the bottom of the sole with sandpaper, then apply double-sided tape. Insert into your sandal and press down hard.
5. Reusable Ice Pack Wrap
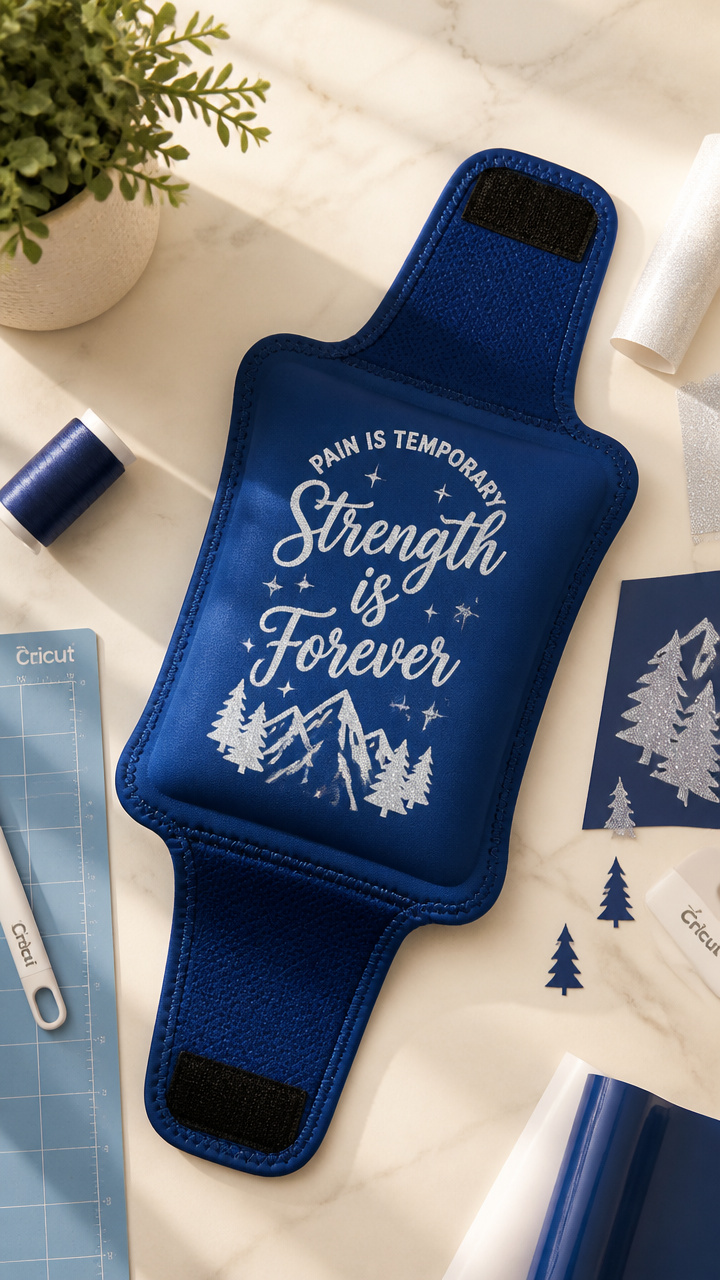
A soft neoprene wrap with a fun print that holds a gel pack securely. Ideal for sprains, cooling drinks, or naptime headaches.
Materials Needed
- Blue neoprene fabric, 9 x 12 inches
- White glitter iron-on vinyl
- Cricut Fabric Grip mat
- Bonded nylon thread
- Sewing machine
How to Make It
- Design a row of evenly spaced stars in Design Space, 7 inches wide. Mirror the image and cut from glitter iron-on vinyl using the 'Iron-On' setting and StandardGrip mat.
- Weed the stars and place them on the neoprene. Press with an EasyPress at 270°F for 15 seconds. Let cool.
- Fold the neoprene in half lengthwise, right sides together. Sew along both long edges with a 1/4 inch seam using the sewing machine.
- Turn the tube right side out. Insert a store-bought gel pack to test fit. The wrap should snugly hold it in place.
6. Pool Float Name Tags

Bright waterproof labels with names that stick to inflatables using cling vinyl. No more mix-ups when everyone brings a flamingo float.
Materials Needed
- Clear cling vinyl, 12 x 12 inch sheet
- Black permanent marker
- Scissors
- Cricut Joy Smart Label Roll if desired
- Lint-free cloth
How to Make It
- In Design Space, type each guest’s name in a bubbly font like Comic Sans MS, 3 inches tall. Cut individual labels using the 'Cling Vinyl' setting.
- If using a Smart Label Roll, load it directly. Otherwise, trim the mat-cut label to size with scissors.
- Clean the float surface with a lint-free cloth. Peel the backing and smooth the label on without bubbles.
- Use the black marker to trace the edge of each letter for extra visibility in sunlight.
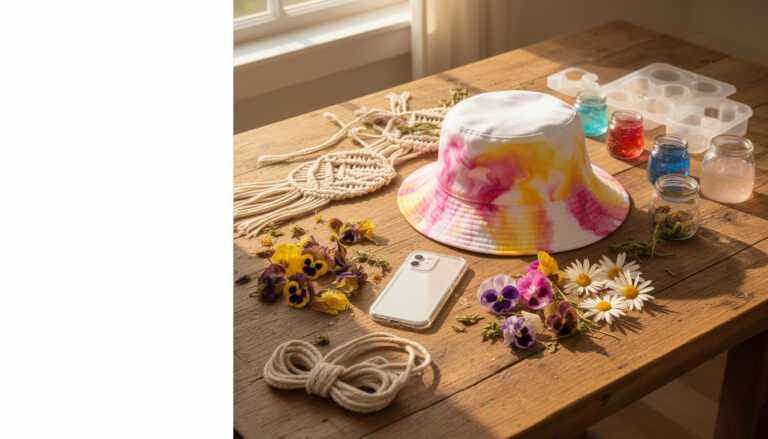
7. Sun Hat with Vinyl Brim
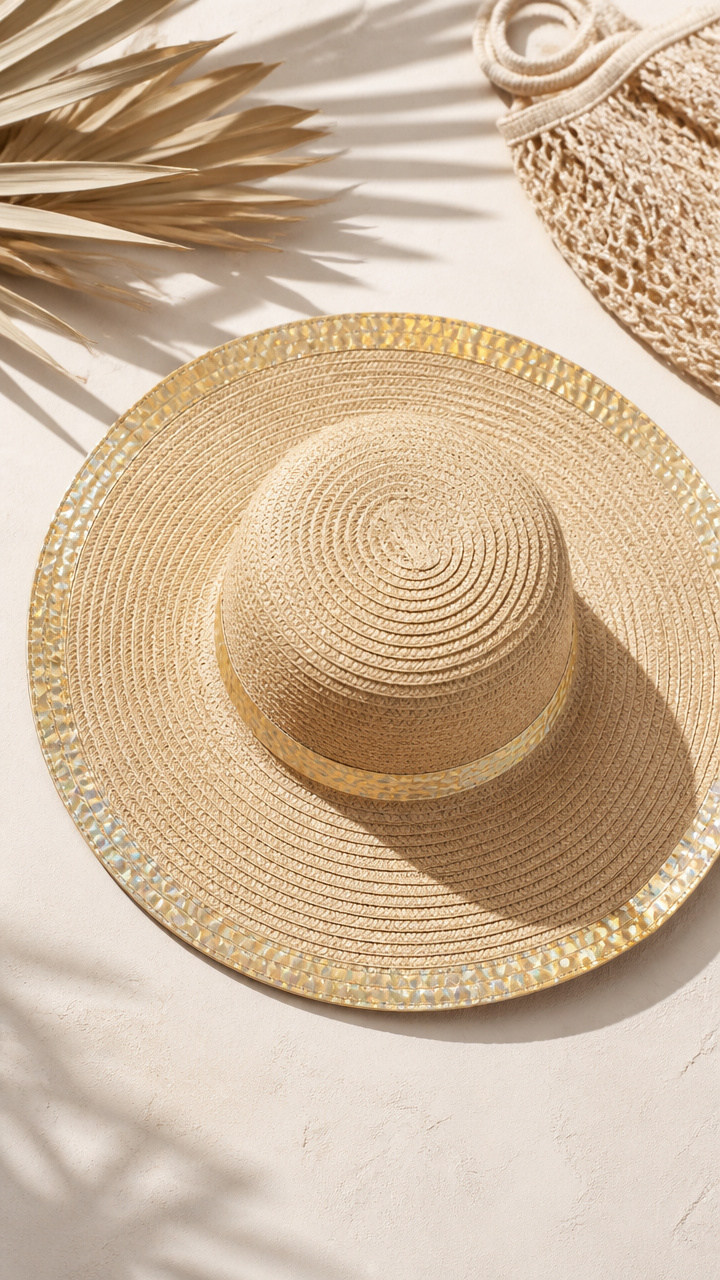
A lightweight cotton hat updated with a sunbeam-patterned brim using heat-transfer vinyl. Blocks glare and adds instant style.
Materials Needed
- Straw sun hat with wide brim
- Gold holographic iron-on vinyl
- Ruler
- Parchment paper
- EasyPress 2
How to Make It
- Measure the outer edge of the brim. In Design Space, create a half-circle border of rays, 28 inches wide and 2 inches deep. Mirror and cut using 'Iron-On' setting.
- Weed each ray carefully. Place the design on the underside of the brim, aligning the straight edge with the hat’s edge.
- Cover with parchment paper. Press with the EasyPress at 305°F for 20 seconds, applying firm pressure.
- Peel the carrier sheet while warm. Let the hat cool completely before wearing.
8. Picnic Napkin Rings

Stiff fabric rings with mini sandwich or watermelon designs. Keep cloth napkins tidy at outdoor meals with a touch of humor.
Materials Needed
- Red and green felt sheets, 9 x 12 inches
- White adhesive vinyl
- Rotary cutter
- Self-healing mat
- Fabric glue
How to Make It
- In Design Space, draw a 1.5 inch tall watermelon slice and a tiny grilled cheese sandwich. Cut from white vinyl using the 'Vinyl' setting.
- Weed each shape. Apply transfer tape and position one on each 2 x 6 inch strip of red and green felt.
- Press gently to adhere, then remove the tape. Add a drop of fabric glue behind each vinyl piece for durability.
- Wrap each strip around a napkin bundle and tie snugly. Let glue dry for 20 minutes before use.
9. Outdoor Lantern Labels
Weatherproof labels with flame icons and safety warnings for battery-powered lanterns. Helps kids know which ones are safe to touch.
Materials Needed
- Clear adhesive vinyl, 6 x 9 inch sheet
- Black inkjet printer (for test prints)
- Laser-cut stencil sheet optional
- Lint roller
- Craft knife
How to Make It
- In Design Space, type 'KID-SAFE LANTERN' in bold letters and add a small flame symbol below. Size to 4 inches wide. Cut from clear vinyl using 'Vinyl' setting.
- Clean the lantern surface with a lint roller. Peel the backing and align the label on the base.
- Smooth from center outward to avoid bubbles. Use the craft knife to trim any excess at the edges.
- Repeat for additional lanterns, placing each label in the same orientation for consistency.
10. Beach Towel Monograms
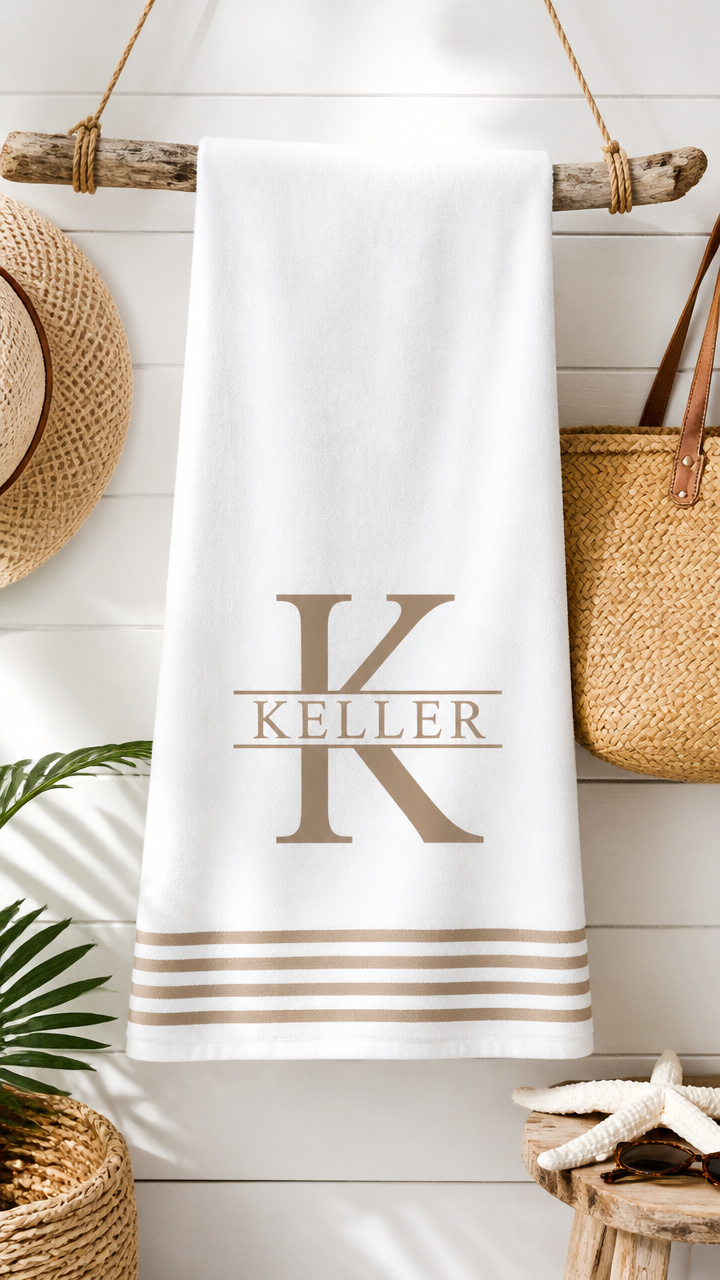
Initials cut from sand-colored iron-on vinyl and applied to terry cloth towels. Lets everyone grab their own towel without confusion.
Materials Needed
- White beach towel, 30 x 60 inches
- Tan iron-on vinyl
- Cricut StrongGrip mat
- Clothes dryer
- Hanging rod
How to Make It
- In Design Space, type your chosen initial in a serif font like Georgia, sized to 6 inches tall. Mirror and cut using 'Iron-On' setting.
- Weed the excess vinyl, then press the design onto the lower corner of the towel using an EasyPress at 305°F for 35 seconds.
- Let cool, then peel the carrier sheet. Tumble the towel in the dryer on low for 10 minutes to set the bond.
- Hang the towel by the rod to air dry fully before first use.
11. Water Bottle Time Tracker
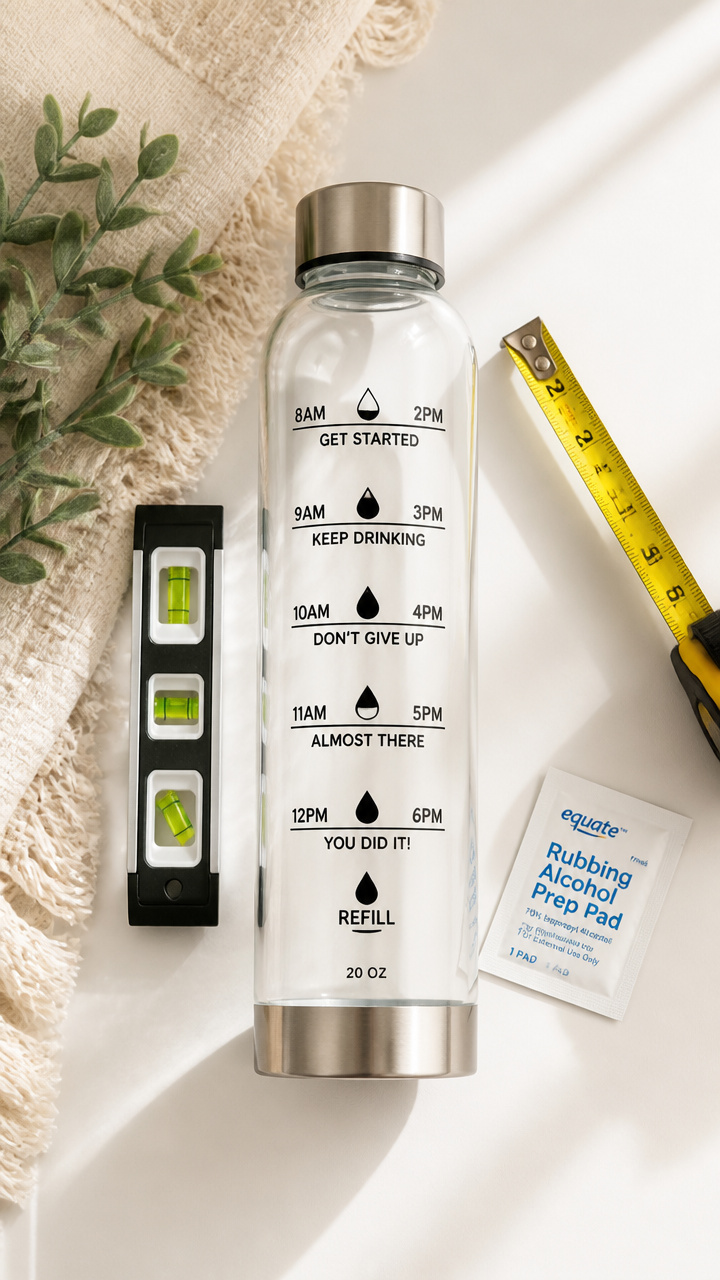
A labeled reusable bottle with hourly marks and motivational phrases like 'Hydrate Now'. Encourages steady drinking throughout the day.
Materials Needed
- Clear 20 oz stainless steel water bottle
- Black permanent vinyl, 12 x 12 inch sheet
- Measuring tape
- Level tool
- Rubbing alcohol wipe
How to Make It
- In Design Space, create horizontal lines spaced 1 inch apart down the bottle's height. Add text markers like '9 AM', '10 AM', up to '6 PM'.
- Cut the design from black vinyl using the 'Vinyl' setting. Weed each line and label carefully.
- Clean the bottle with rubbing alcohol. Wrap measuring tape around to mark placement, then use the level to align the first line.
- Apply transfer tape to the weeded design. Position it vertically and press firmly. Remove tape slowly at a low angle.
12. Kids’ Sidewalk Chalk Holder
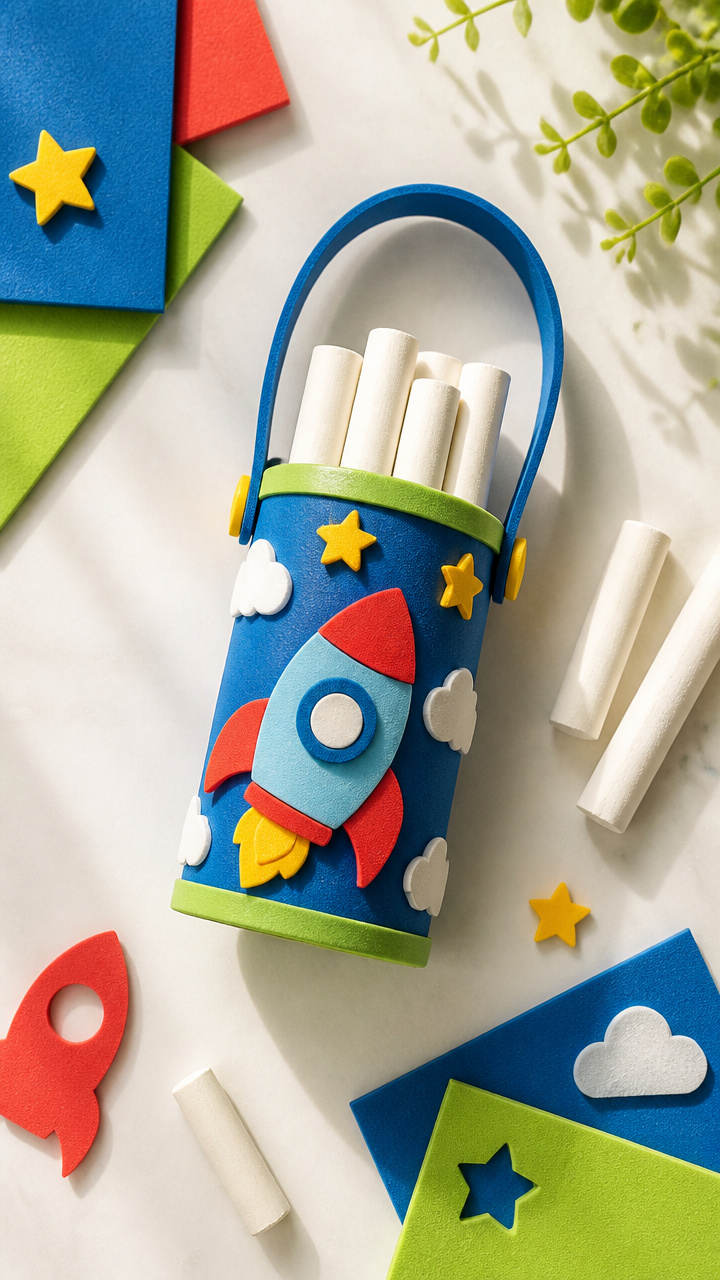
Colorful foam tubes that grip standard chalk sticks and prevent little hands from getting dusty. Made from soft craft foam.
Materials Needed
- Assorted colors of craft foam sheets
- White school chalk, 6 sticks
- Hot glue gun
- Chalk-sized cardboard tube
- Scissors
How to Make It
- Trace the cardboard tube onto foam and cut 6 circles. Then cut one slit through the center of each.
- Slide each circle onto a chalk stick, then fan the petals outward. Glue the base to secure the shape.
- Wrap a 1.5 x 4 inch foam rectangle around the chalk midsection. Overlap ends and glue shut.
- Let glue cure for 5 minutes. Hand them to kids for clean, comfortable drawing on driveways.
13. Sunscreen Reminder Sticker Sheet
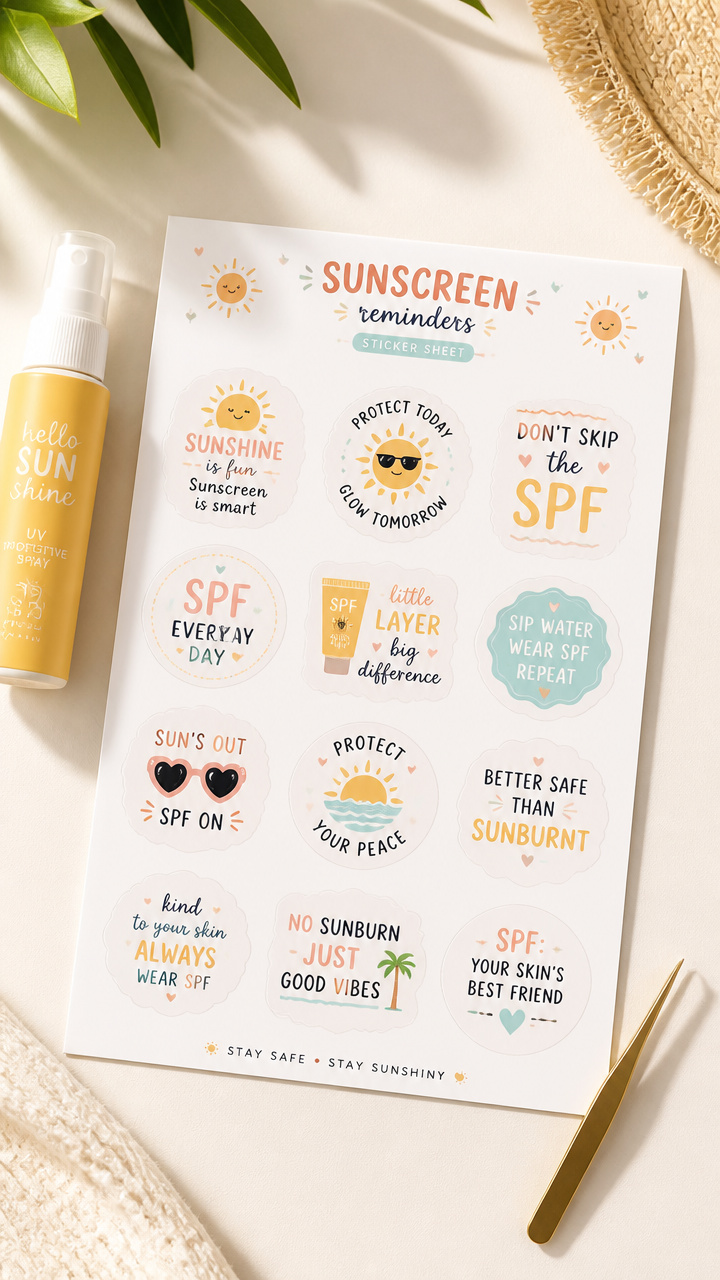
A sheet of repositionable stickers with faces wearing hats and sunglasses. Stick one on your mirror each morning as a visual cue.
Materials Needed
- Removable white sticker paper, 8.5 x 11 inch sheet
- Cricut Joy with Smart Materials capability
- Mini UV protective spray
- Tweezers
How to Make It
- In Design Space, arrange six cartoon faces with hats and shades, each 1 inch wide. Add speech bubbles saying 'Don’t forget SPF!'.
- Load the sticker sheet into the Joy without a mat. Cut using the 'Sticker Paper' setting and default pressure.
- Weed each sticker with tweezers. Lightly spray the sheet with UV protectant and let dry for 10 minutes.
- Peel one sticker daily and place it on your bathroom mirror. It removes cleanly without residue.
14. Fruit Infuser Water Jar Decal
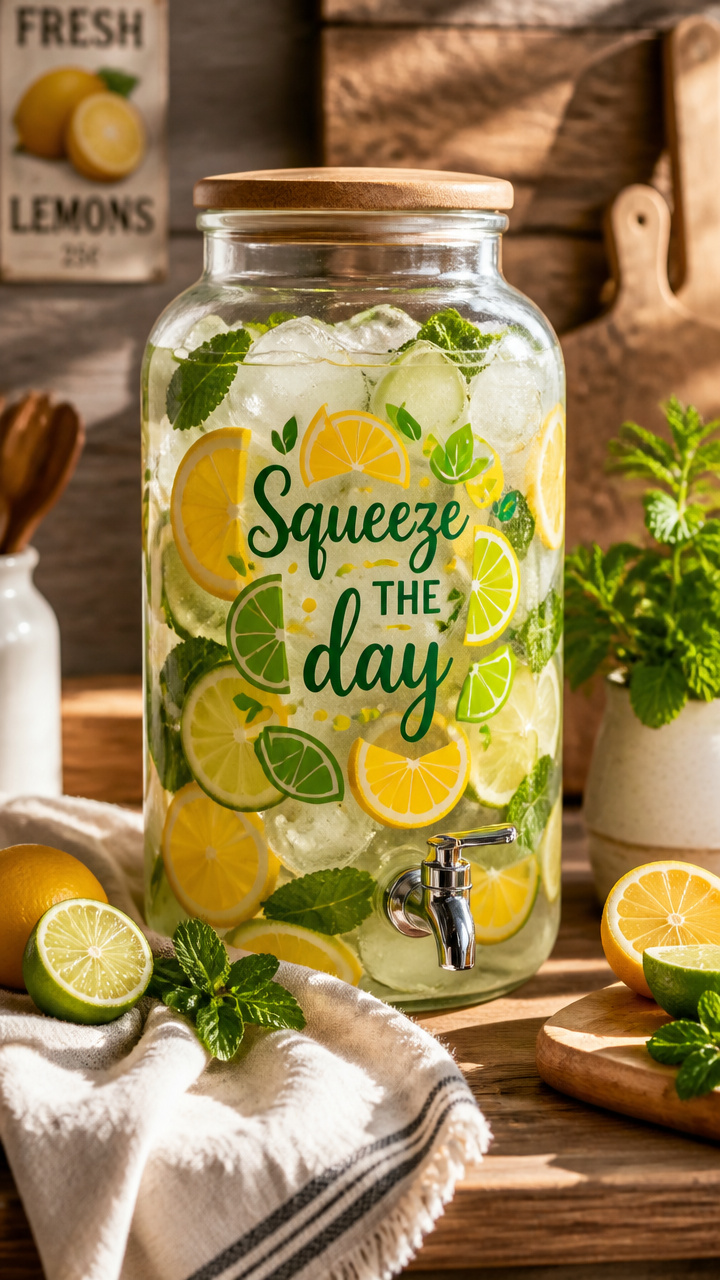
A large circular decal showing lemon, cucumber, and mint leaves arranged around the word 'INFUSED'. Sticks to glass pitchers.
Materials Needed
- Clear adhesive vinyl, 12 x 12 inch sheet
- Glass water pitcher, 64 oz
- Spray bottle with soapy water
- Squeegee tool
- Paper towel
How to Make It
- In Design Space, arrange lemon slices, cucumber rounds, and mint leaves in a circle around the word 'INFUSED' in lowercase. Size to 8 inches diameter.
- Cut the design from clear vinyl using the 'Vinyl' setting. Weed all inner and outer sections carefully.
- Spritz the pitcher with soapy water. Apply transfer tape to the design, then press it on, sliding into place with the squeegee.
- Wipe away excess solution with a paper towel. Let sit 10 minutes before filling with water and fruit.
15. DIY Sand-Free Beach Mat
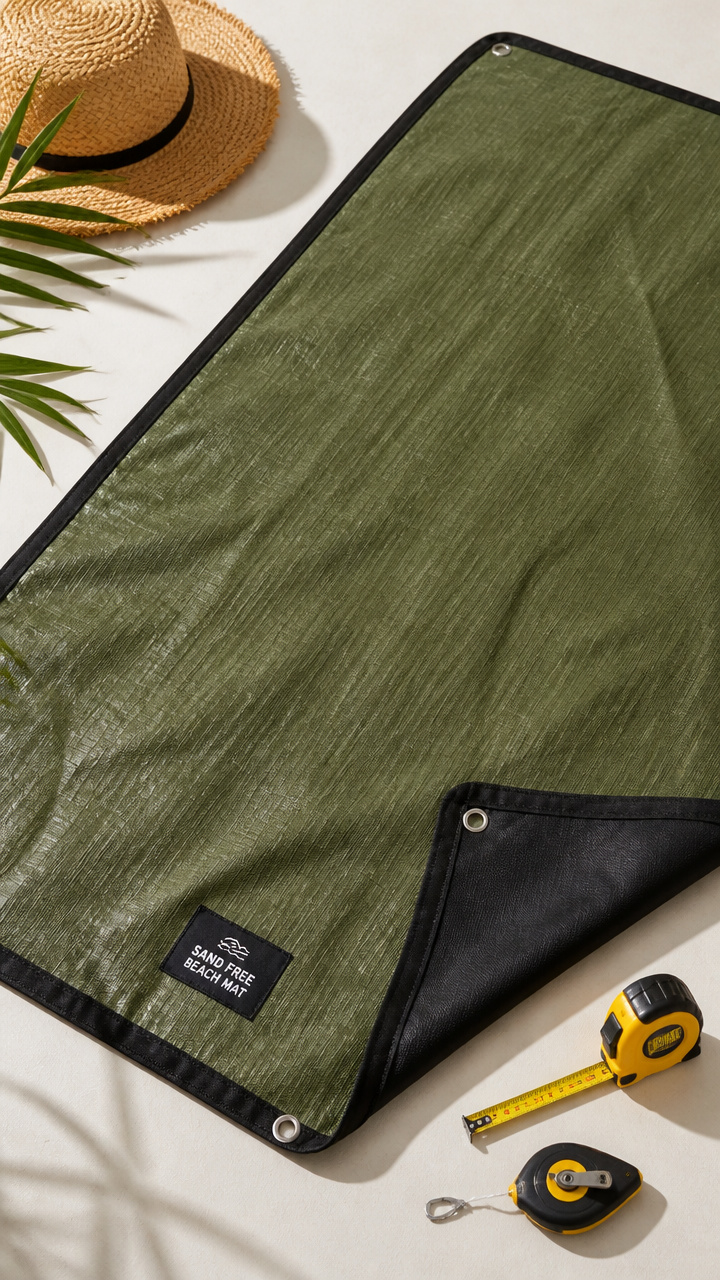
A large tarp with a central grid pattern cut from black vinyl to trap sand beneath. Step on it and shake your feet clean.
Materials Needed
- Olive green poly tarp, 5 x 7 feet
- Black marine-grade vinyl, 12 x 12 inch sheet
- Chalk line tool
- Cricut Knife Blade
- Tape measure
How to Make It
- Lay the tarp flat. Use the tape measure to mark a 3 x 3 foot square in the center. Snap a chalk line at 6 inch intervals across it.
- In Design Space, create a 36 x 36 inch grid of 6 x 6 inch squares. Cut from black vinyl using the Knife Blade and 'Heavy Iron-On' setting.
- Weed each square outline. Transfer the full grid using large transfer tape, aligning with the chalk lines.
- Press firmly with your palms. Step on the mat with sandy feet, then lift and shake the tarp to dump trapped sand below.
You’ve got everything you need to start today with just a few supplies and a spark of inspiration. Let your Cricut help you make summer brighter, one simple project at a time.