15 Easy Letter K Crafts for Preschool Alphabet Learning Activities
Learning the alphabet should feel like play, not work. These letter K crafts turn simple materials into joyful moments that build recognition, fine motor skills, and confidence.
Each idea is made for little hands and big imaginations. You’ll find textures, movements, and surprises that make the letter K stick—without flashcards or drills.
1. K Is for Kite Painting
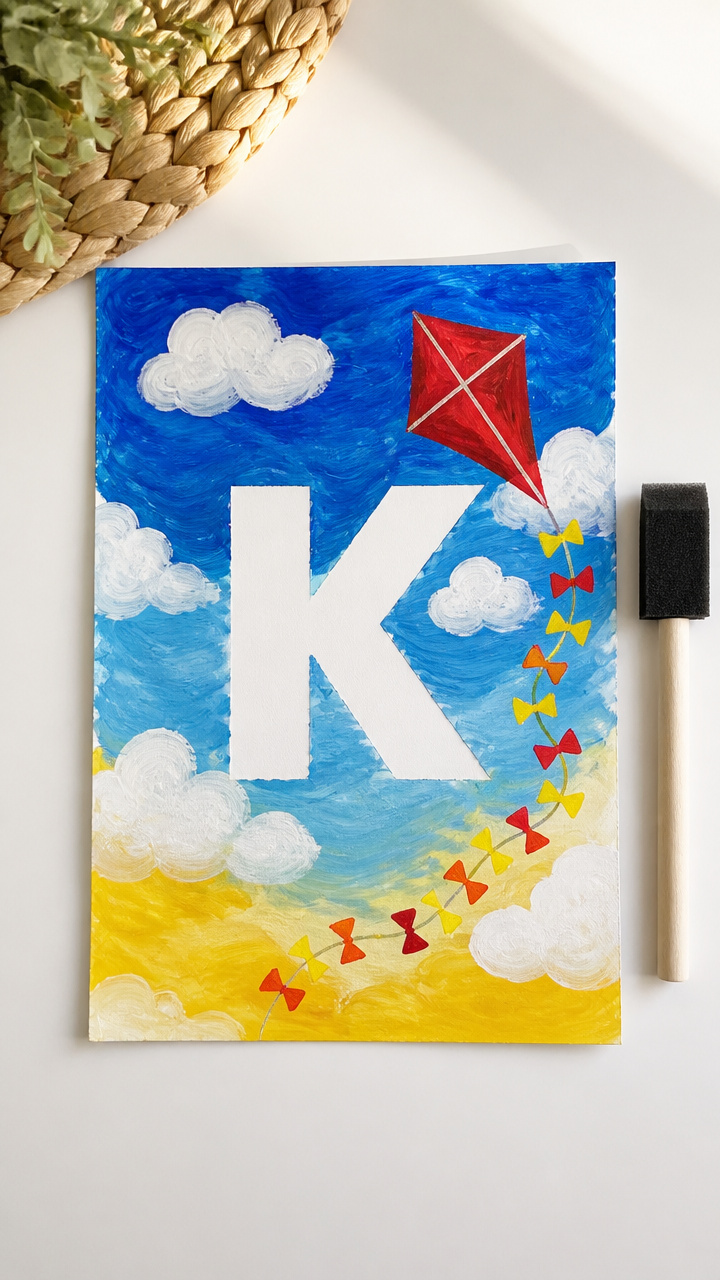
Bright swirls of color on a kite shape help children connect the letter K with motion and creativity. This wet-on-wet paint method gives smooth blending without frustration.
Materials Needed
- Letter K stencil (6 inches tall)
- A4 white cardstock
- Blue acrylic paint
- Yellow acrylic paint
- Red acrylic paint
- Foam brush (1 inch wide)
- Popsicle stick
- Glue stick
How to Make It
- Place the letter K stencil in the center of the cardstock and trace lightly with a pencil.
- Use the foam brush to fill the inside of the K with blue paint, covering all areas evenly.
- While the blue is still wet, add small dabs of yellow and red paint along the edges to blend into the blue.
- Let the paint dry completely for 20 minutes on a flat surface.
- Glue the popsicle stick vertically to the bottom of the K to look like a kite tail.
2. Kangaroo Paper Bag Puppet
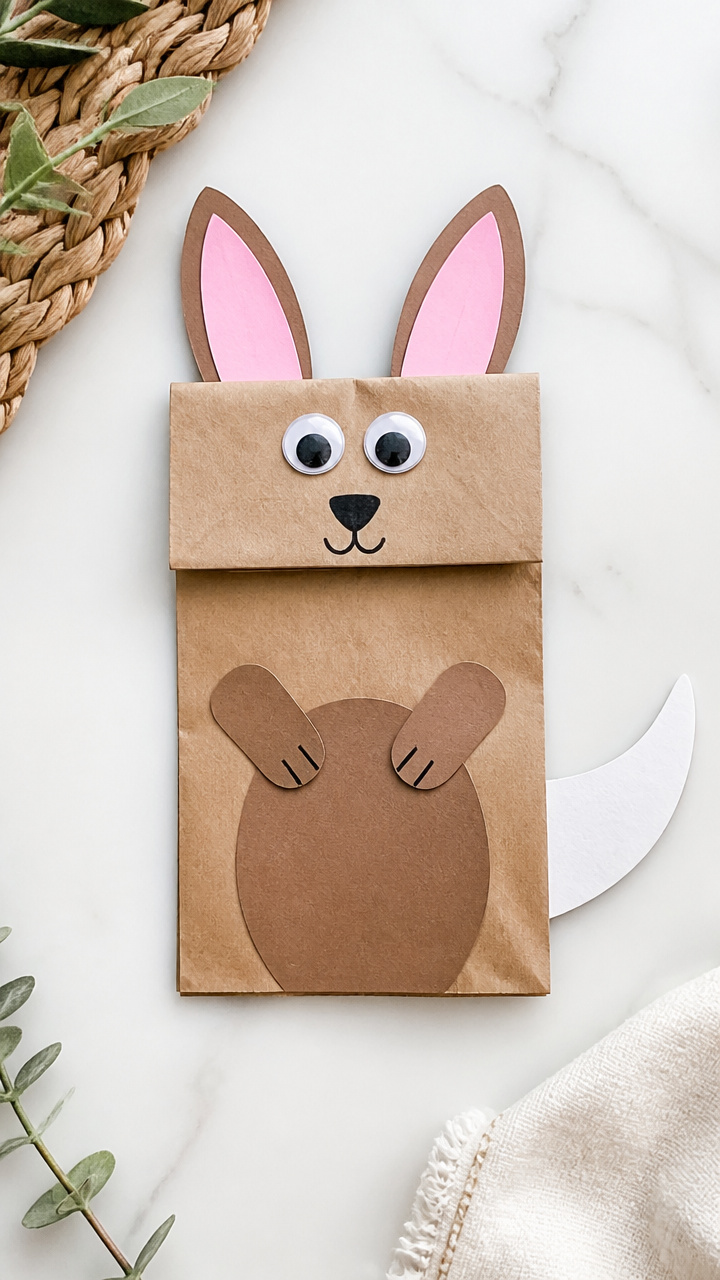
A bouncy kangaroo made from a lunch bag turns storytelling into a letter K adventure. Kids love moving the arms and mouth while saying words that start with K.
Materials Needed
- Brown paper lunch bag
- Pink construction paper (6×6 inch square)
- White craft foam sheet
- Googly eyes (12 mm, 2 pieces)
- Black marker
- Scissors
- Glue stick
How to Make It
- Cut two oval ears from the brown paper bag flap and glue them inside the top corners of the bag's front.
- Cut a small pouch shape from pink paper and glue it to the center of the bag’s front, just below the middle.
- Cut two tiny feet from white foam and glue them to the bottom edge of the bag.
- Add googly eyes above the pouch and draw a smile underneath with the black marker.
3. K Is for Key Stamp Art

Foam keys stamped in rows create a bold pattern that doubles as letter practice. The stamping action builds hand strength and rhythm.
Materials Needed
- Green foam sheet
- Pencil
- Scissors
- Black ink pad
- A4 white drawing paper
- Glue stick
How to Make It
- Draw a large lowercase k on the green foam and cut it out carefully with scissors.
- Press the foam k firmly onto the ink pad until the entire surface is coated.
- Stamp the k onto the drawing paper five times in a row, leaving space between each.
- Let the ink dry for 5 minutes, then glue the paper into a folder or display it flat.
4. Kazoo Sound Shaker Craft
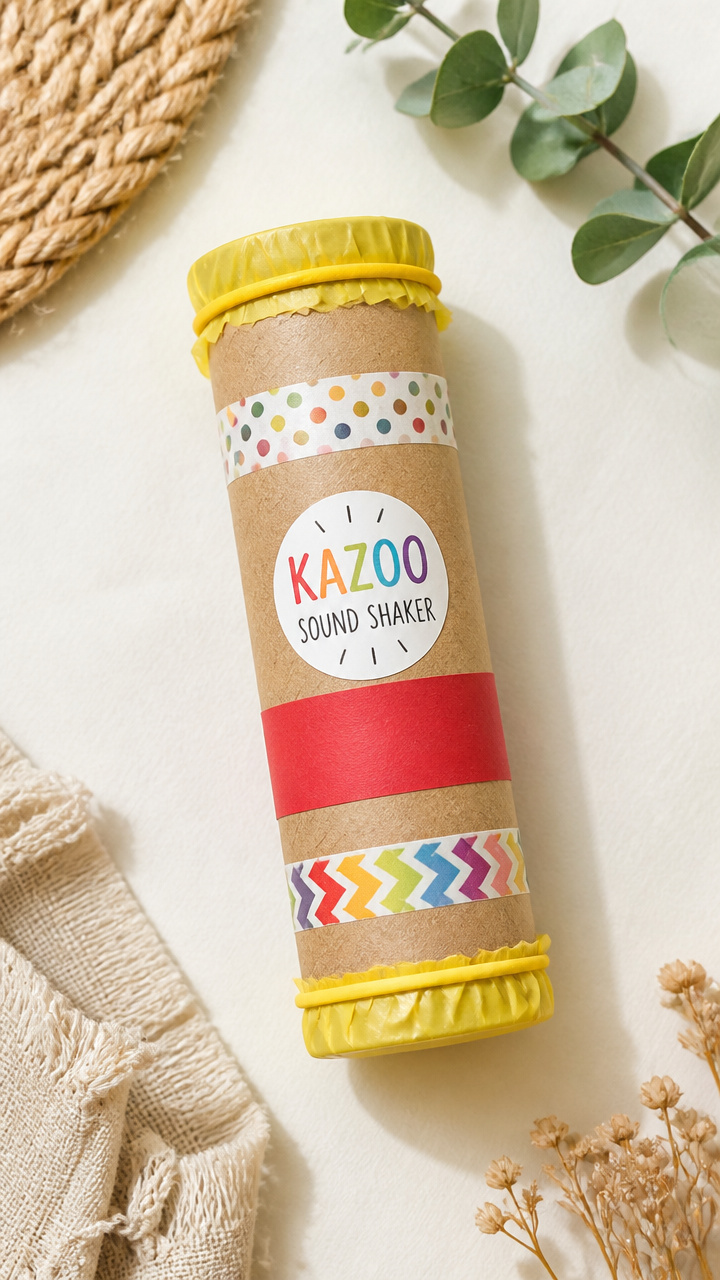
A working kazoo made from cardboard and wax paper teaches sound vibration and the /k/ sound. Blowing through it makes learning feel like music.
Materials Needed
- Toilet paper roll
- Yellow wax paper (8×8 inch square)
- Rubber band (size #32)
- Construction paper (red, 3×6 inch strip)
- Tape
- Hole punch
How to Make It
- Stretch the wax paper tightly over one end of the toilet paper roll and secure it with the rubber band.
- Use the hole punch to make a single hole through the side of the roll, 1 inch from the covered end.
- Wrap the red paper strip around the roll like a stripe and tape it in place.
- Speak or hum into the open end to make the kazoo vibrate and buzz.
5. K Is for Koala Fingerprint Art
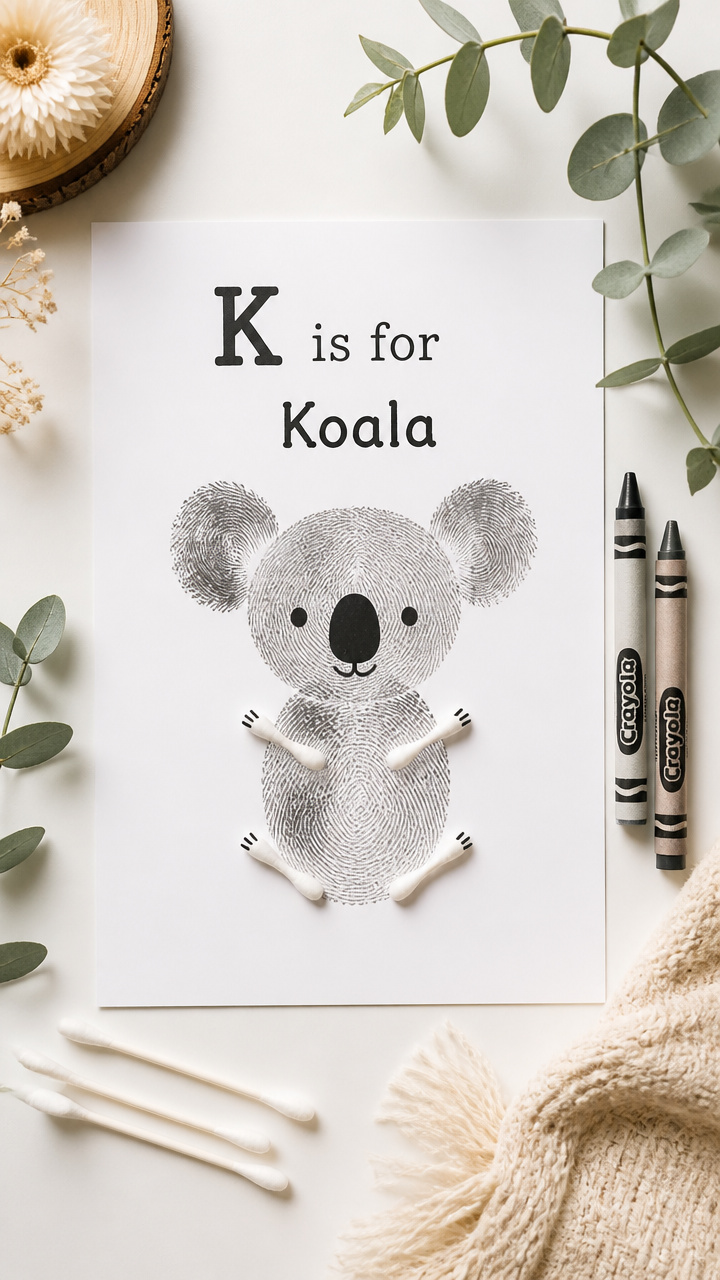
Tiny thumbprints grow into fuzzy koalas with drawn details. This sensory-friendly craft uses minimal tools and maximum charm.
Materials Needed
- Black washable ink pad
- A4 white cardstock
- Cotton swabs (2 per koala)
- Gray crayon
- Pencil
- Eraser
How to Make It
- Press your child’s thumb gently onto the ink pad and stamp it sideways on the cardstock to form a koala head.
- Repeat to make three koalas, spacing them apart on the page.
- Use the gray crayon to draw ears, nose, arms, and legs around each print.
- Dip a cotton swab in water and lightly rub it over the thumbprint to soften the edge and look furry.
6. K-Cut Glitter Collage
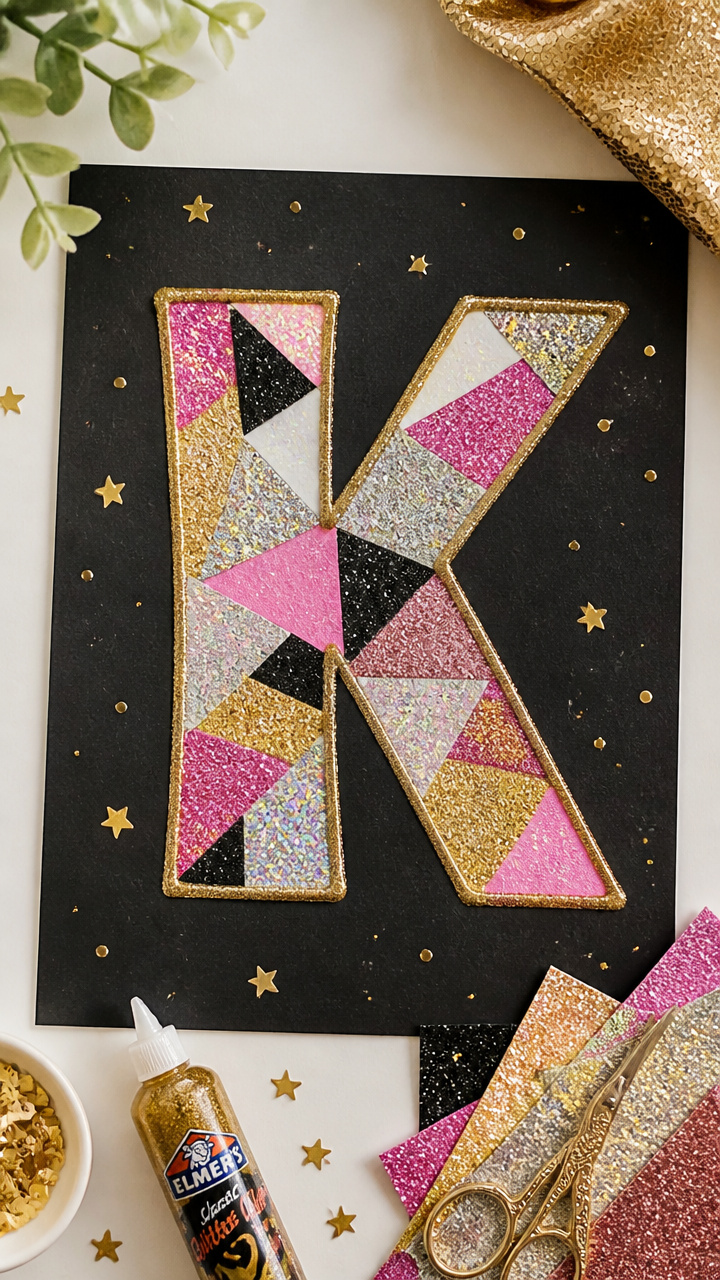
Sharp snips and sparkly glue make this glittery K dazzle on dark paper. The tactile contrast helps memory through touch and sight.
Materials Needed
- Black construction paper (9×12 inch sheet)
- Gold glitter glue (0.5 oz bottle)
- Scissors
- Pencil
- Ruler
How to Make It
- Use the ruler and pencil to lightly draw a large uppercase K in the center of the black paper.
- Squeeze the glitter glue directly over the pencil lines, staying within the width of the stroke.
- Let the glue dry completely for 45 minutes with the paper lying flat.
- Once dry, shake off loose glitter over a trash can and save the rest for another project.
7. K Is for Kettle Coloring Scene
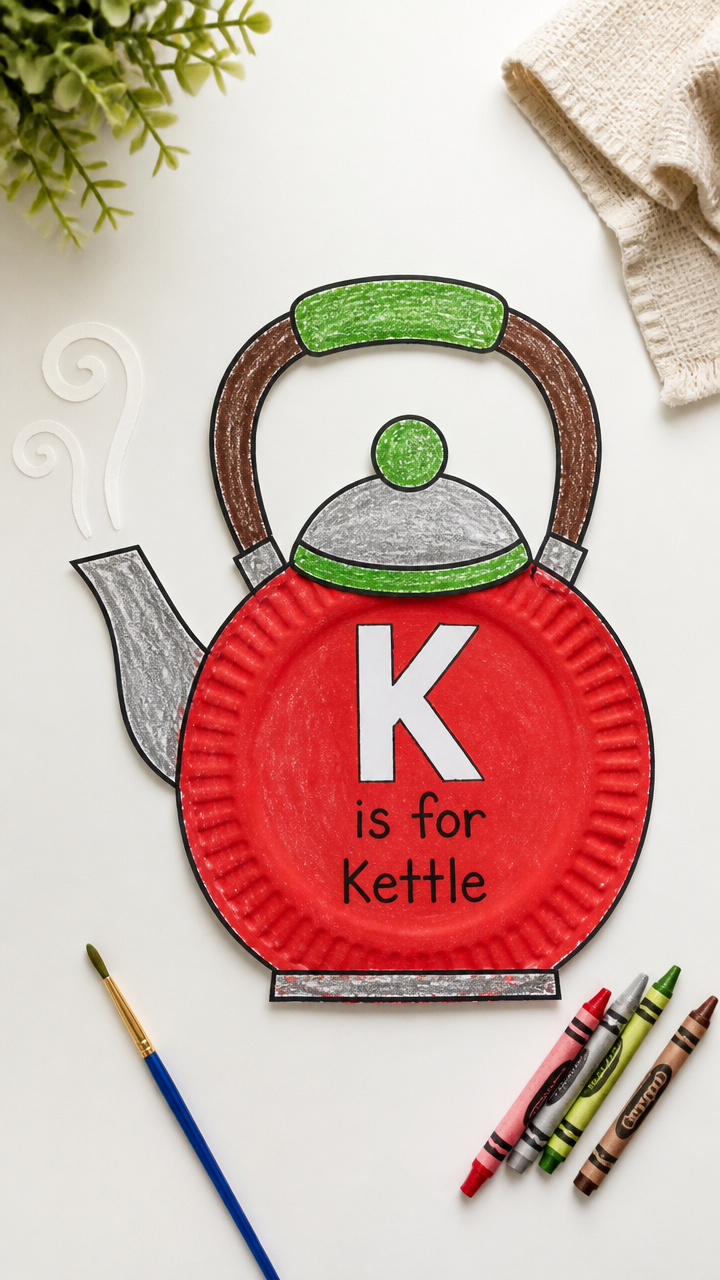
A steaming tea kettle drawn on a tray becomes part of a cozy kitchen scene. Coloring within themed shapes supports focus and letter recall.
Materials Needed
- Large paper plate
- Black marker
- Crayons (red, silver, green, brown)
- White tempera paint (1 tablespoon)
- Paintbrush (small round)
How to Make It
- Draw a large kettle on the paper plate using the black marker, placing the body on the left and spout on the right.
- Write a capital K on the kettle’s side with the marker.
- Color the kettle red, handle brown, and spout silver using crayons.
- Dip the brush in white paint and flick it upward from the spout to make steam wisps.
8. Kite Tail Ribbon Weave
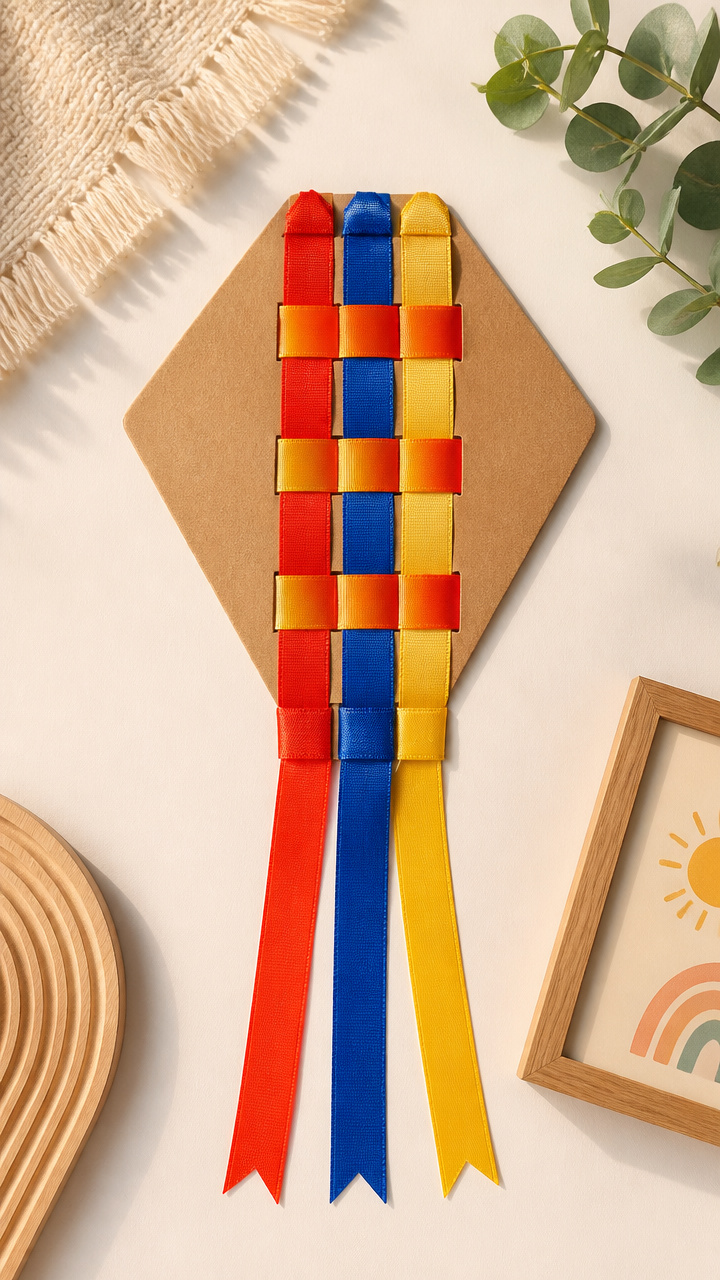
Colorful ribbons threaded through slits make a fluttering kite tail. The weaving motion improves bilateral coordination and visual tracking.
Materials Needed
- Cardboard rectangle (6×8 inches)
- Red ribbon (1/4 inch wide, 12 inches long)
- Blue ribbon (1/4 inch wide, 12 inches long)
- Yellow ribbon (1/4 inch wide, 12 inches long)
- Craft knife (for adult use only)
- Pencil
- Ruler
How to Make It
- Draw a large uppercase K on the cardboard with pencil and ruler, making the vertical line thick enough for weaving.
- Use the craft knife to cut horizontal slits across the vertical stem every 1 inch, about halfway through.
- Hand the red ribbon to your child and guide them to thread it over and under the slits from top to bottom.
- Repeat with blue and yellow ribbons side by side to fill the stem with woven color.
9. K Is for King Crown
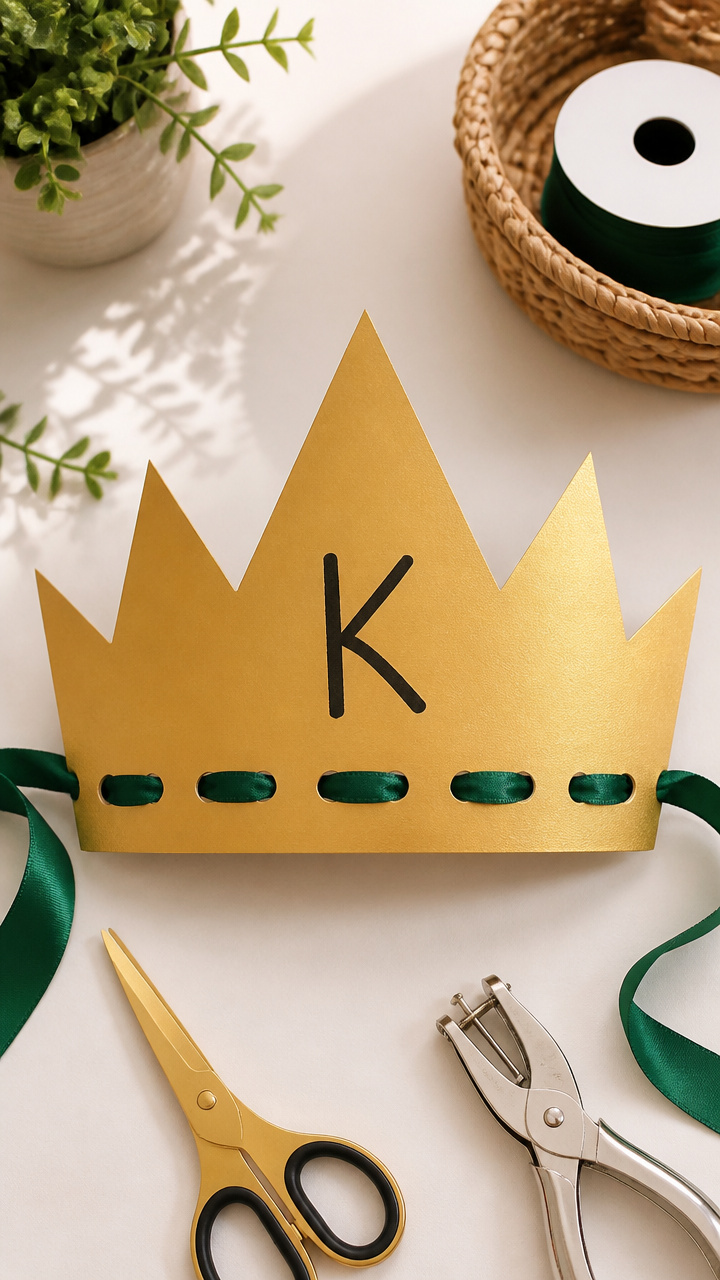
A golden crown with a bold letter K lets kids rule their learning kingdom. Wearing the letter boosts engagement and pride.
Materials Needed
- Gold poster board (8.5×11 inch sheet)
- Black marker
- Scissors
- Hole punch
- Double-sided tape
- Ribbon (green, 12 inches)
How to Make It
- Cut a crown shape from the gold poster board: a rectangle 3 inches tall and long enough to fit around the child’s head, with triangular peaks along the top edge.
- Write a large K in the center peak using the black marker.
- Punch one hole at each end of the crown and attach the ribbon with knots to fit behind the head.
- Secure the peaks with small pieces of double-sided tape on the inside if needed.
10. Kakapo Bird Feather Press
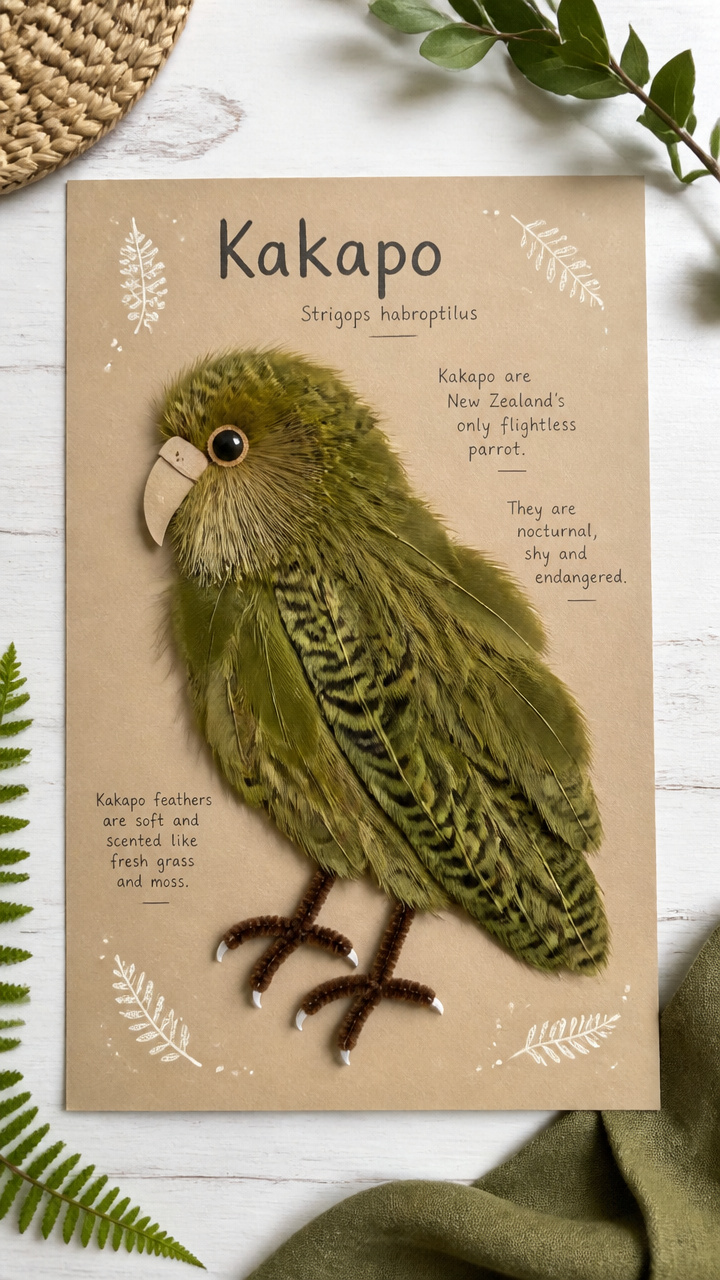
Real feathers glued into a soft bird shape teach texture and rare animal facts. This quiet craft invites gentle handling and observation.
Materials Needed
- Olive green craft feathers (6 small)
- Brown pipe cleaner (1 piece)
- White school glue
- A4 tan cardstock
- Pencil
- Blunt-nosed scissors
How to Make It
- Draw a rounded kakapo body on the cardstock using pencil, about 5 inches tall.
- Apply a thin layer of glue inside the outline and press the feathers down overlapping slightly to cover the shape.
- Cut the pipe cleaner in half and twist one piece into each side for wings.
- Let the glue dry for 30 minutes before touching the feathers.
11. K Is for Kiwi Fruit Slice
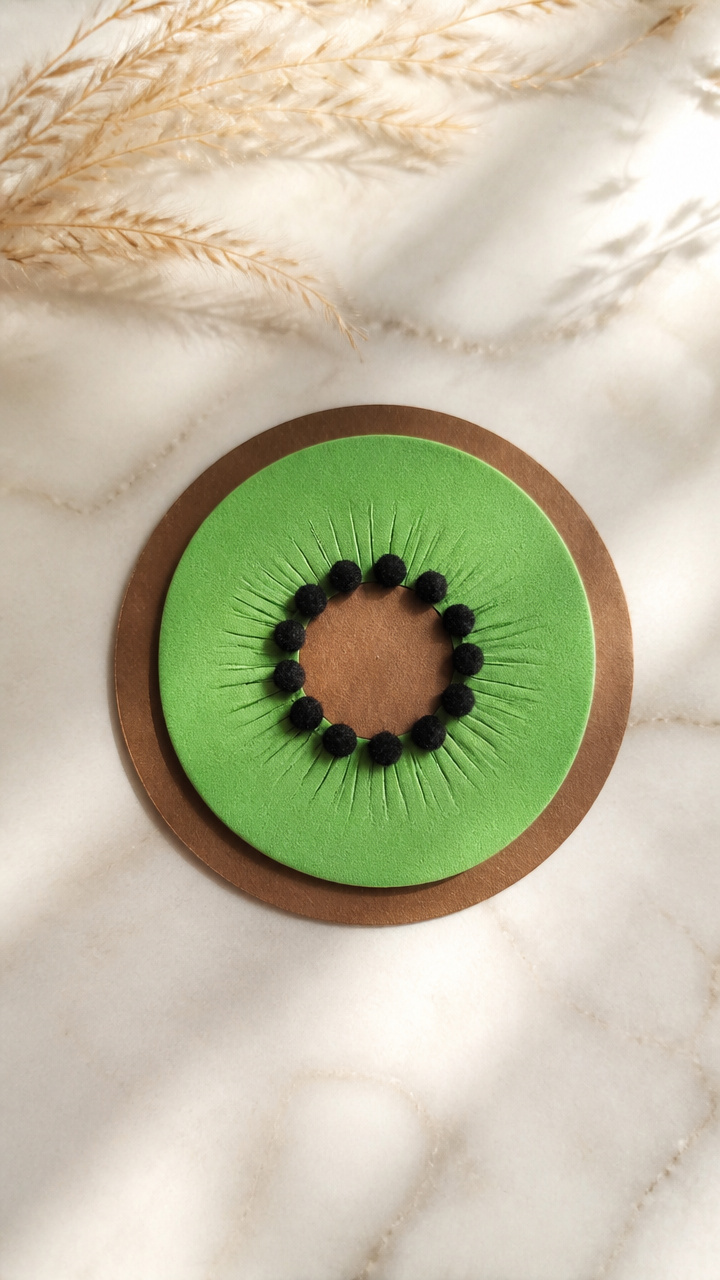
A bright paper kiwi with black seeds and green flesh teaches healthy food names and circular cutting. The layered design builds spatial awareness.
Materials Needed
- Brown construction paper (6×6 inch square)
- Green craft foam sheet
- Black pom poms (3 mm, 15 pieces)
- White glue
- Circle punch (2 inch diameter)
- Scissors
How to Make It
- Use the circle punch to cut one circle from the brown paper and one from the green foam.
- Glue the green circle centered on top of the brown circle to make the fruit slice.
- Arrange 15 black pom poms in spiral pattern on the green surface to mimic kiwi seeds.
- Press each pom pom gently into a dab of glue and let dry for 20 minutes.
12. Kinetic Sand K Tracing Tray
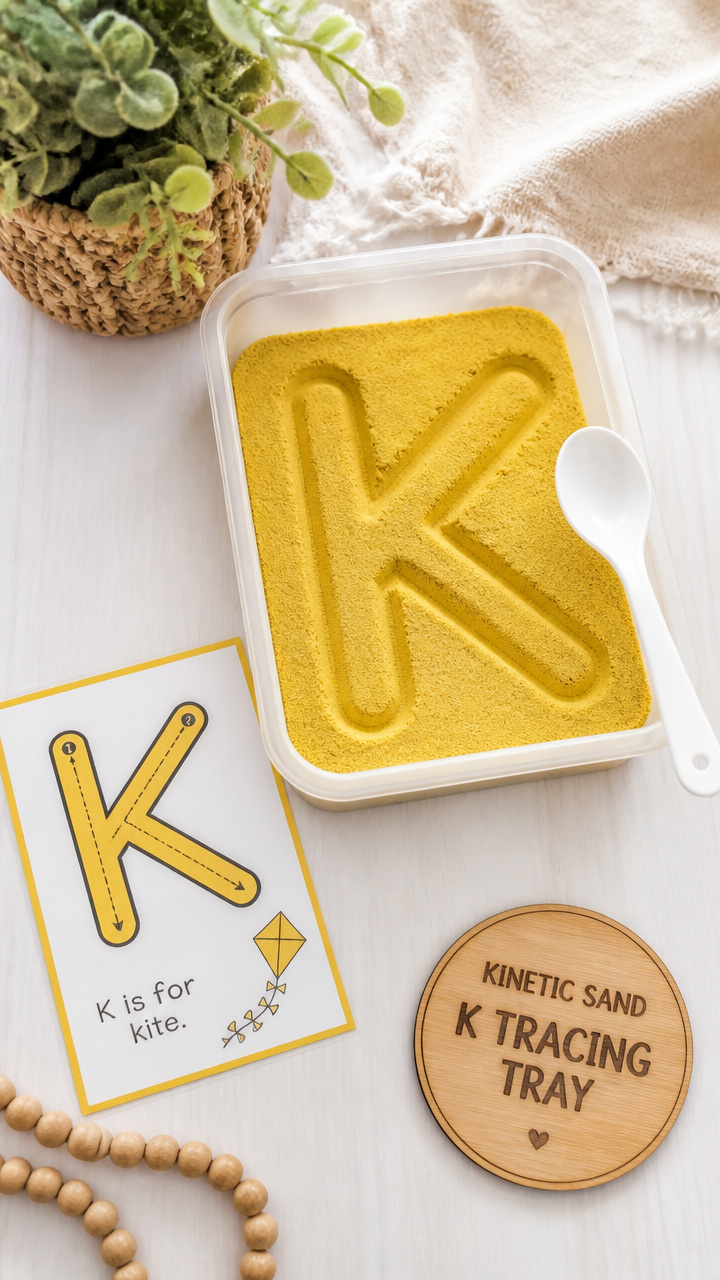
Fingers dig and shape a letter K in colored sand, reinforcing muscle memory through movement. The tray setup invites repeated practice without mess.
Materials Needed
- Plastic sandwich container with lid (6×8 inches)
- Yellow kinetic sand (1 cup)
- Plastic spoon
- Laminated K tracing card (3×5 inch)
How to Make It
- Pour the kinetic sand into the container and spread it evenly with the spoon.
- Place the laminated K card beside the tray for reference.
- Use your index finger to trace a large K into the sand, starting at the top and following the correct stroke order.
- Smooth the sand with the spoon and repeat three times.
13. Kangaroo Pocket Stuffing Game

A felt kangaroo with a real pouch holds letter cards that start with K. Reaching in to pull one out adds surprise and vocabulary building.
Materials Needed
- Beige felt sheet (9×12 inch)
- Scissors
- Fabric glue
- Pink felt (4×4 inch square)
- Black embroidery floss
- Needle (blunt tip)
- Index cards (3×5 inch, 5 pieces)
How to Make It
- Cut a kangaroo shape from beige felt: tall body, large feet, and curved tail.
- Cut a small oval from pink felt and glue it to the belly to make the pouch.
- Stitch on eyes and nose with black floss using a backstitch for durability.
- Write one K-word (kite, key, king, koala, kiwi) on each index card and slide them into the pouch.
14. K Is for Kite String Beads
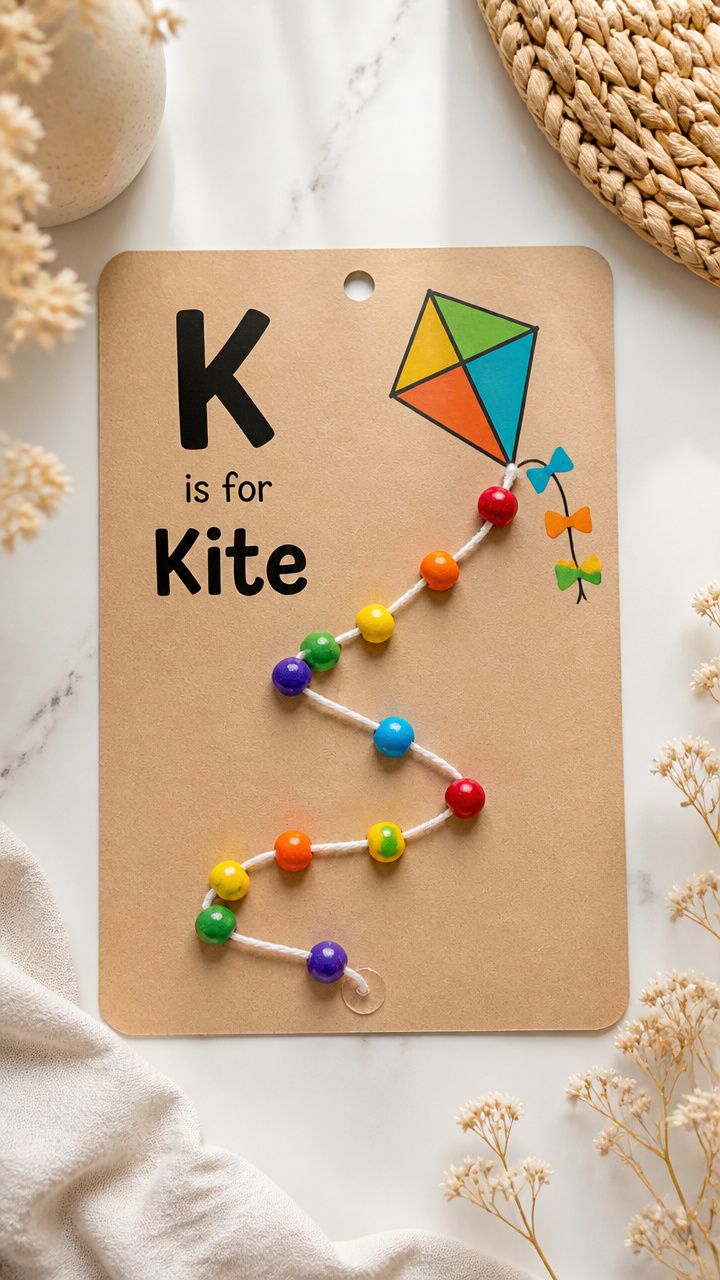
Wooden beads slide along yarn to form a wobbly K shape. Threading improves grip and attention while spelling out the letter physically.
Materials Needed
- Cardboard (8×10 inch sheet)
- White yarn (24 inches)
- Colored wooden beads (12 pieces, 1/2 inch)
- Hole punch
- Glue dot
How to Make It
- Draw a large uppercase K on the cardboard and punch holes at the top, middle split, and bottom points.
- Thread one end of the yarn through the top hole and secure the back with a glue dot.
- String beads onto the yarn as you pull it down to the middle point, then up to the right arm, and down again.
- Tie a knot at the final hole to keep the yarn taut and bead-filled.
15. Kaleidoscope Letter Viewer
A handheld tube with rotating colored chips creates shifting K patterns. Peering inside feels magical while anchoring the letter shape.
Materials Needed
- Clear plastic report cover (letter size)
- Red tissue paper (6×6 inch square)
- Blue tissue paper (6×6 inch square)
- Scissors
- Double-sided clear tape
- Round cookie cutter (3 inch diameter)
How to Make It
- Trace the cookie cutter twice on the plastic report cover and cut out both circles.
- Crumple the red and blue tissue papers and place small bits between the plastic circles.
- Seal the edges completely with double-sided tape to make a sealed disc.
- Hold the disc up to light and tilt it to see colors shift into K-like angles and reflections.
You’ve got everything you need to make the letter K come alive. Grab a few supplies and let your child’s hands do the learning—it’s in those little moments that letters truly stick.