15 Cute Letter Y Crafts for Preschool Alphabet Practice at Home
Learning the alphabet should be joyful, especially when it's shaped like a wiggly yellow yarn letter or stamped with tiny fingerprints. These hands-on activities turn the letter Y into something your child can touch, build, and play with.
Each craft uses simple materials you likely have at home and focuses on fine motor skills, creativity, and letter recognition. You'll find paint, pasta, stickers, and more—all designed to make learning feel like playtime.
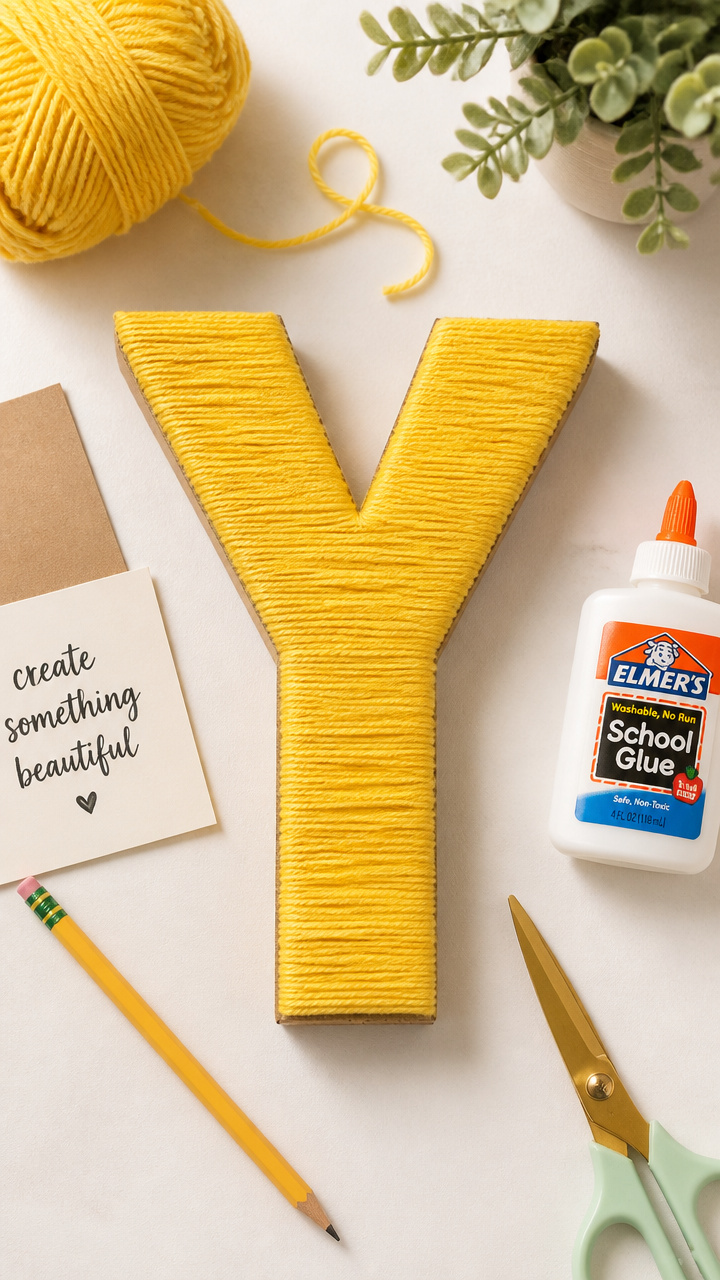
1. Yarn Letter Y
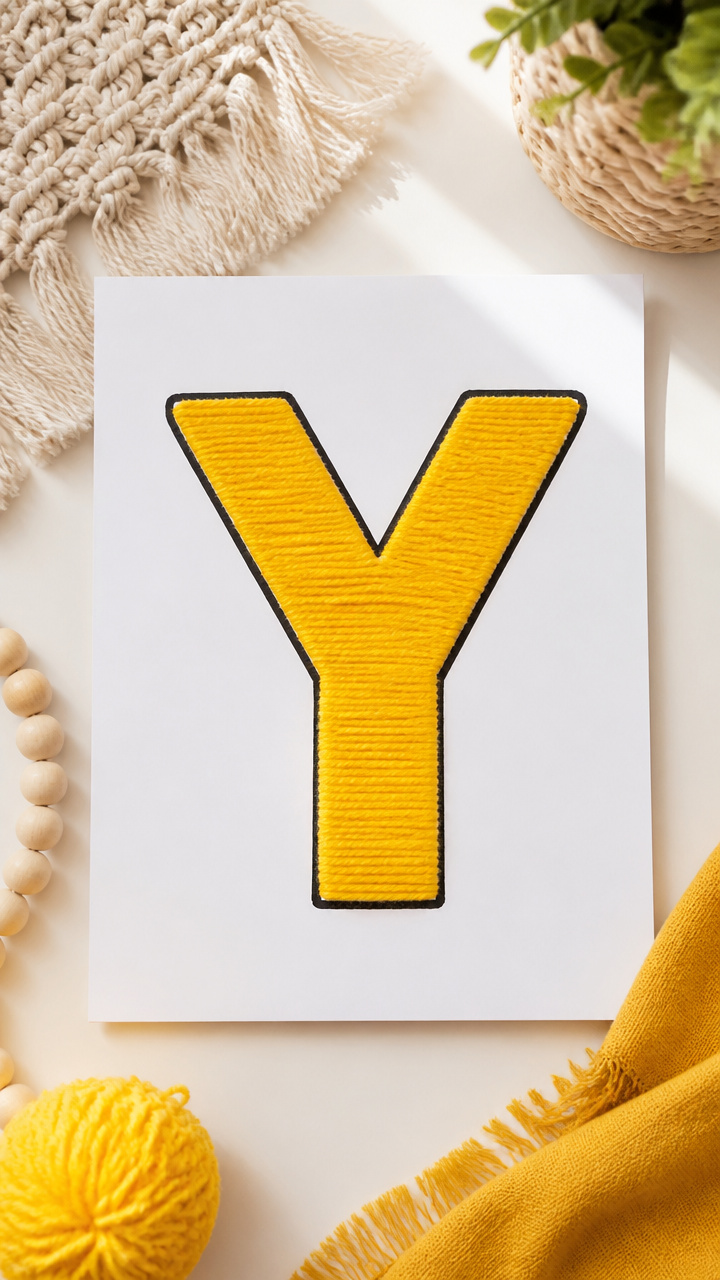
Soft and squishy, this textured letter helps little fingers trace the shape of Y while building sensory memory. The glue and yarn method strengthens hand control too.
Materials Needed
- A4 white cardstock
- White school glue
- Yellow craft yarn, 3 feet
- Scissors
- Black marker
How to Make It
- Draw a large uppercase Y on the cardstock using the black marker, making the lines thick and easy to follow.
- Squeeze glue along the outline of the Y, pressing the yellow yarn into the glue as you go, starting from the bottom up.
- Let the craft dry flat for at least 2 hours before touching, then trim any excess yarn ends with scissors.
2. Yellow Painted Pasta Y
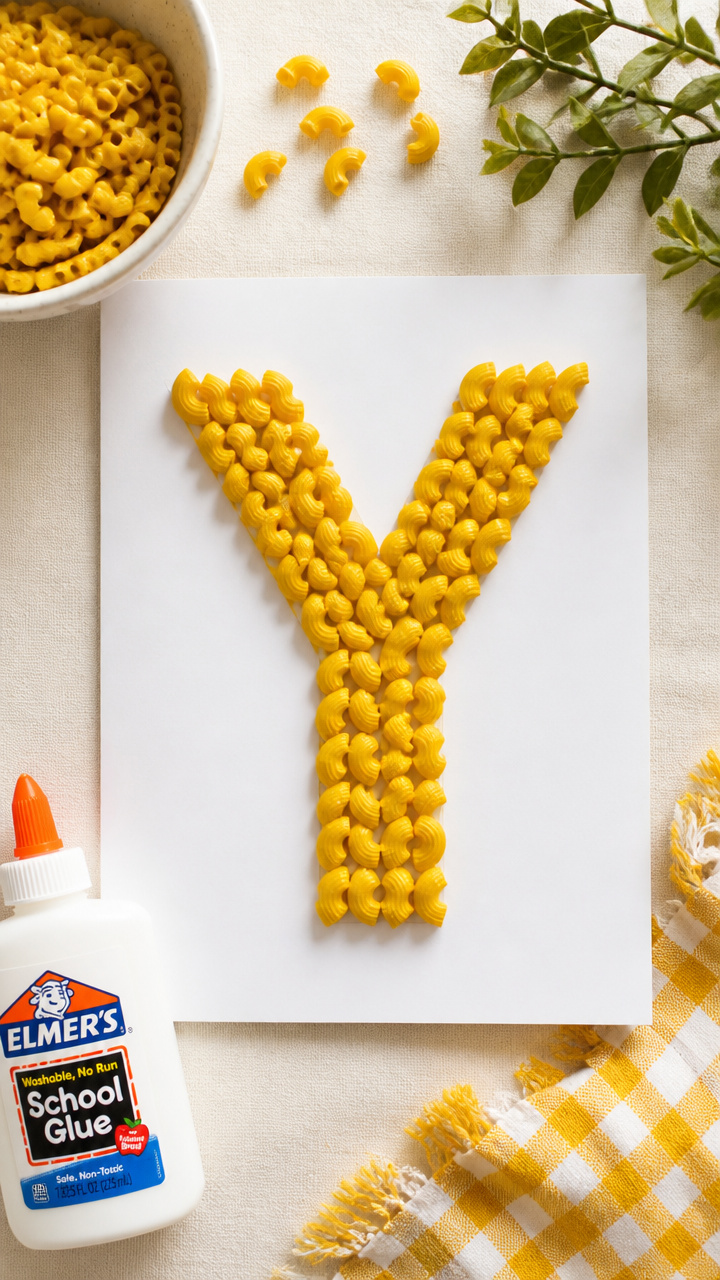
Sturdy and colorful, this letter Y is made from dyed elbow pasta glued in formation. It’s perfect for little hands to pick up and rearrange.
Materials Needed
- Elbow macaroni, 15 pieces
- Yellow food coloring, 10 drops
- Water, 1/2 cup
- White school glue
- A4 white cardstock
- Small bowl
- Tongs
How to Make It
- Mix water and yellow food coloring in a bowl, then add the macaroni and soak for 30 minutes, stirring once.
- Use tongs to remove each piece and lay them flat on a paper towel to dry completely, about 2 hours.
- Glue the dyed pasta onto cardstock in the shape of a large Y, spacing them just apart so the letter form is clear.
3. Y-Shaped Crayon Rubbing
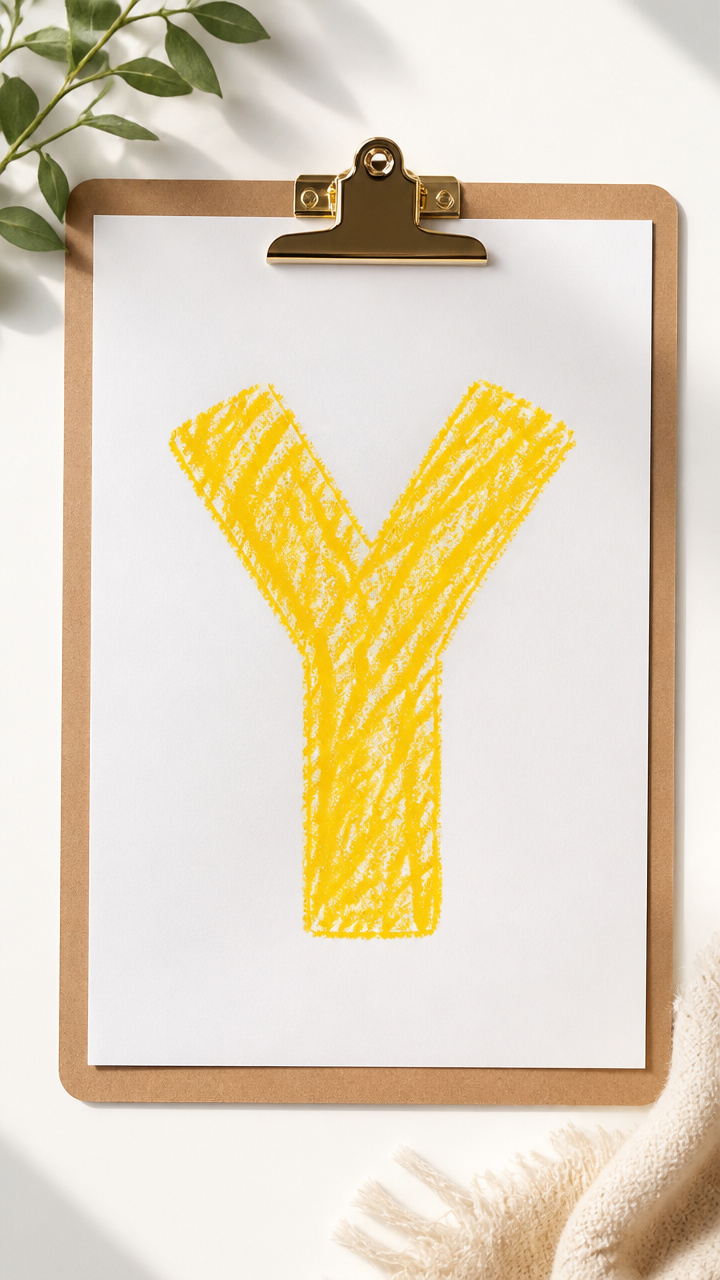
Hidden texture comes alive under crayons when kids rub over a raised Y. This quiet activity builds focus and reveals a surprise.
Materials Needed
- Cardboard letter Y cutout, 4 inches tall
- White school glue
- A4 white printer paper
- Yellow crayon, peeled
- Clipboard
How to Make It
- Glue the cardboard Y firmly onto a table surface and let it dry for 1 hour.
- Place the printer paper over the cardboard letter and hold it still with one hand.
- Rub the peeled yellow crayon sideways across the paper until the shape of the Y appears clearly.
4. Y Is for Yo-Yo Craft
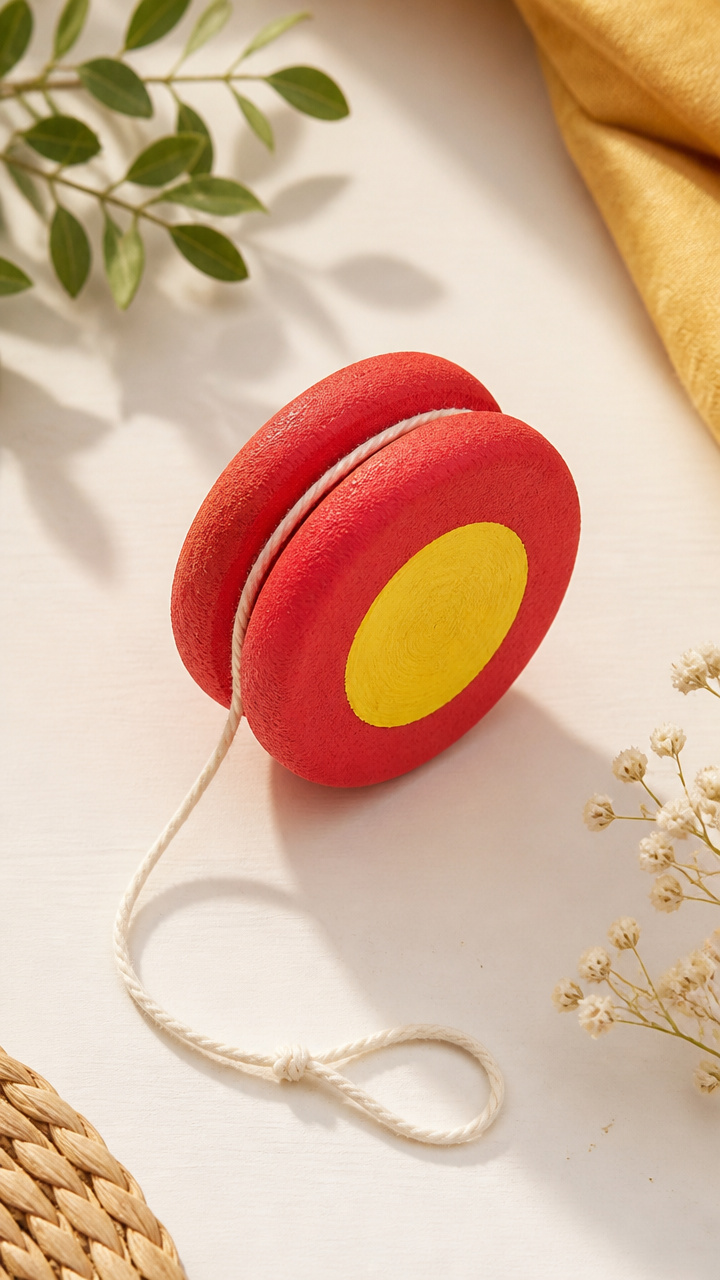
This playful mobile swings gently and spells Y in bold colors. Kids love seeing their name-letter spin slowly above their space.
Materials Needed
- Two 3-inch red foam plates
- Yellow acrylic paint
- Paintbrush
- String, 18 inches
- Hot glue gun
- Scissors
- Black marker
How to Make It
- Paint both foam plates yellow and let dry completely on a flat surface for 1 hour.
- Use scissors to poke a hole in the center of each plate, then thread the string through and tie knots at both ends.
- Glue a large Y in black marker on one side of one plate, then press the two plates together at the center with hot glue.
5. Puffy Paint Y
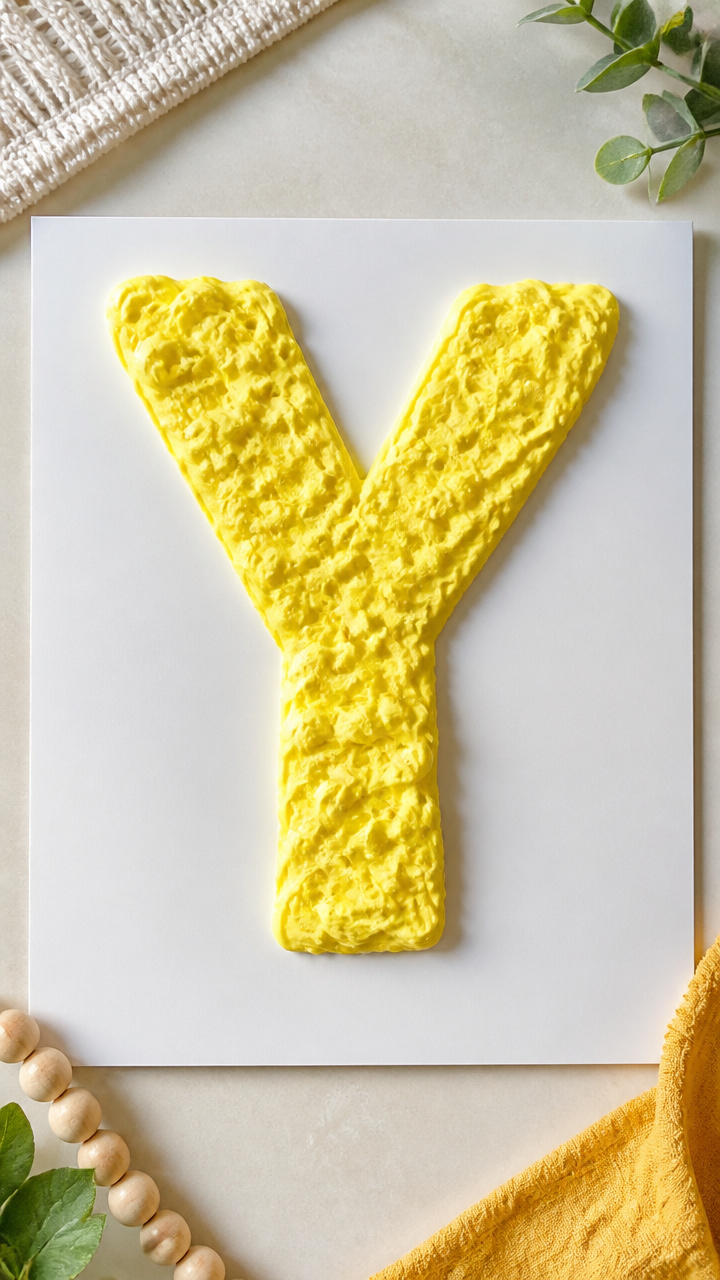
Thick, puffy paint gives the letter Y real dimension and a fun-to-touch finish. Watching it rise off the page feels magical.
Materials Needed
- White poster board
- White school glue, 3 tablespoons
- Shaving cream, 6 tablespoons
- Yellow food coloring, 5 drops
- Plastic spoon
- Ziplock bag
- Scissors
How to Make It
- Mix glue, shaving cream, and food coloring in a bowl until smooth and bright yellow.
- Spoon the mixture into a ziplock bag, seal it, and snip one corner to create a small opening.
- Squeeze the mixture onto poster board in the shape of a large Y and let it dry undisturbed overnight.
6. Yarn-Wrapped Cardboard Y
Sturdy and satisfying, wrapping yarn around a cardboard frame improves grip strength while creating a bold letter display.
Materials Needed
- Cardboard, 6×6 inch square
- Scissors
- Pencil
- Yellow yarn, 4 feet
- White school glue
- Paintbrush
How to Make It
- Draw a large Y on cardboard and cut it out carefully with scissors.
- Dab a thin line of glue along the outer edge of the Y with a paintbrush.
- Start at the base and wrap the yarn tightly around the edge, pressing into the glue, until the entire border is covered and let dry 2 hours.
7. Yellow Fingerpaint Y
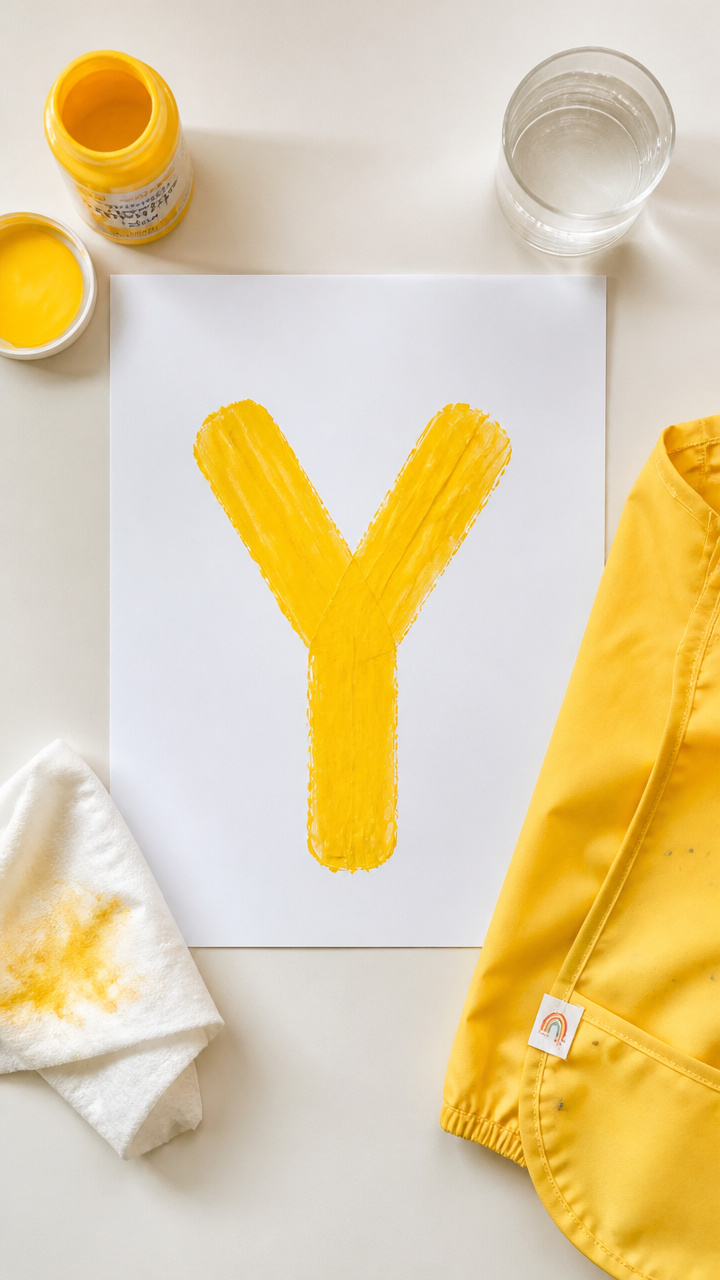
Simple and messy in the best way, this craft lets toddlers use their hands to spread color into the shape of Y. Great for first tries.
Materials Needed
- Yellow tempera paint, 2 tablespoons
- A4 white construction paper
- Baby wipe
- Cup of water
- Smock
How to Make It
- Place the paper flat on a table and put a dollop of yellow paint in the center.
- Use your index finger to drag paint downward into a Y shape, making two arms that split from the top center.
- Rinse fingers in water between strokes and let the painting dry flat for 1 hour.
8. Y-Shaped Sticker Mosaic
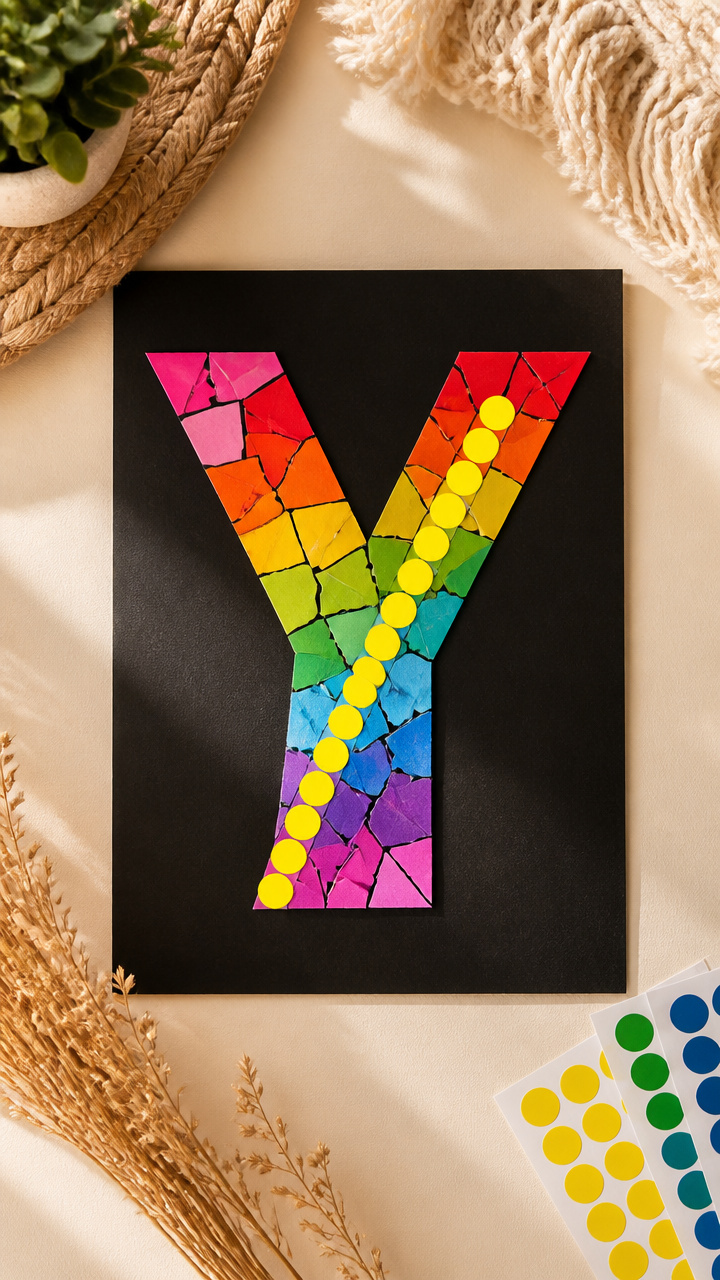
Bright round stickers form a chunky Y that stands out on dark paper. Peeling and placing builds dexterity and pride.
Materials Needed
- Black A4 cardstock
- 1-inch yellow dot stickers, 12 pieces
- Pencil
- Ruler
How to Make It
- Use pencil and ruler to lightly draw a large Y on the black cardstock, making sure the lines are wide enough to fit stickers.
- Peel one sticker at a time and place them side by side along the pencil lines until the Y is fully filled.
- Press each sticker down firmly with your fingertip to avoid bubbles.
9. Y Is for Yellow Leaf Print
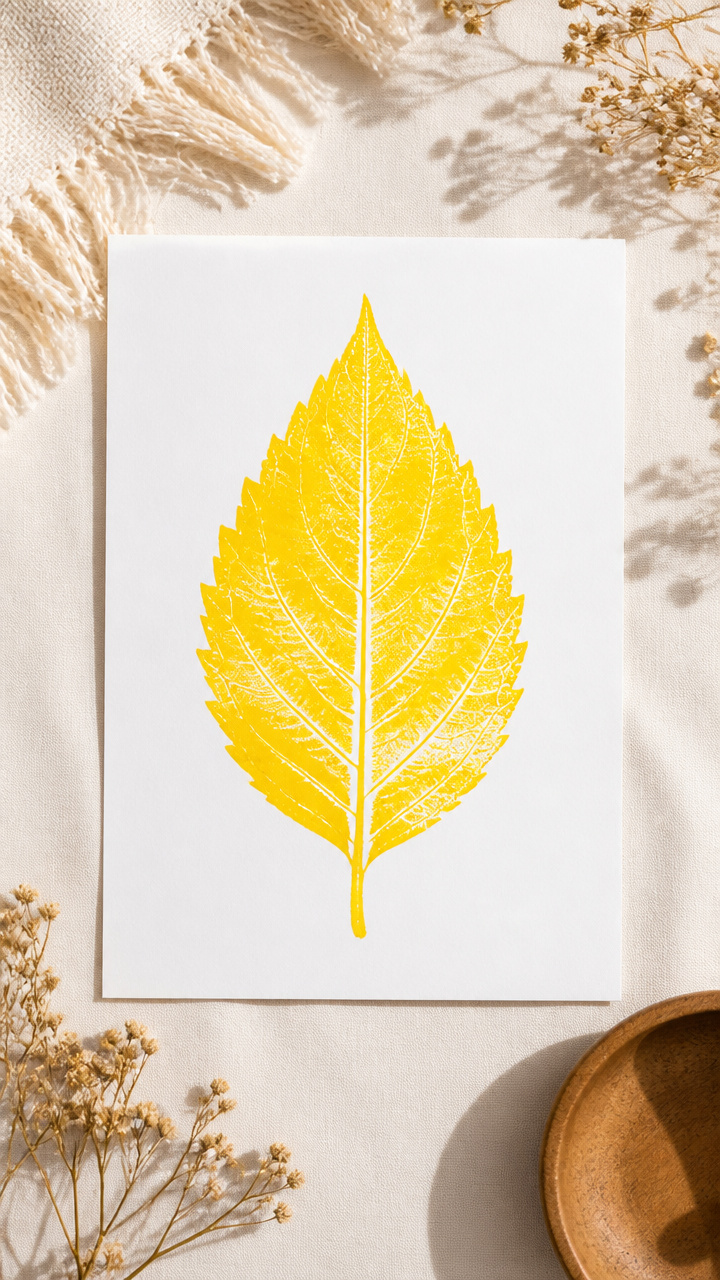
Real leaves dipped in paint become stamps that spell Y in natural shapes. It connects letters to the world outside.
Materials Needed
- Fresh green leaf with pointed edges, 1
- Yellow acrylic paint
- Paint tray
- A4 white cardstock
- Paintbrush
How to Make It
- Brush yellow paint evenly over the bumpy side of the leaf using the paintbrush.
- Press the painted side firmly onto the cardstock in the shape of one arm of a Y, then repeat for the second arm and trunk.
- Let the print dry for 45 minutes before adding a black marker line to sharpen the Y outline.
10. Pipe Cleaner Y Bend
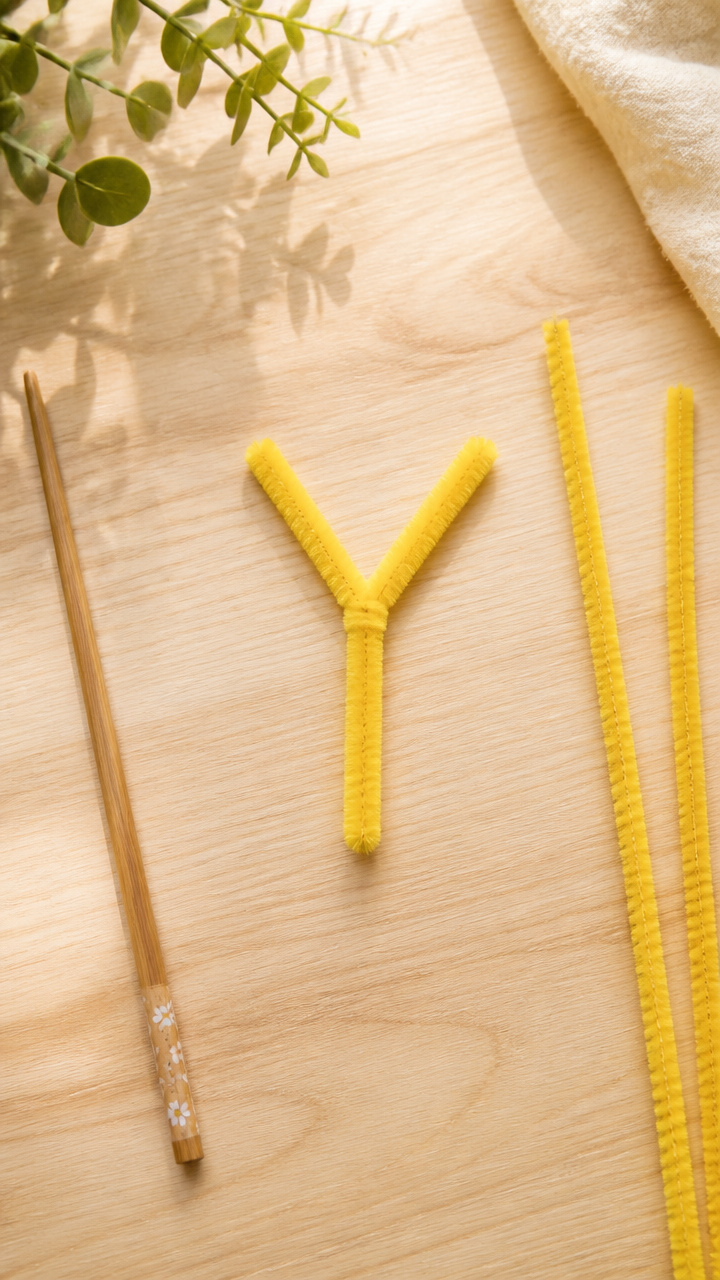
Bendy and bright, this twistable letter holds its shape but can be reshaped again and again. Perfect for fidgety learners.
Materials Needed
- Two yellow pipe cleaners, 12 inches each
- Chopstick
- Flat surface
How to Make It
- Lay one pipe cleaner flat and bend it sharply in the middle to form a 45-degree angle on each side.
- Wrap the center of the second pipe cleaner around the bend point of the first, twisting tightly three times to lock in place.
- Adjust each arm so they form a clean Y shape with even angles, using the chopstick to press bends if needed.
11. Y for Yarn Ball Toss
A soft target game where kids toss mini yarn balls at a giant Y. Learning gets physical and full of giggles.
Materials Needed
- A4 yellow cardstock
- Black marker
- White school glue
- Cotton yarn, 1 foot
- Scissors
How to Make It
- Draw a large Y on yellow cardstock with a black marker, filling the edges thickly.
- Cut yarn into 6 pieces, roll each into a tiny ball, and squeeze glue inside each as you roll to bind it.
- Tape the Y sheet to a wall at kid height and let your child toss the yarn balls to stick on the letter.
12. Wax Resist Y Painting
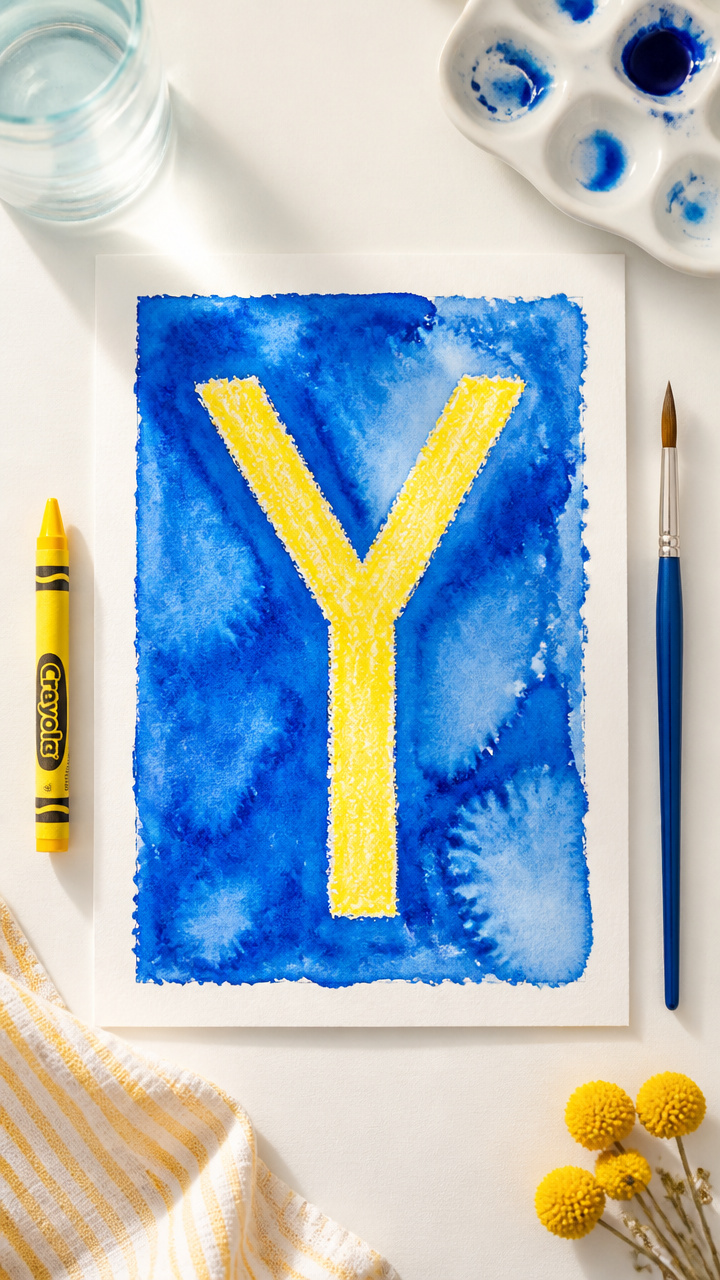
A hidden Y appears when paint washes over a crayon drawing. The magic of reveal keeps kids trying it again.
Materials Needed
- Yellow crayon
- A4 white watercolor paper
- Blue watercolor paint, 2 tablespoons
- Paintbrush
- Cup of water
How to Make It
- Use the yellow crayon to draw a thick Y on the watercolor paper, pressing hard to leave wax behind.
- Dip the brush in blue paint mixed with a splash of water and cover the entire page.
- Let the paint dry for 40 minutes—the blue will dry flat but the Y will stay bright and clear.
13. Y-Shaped Puzzle Cut
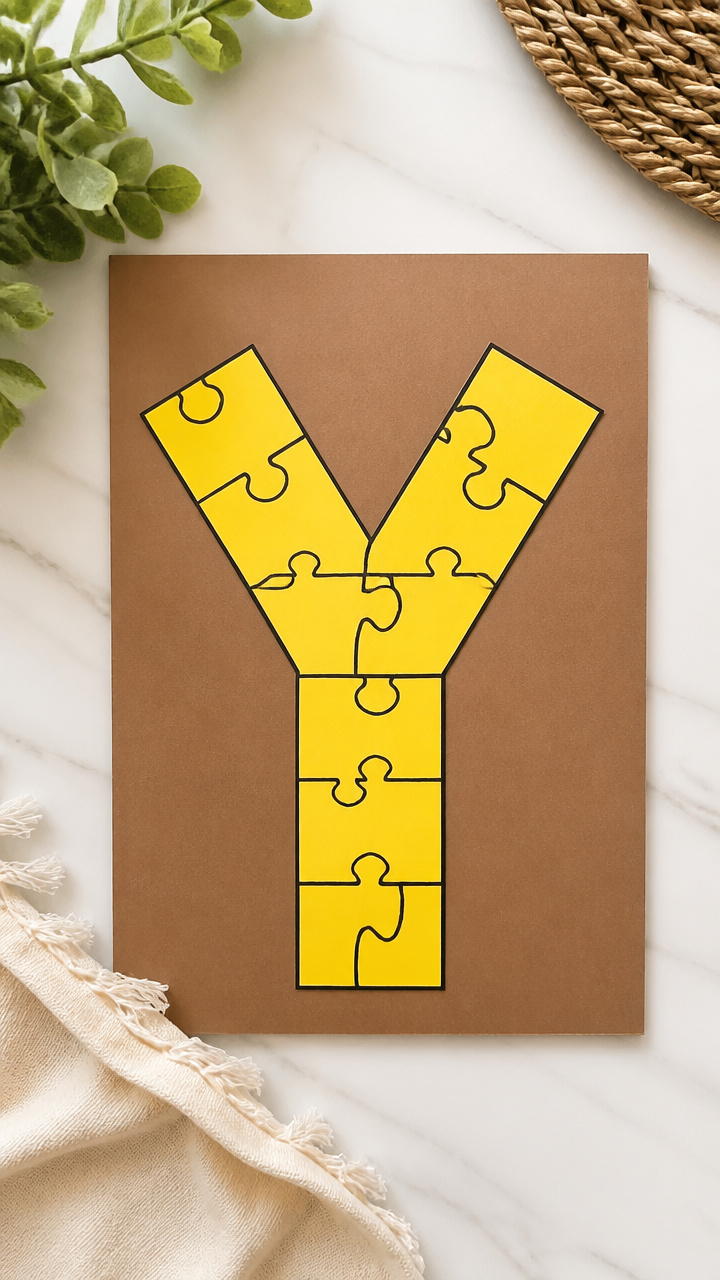
A simple paper puzzle teaches shape matching with a personal twist—your child's own Y art becomes the piece to place.
Materials Needed
- A4 yellow construction paper
- Black marker
- Scissors
- Glue stick
- Brown folder
How to Make It
- Draw a large Y on yellow paper and color it in completely with the marker.
- Cut the Y out carefully with scissors, then cut it into 3 uneven puzzle pieces.
- Glue the brown folder to a table to make a base, then invite your child to reassemble the Y on it.
14. Y Is for Yellow Feather Fan
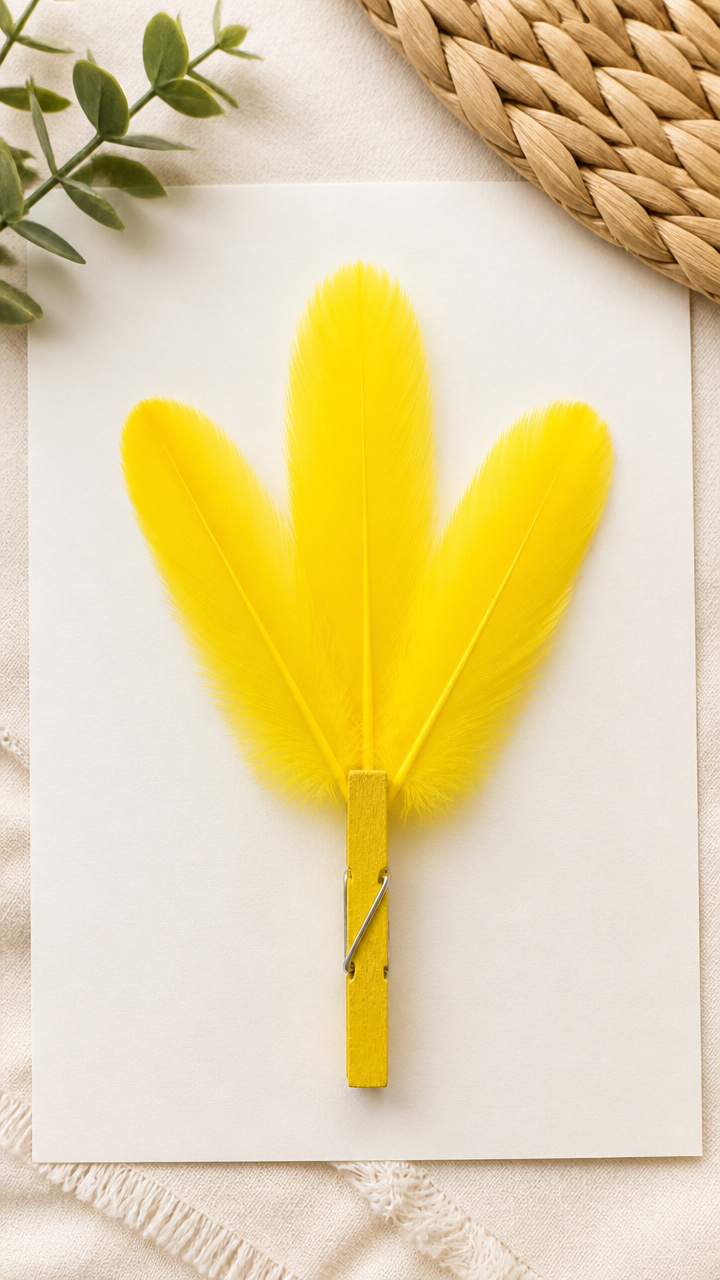
Feathers glued in a Y shape flutter with movement and catch light. It doubles as a decoration or a gentle storytelling prop.
Materials Needed
- Three yellow craft feathers, 4 inches long
- White school glue
- Paintbrush
- A4 white cardstock
- Clothespin
How to Make It
- Lay the cardstock vertically and place one feather straight down the center as the stem of the Y.
- Glue the second and third feathers at an upward angle from the base, forming the two top arms.
- Clip the clothespin at the bottom to hold the stems together while drying for 90 minutes.
15. Salt Line Y Drawing
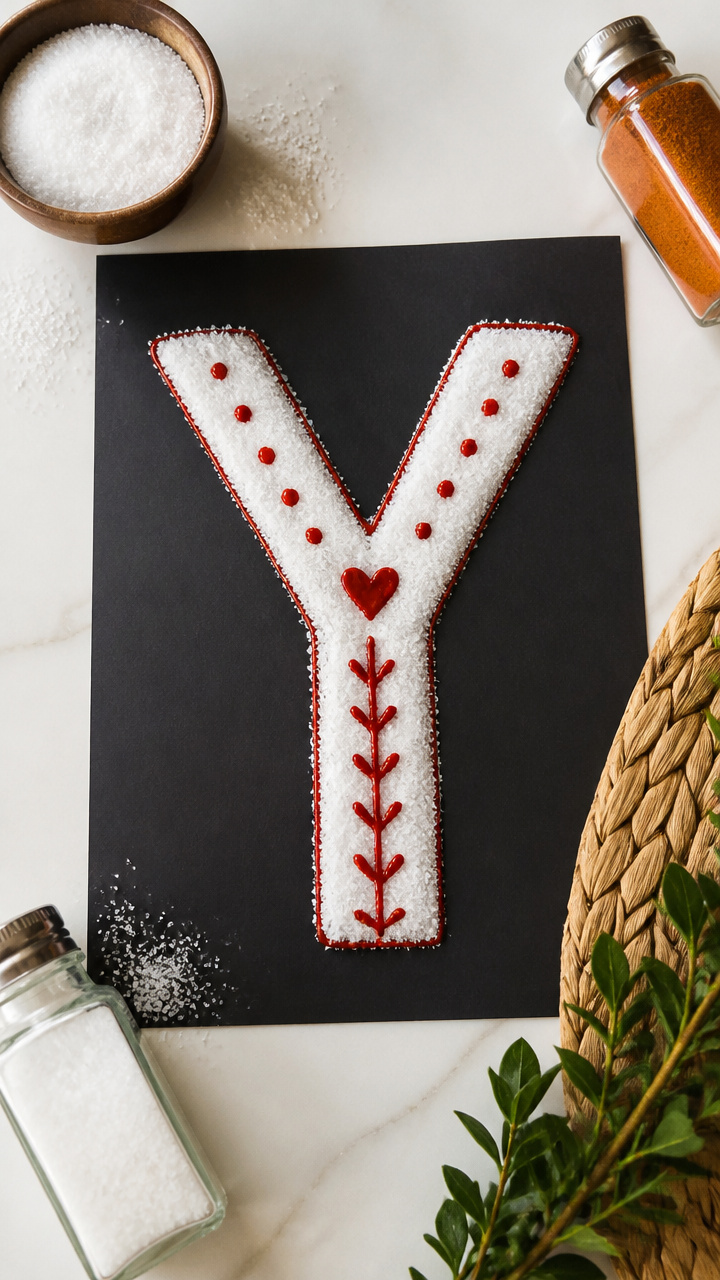
Sprinkled salt over glue makes a sparkly, bumpy Y that begs to be touched. The crunch under paint adds extra fun.
Materials Needed
- A4 black construction paper
- White school glue
- Salt, 2 tablespoons
- Small bowl
- Spice shaker
- Red marker
How to Make It
- Draw a large Y on black paper with white glue, using steady pressure to keep the line thick.
- Pour salt into the bowl, then sprinkle it evenly over the glue line using your fingers or a shaker.
- Wait 30 seconds, then tilt the paper to dump excess salt back into the bowl and let the drawing dry 1 hour.
You don't need fancy supplies or perfect handwriting to make learning meaningful. With just a few everyday items, you're already set to help your child discover the letter Y in ways they'll remember. Pick one craft today and watch their confidence grow with every try.